 Shop
Shop My
My Custom


FREE 5-Ingredient Recipe EBook
GET IT NOWThis Russian Salad Is The Colorful, Veggie-Packed Recipe My Kids Ask For On Repeat

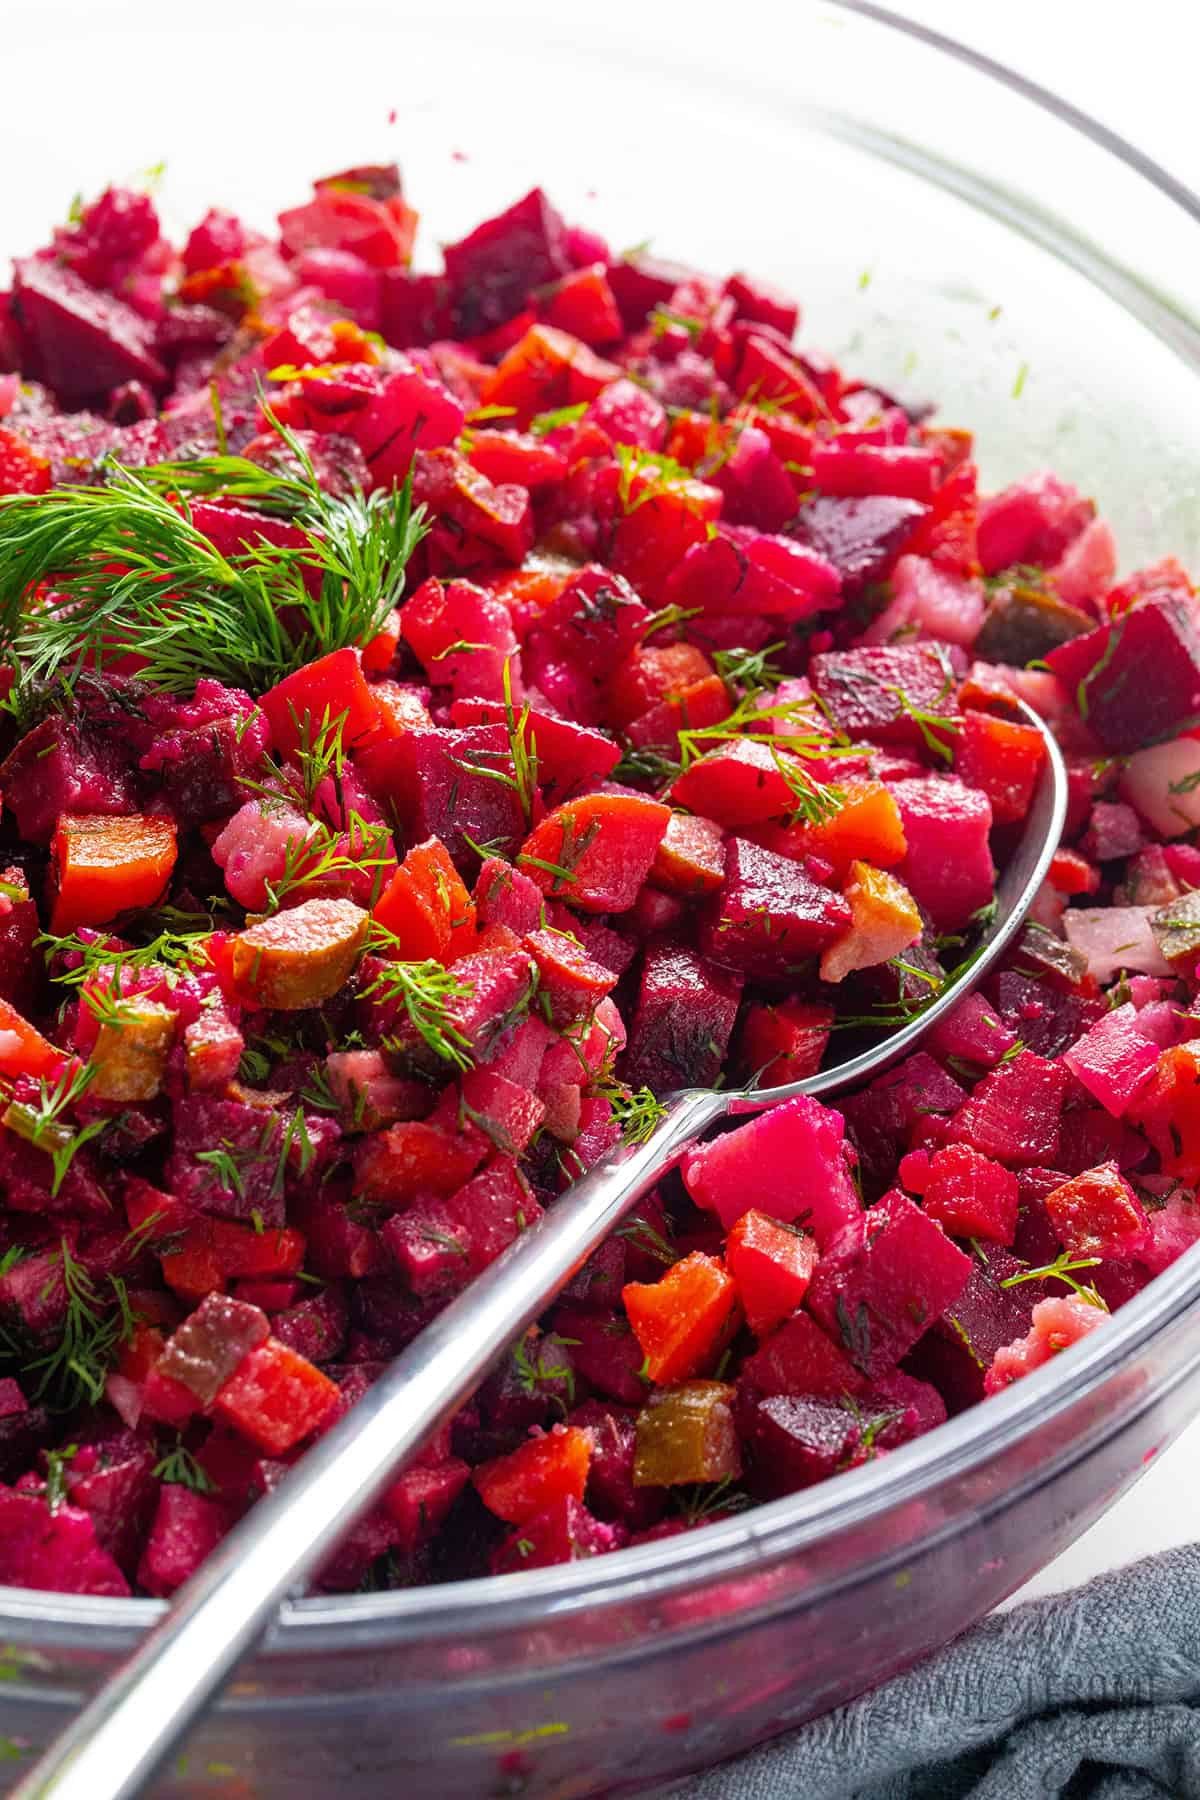
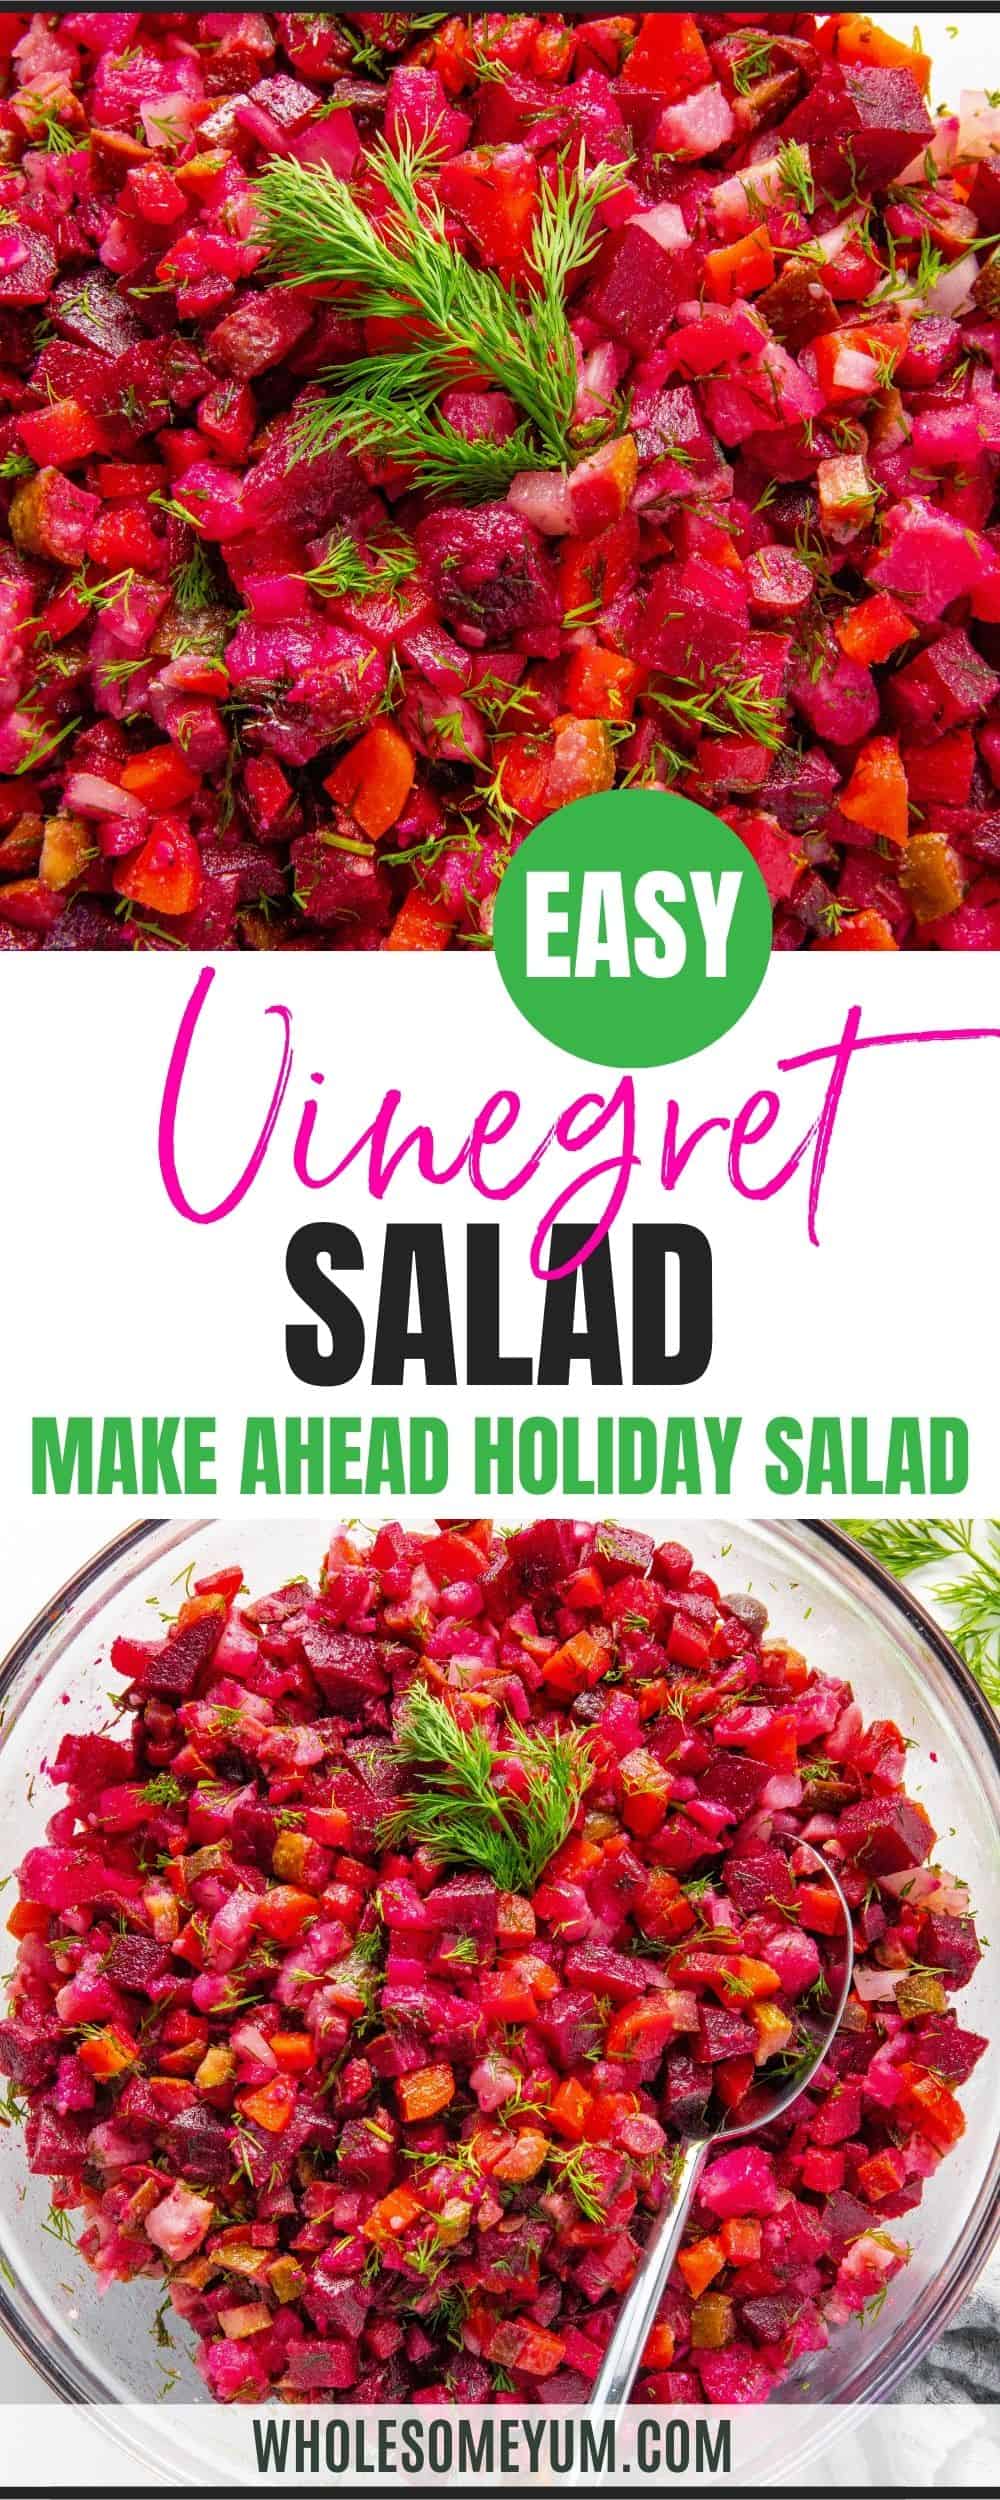
This Russian salad, called vinegret or vinaigrette salad, is my mom’s recipe. I’ve been eating it since I was a kid, and it makes me so happy that my kids are now obsessed with it. It’s loaded with veggies, but to them it’s just colorful, sweet, and tangy.
I kept my mom’s classic base, added plenty of fresh dill, and cut the batch size in half to make it more manageable for most kitchens. Here’s why I think you’ll love this Russian salad recipe:
- Earthy, sweet, and tangy flavor – Beets bring earthy sweetness, potatoes add comfort factor, pickles add a briny pop, and fresh dill ties everything together.
- Tender, perfectly cooked veggies – If you like the flavor and texture of roasted root vegetables, this is like that, but in a cold salad package. This Russian beet salad has that same satisfying, hearty texture, just with a brighter, tangier flavor.
- Meal prep friendly – My mom almost always makes a giant bowl of vinegret, and I usually do the same because it stores so well. It actually tastes even better the next day after the flavors mingle, and stays fresh and delicious for up to a week in the fridge.
- Just 7 simple ingredients – You can find them year round at just about any grocery store.
Unlike the heavier Russian salad olivier (made with mayonnaise, ham, eggs, and more potatoes), this one is lighter and brighter. It’s a staple throughout Eastern Europe, and I’m excited to share how my family makes it. Not only do my kids love it, it always disappears with my friends, too.
Make a batch of this Russian salad with me, and I have a feeling you’ll be doubling it next time, just like I do!

Ingredients & Substitutions
Here I explain the best ingredients for my Russian salad recipe, what each one does, and substitution options. For measurements, see the recipe card.
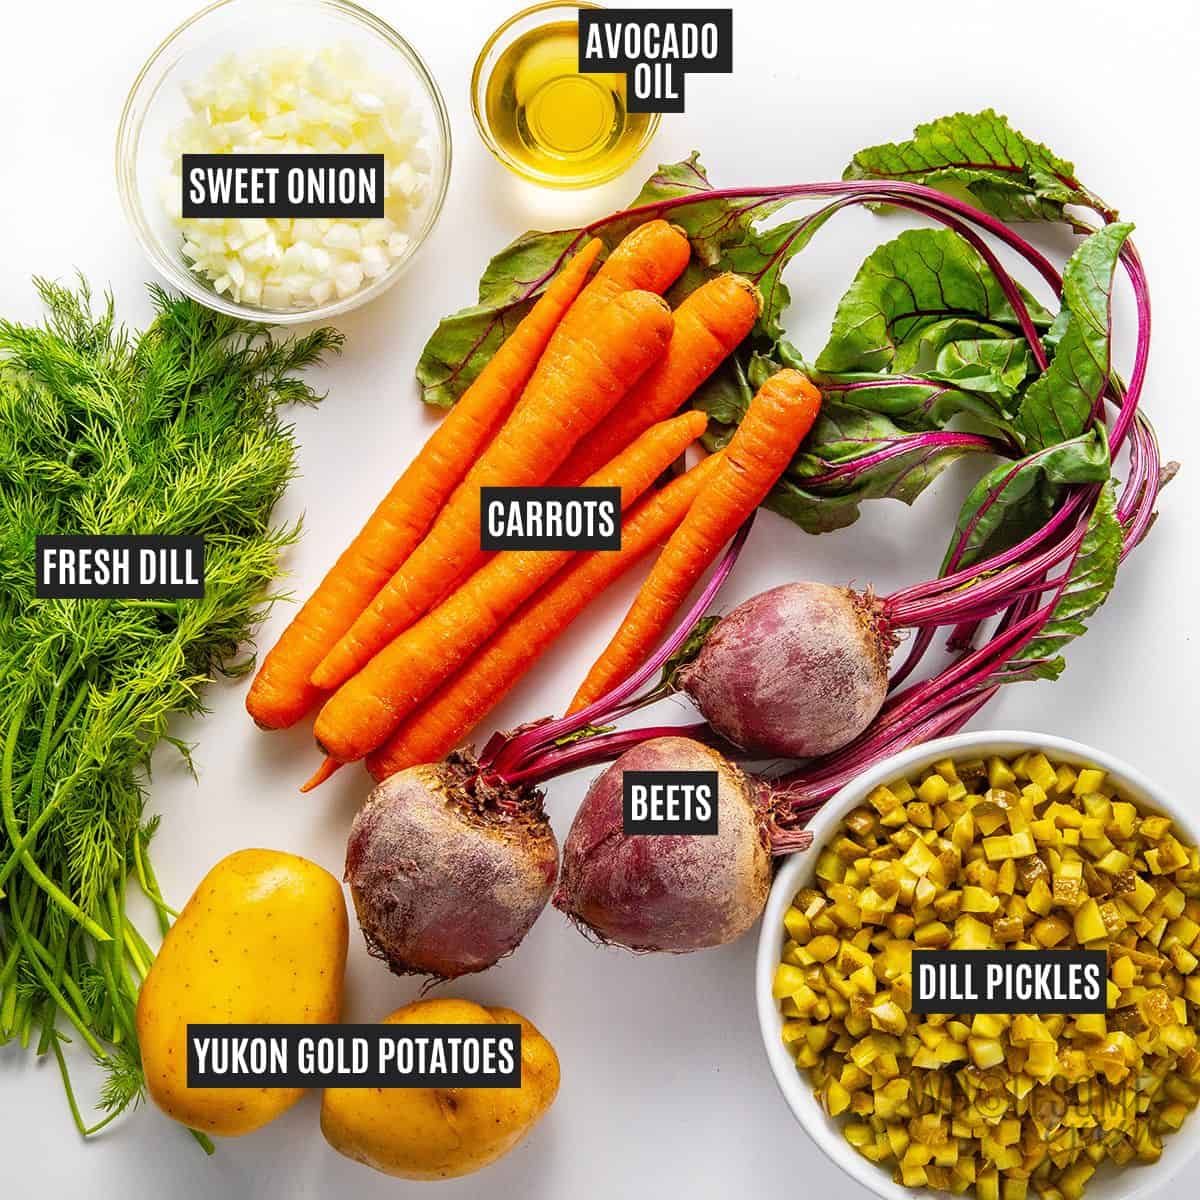
- Vegetables – Vinegret almost always has beets, carrots, and potatoes (I use Yukon gold potatoes) for that classic vinegret flavor and texture. My notes on the veggies:
- The most important part is finding smooth, vibrant beets, as they provide the most flavor to this dish.
- For the potatoes, Yukon golds are naturally creamy and hold their shape well, but red potatoes work too.
- If you want a lighter option, you can swap some or all of the potatoes for cauliflower (not traditional but I’ve done this before). Or simply use more beets and fewer potatoes, but my recipe already has less potatoes than most.
- You can also add peas or beans if you want even more veggie variety with extra protein.
- Dill Pickles – Make sure they’re true dill pickles, not sweet, or the flavor will be off. The pickle juice adds flavor to the entire entire salad.
- Sweet Onion – I prefer sweet or yellow here, because it’s mild and doesn’t overpower the Russian beet salad. I’d skip red because it can take over the flavor.
- Fresh Dill – I added this for freshness, although my mom doesn’t. Fresh parsley makes a good substitute if you’re not a fan. I don’t recommend dried herbs (just not the same in a salad!), but if you have to, reduce the amount to 1 tablespoon.
- Avocado Oil – Its neutral taste lets the veggies shine, and I feel better using it than the sunflower oil (a type of processed seed oil) that some Russian salads have. Light olive oil works as well, but avoid anything too strong or peppery.
How To Make Russian Salad
I have step-by-step photos here to help you visualize the recipe. For full instructions with amounts and temperatures, see the recipe card.
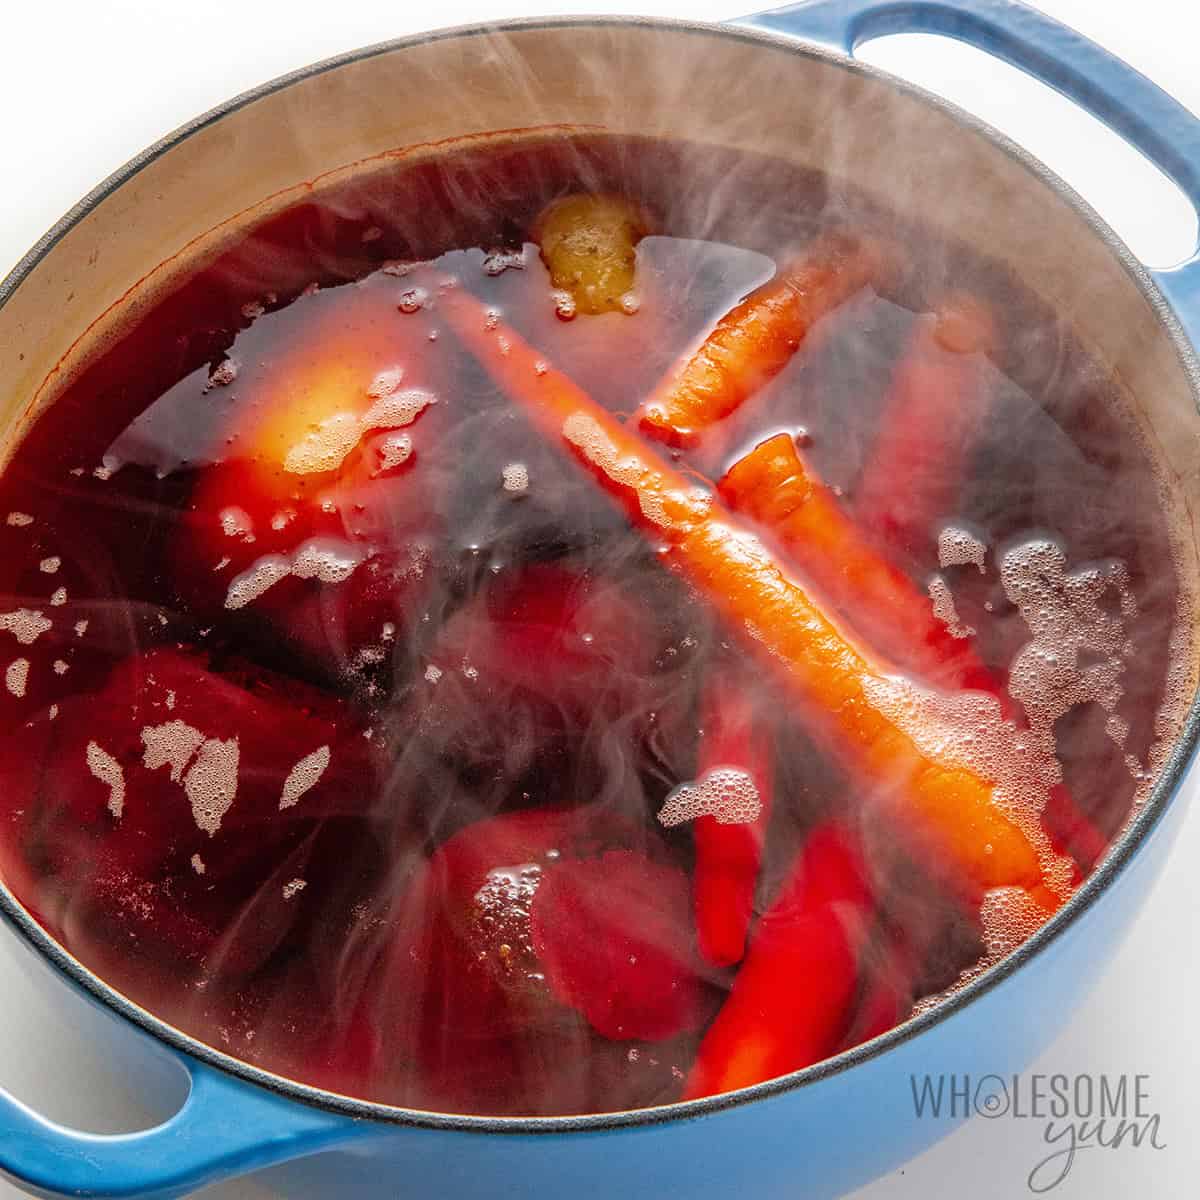
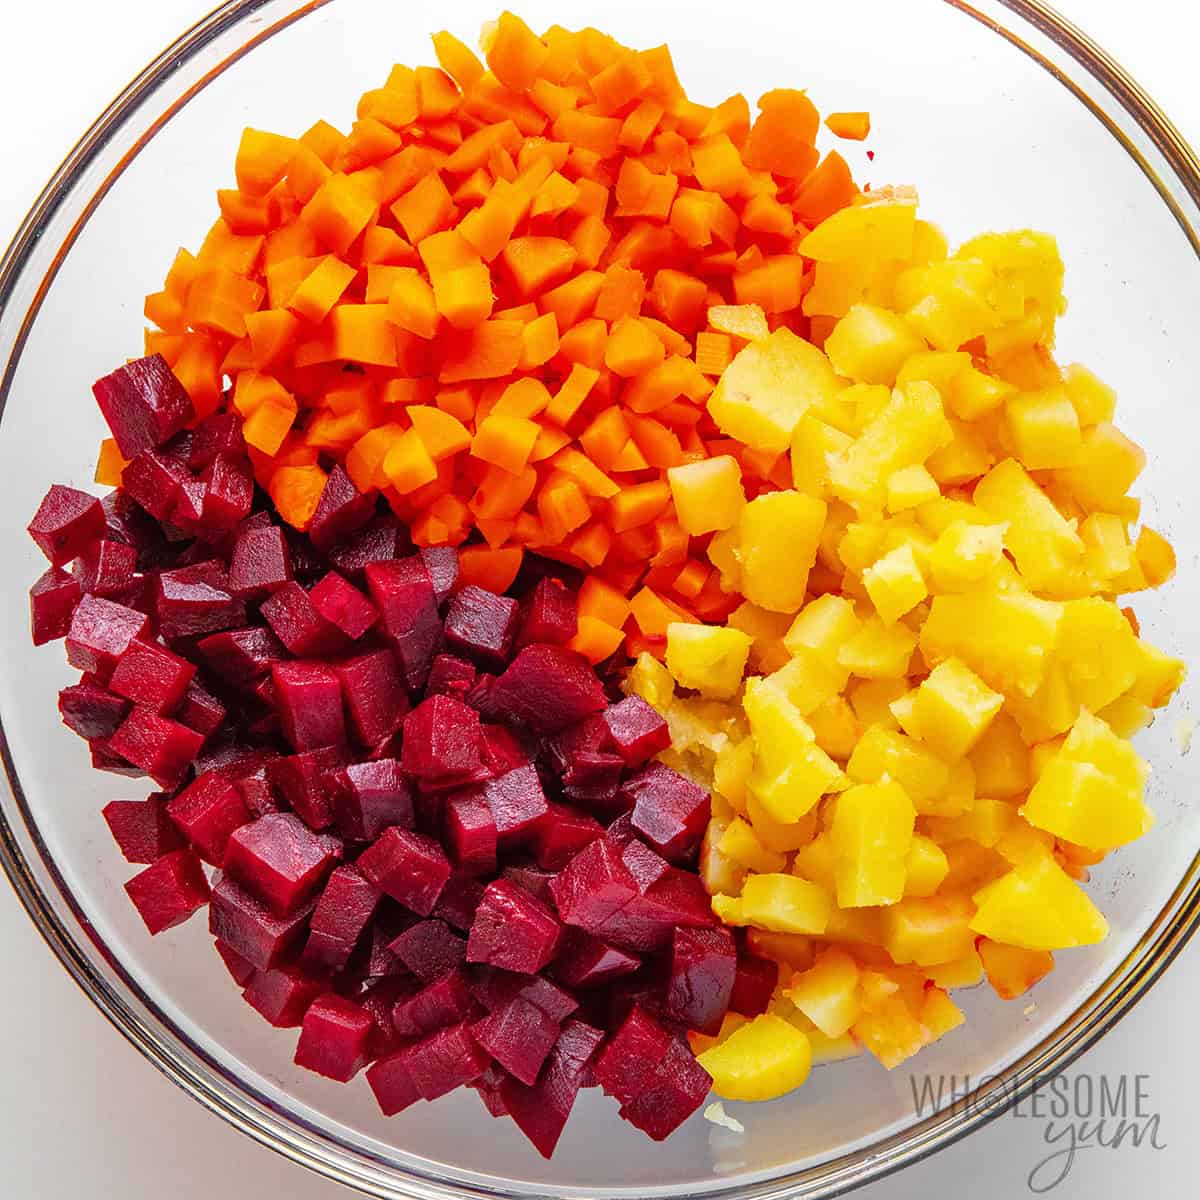
- Prep the vegetables. Scrub the beets, carrots, and potatoes well and trim off any rough ends. Leave the peels on, as the flavor is better if you remove them only after.
- Boil until tender. Place the vegetables in a large pot of water and bring to a boil. Remove them as they become fork-tender (not mushy!).
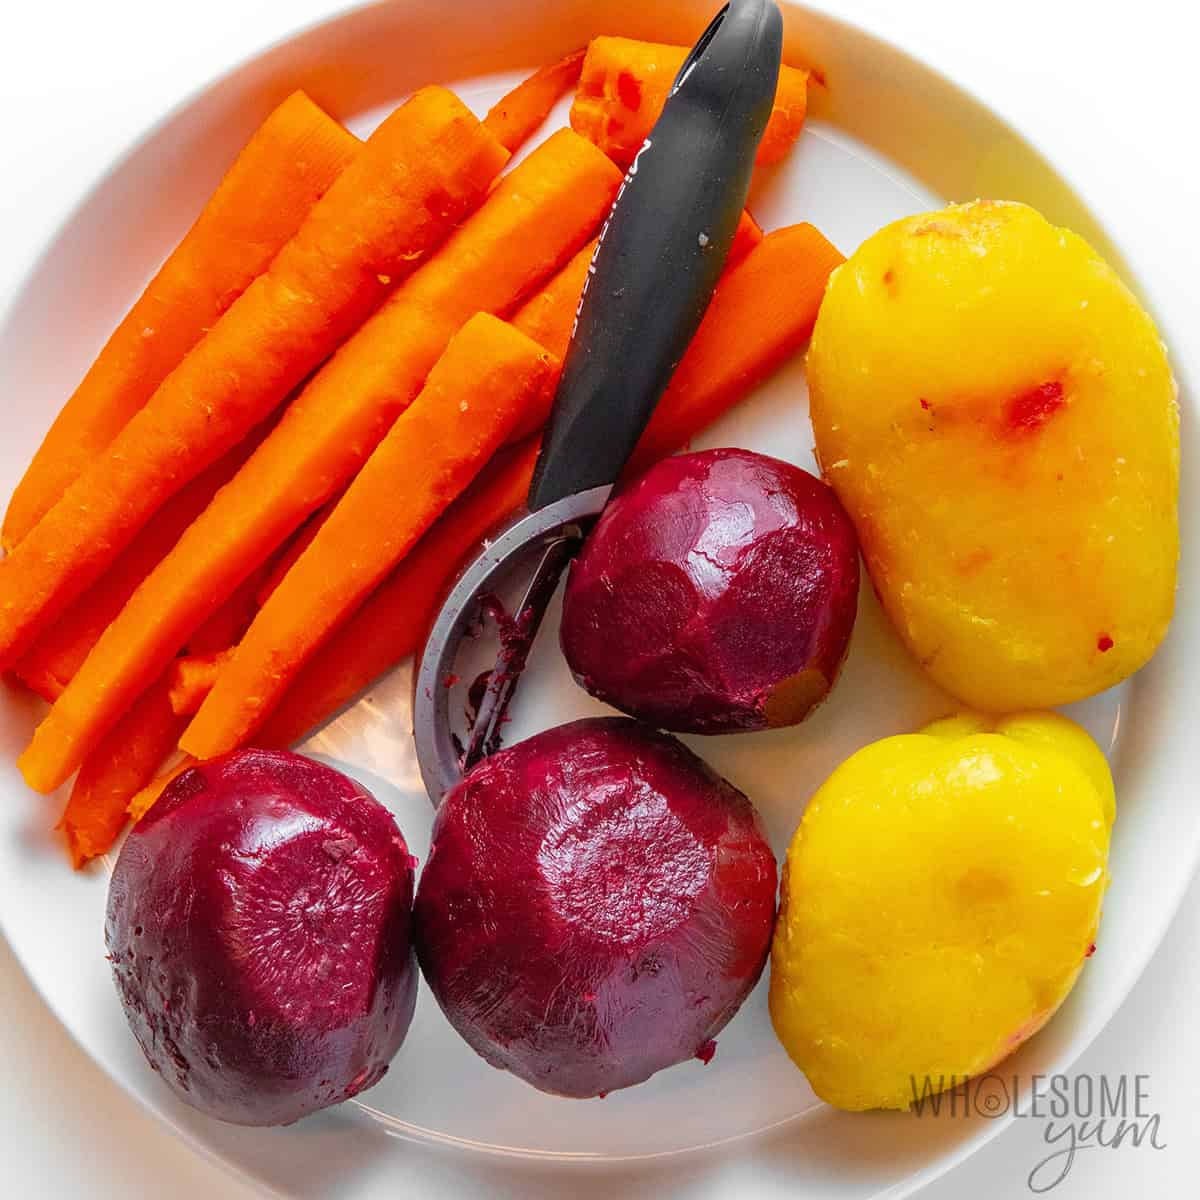
- Cool, then peel. Drain the veggies, rinse under cold water until cool enough to handle, then peel using a paring kife or vegetable peeler — this is my favorite, pictured below.
- Chop finely. Classic vinegret has pretty small pieces, about 1/4 to 1/2 inch.
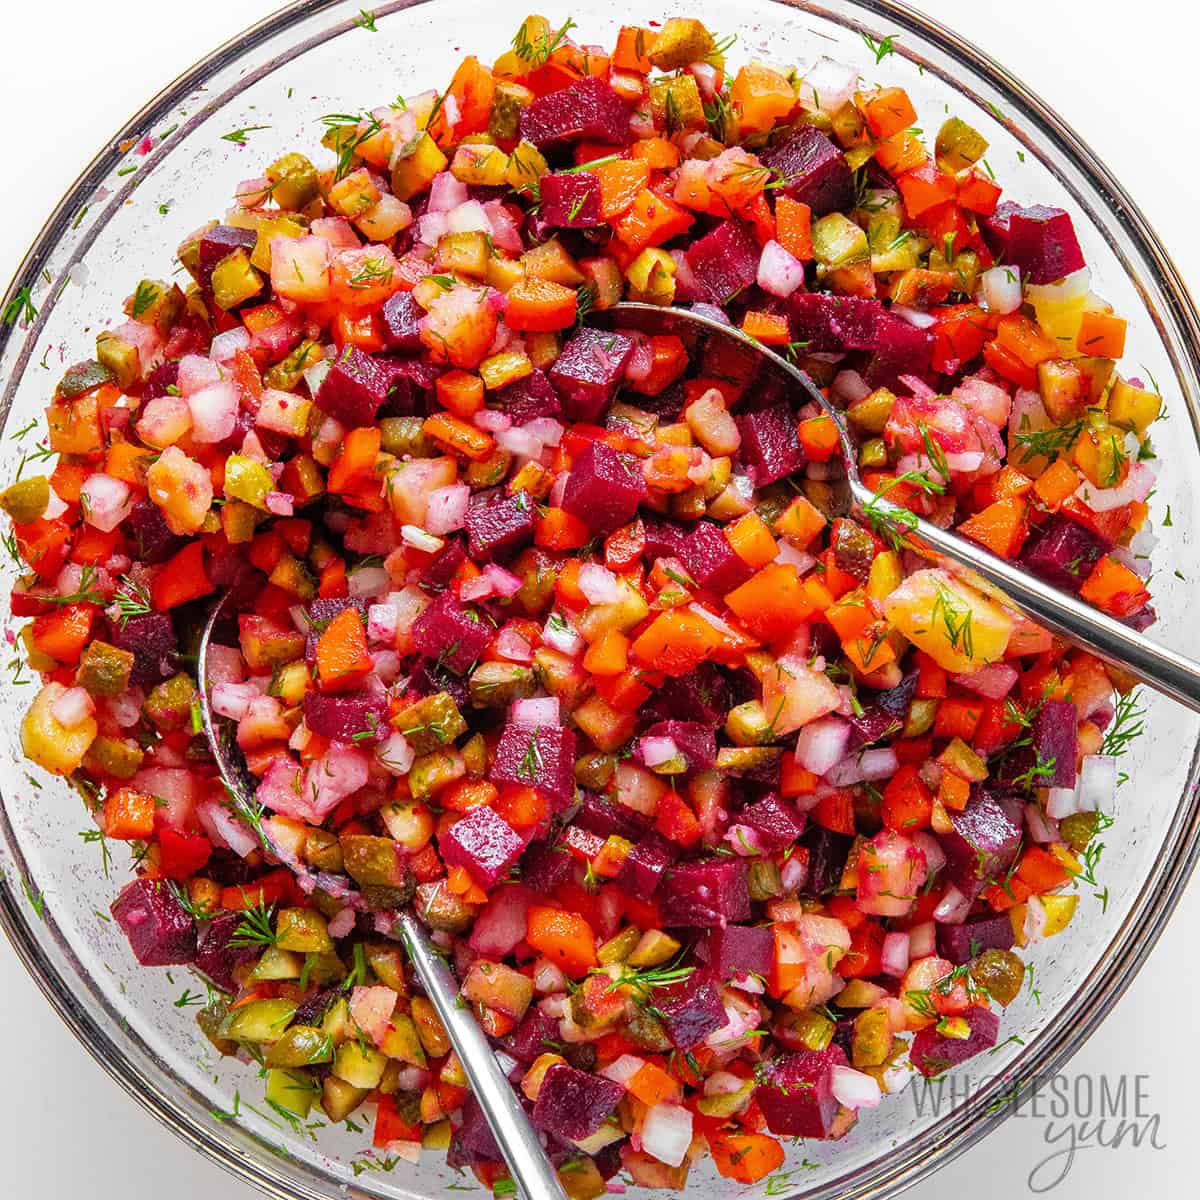
- Mix the salad. Combine the chopped vegetables in a large bowl, along with finely diced pickles and sweet onions, chopped dill, and avocado oil. Gently toss until everything is evenly coated in oil.
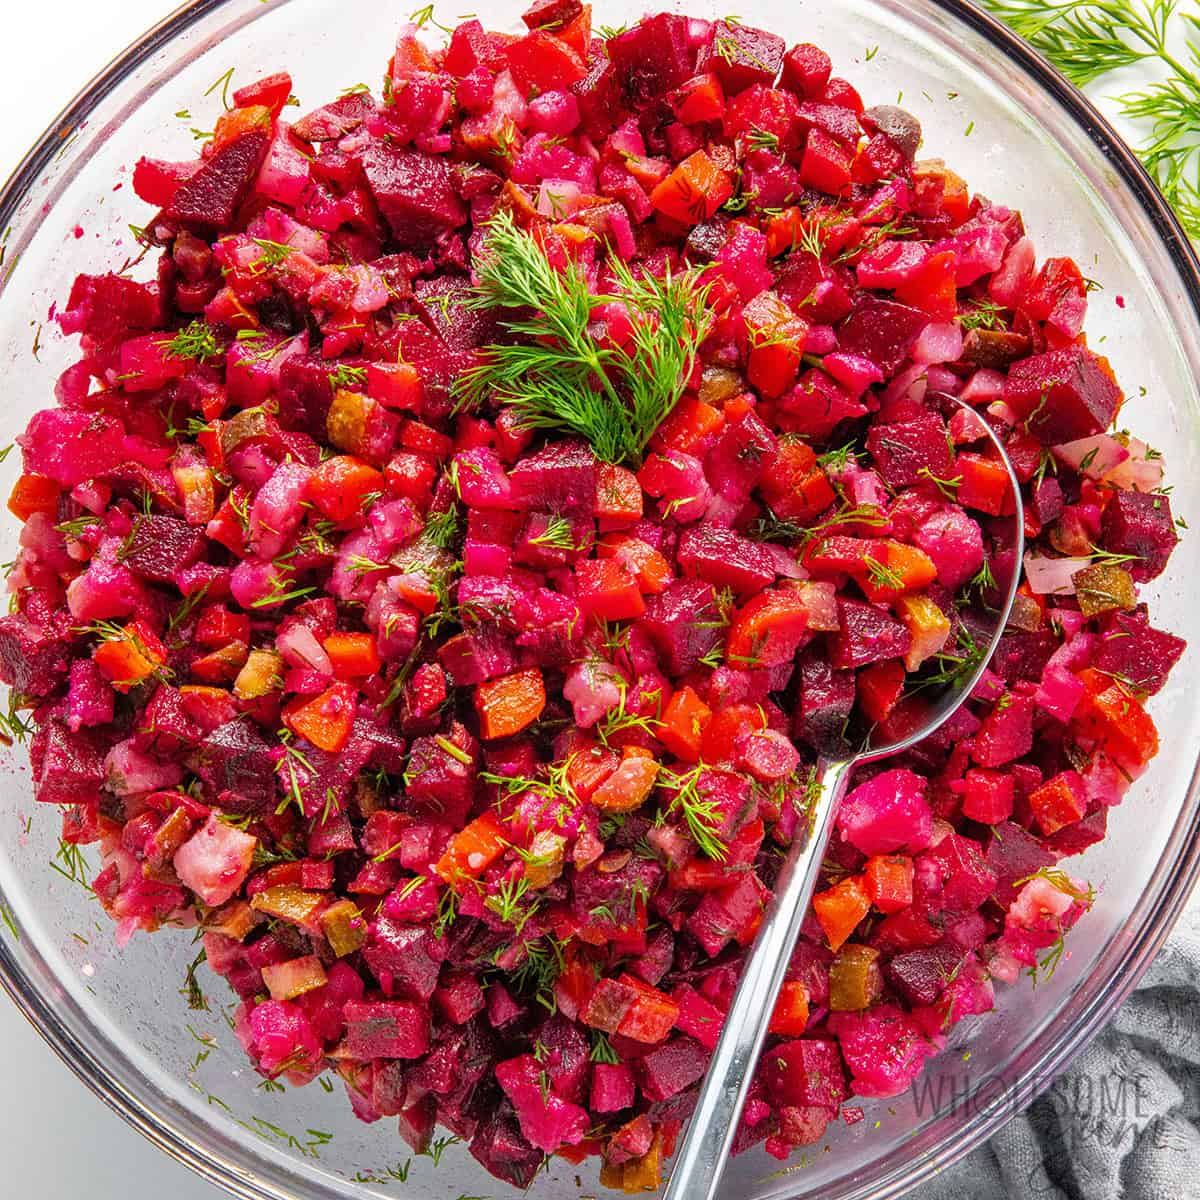
- Chill for best flavor. Refrigerate the Russian salad to let the flavors come together. It’ll become more pink over time (the picture on the right is right after mixing, the larger picture below is after a few hours in the fridge), and that’s when you know it’s ready. Give it a good stir before serving!
My Tips For Making Vinegret
- If your vegetables don’t fit in one pot, feel free to cook them in multiple pots. I usually cook them separately when I make a double or triple batch. For a single batch, I cook them together in one pot and remove at different times.
- Boiling time will vary depending on the size of your vegetables, as well as the type. Carrots cook faster than beets and potatoes. If some of your potatoes, carrots, or beets are significantly different from each other, cut the larger ones into smaller pieces.
- Be careful not to boil too long. The vegetables should be fork-tender but still hold their shape, with a slight firmness in the center. If they’re overly soft or falling apart, they’ll turn mushy and be harder to peel and dice neatly.
- The peels should come off very easily after boiling, sometimes even with your fingers. But I still prefer my peeler for the easiest method.
- You can use a vegetable chopper to save time for this recipe. I’ve done it many times by hand, too. Just make sure the pieces are uniform in size.
- For the best texture and flavor, dice everything small, but especially the pickles and onions. I cut the beets, carrots, and potatoes into cubes about 3/8 to 1/2 inch in size, but the pickles and onions are best when they are 1/4 inch or even smaller.
- How do I know when the Russian salad is ready? One way to tell it’s ready after chilling is it should darken and become more pink in color than it is initially. You can also stir it and check if it tastes good to you.
- If you want to lighten it up, increase the beets to 1 1/2 pounds and reduce potatoes to 1/2 pound. You can also replace the boiled potatoes with boiled or steamed cauliflower for a lighter option. You won’t really taste its flavor because the primary flavors in this salad are beets, briny pickle flavor, and dill.
- Don’t you need salt? Nope! I was surprised my mom didn’t use any, but the pickles actually provide enough (and I love salt). But you can add salt and or pepper to taste at the end if you like.
- You can easily double this Russian salad recipe. I often do when making this for a crowd!
Russian Salad (Vinegret)
My Russian salad recipe (vinegret) is tangy, colorful, and family friendly, with tender root veggies, pickles, and fresh dill in every bite.
Instructions
Tap on the times in the instructions to start a kitchen timer.
-
Wash the beets, carrots, and potatoes, scrubbing with a vegetable brush if needed. Cut off any bad parts and root ends, but leave the peels on.
-
Place the vegetables into a large pot. Add water to submerge. Place the pot on the stove over high heat and bring to a boil. Boil for 8-12 minutes, until the carrots are fork tender. Remove the carrots and continue cooking.
-
Boil the potatoes and beets left in the pot for 10-20 more minutes (20-30 minutes total), until the potatoes are fork tender. Remove the potatoes and continue cooking.
-
Boil the beets left in the pot for about 10 more minutes (30-40 minutes total), until they are fork tender.
-
Drain the vegetables and run under cold water to cool enough to handle. Pat dry.
-
Peel the beets, carrots, and potatoes. Dice them into 1/4 to 1/2 inch pieces and place into a large bowl.
-
Add the diced pickles, sweet onions, dill, and avocado oil. Mix well.
-
Refrigerate the Russian salad for at least 4 hours, or preferably overnight, to let the flavors develop. Stir again before serving.
LAST STEP: Leave a rating to help other readers, or tag me @wholesomeyum on Instagram. I’d love to hear from you!
Maya’s Recipe Notes
Serving size: 1 cup
- Tips: Check out my recipe tips above to help you nail the flavor and texture of this Russian salad.
- Storage & meal prep: This salad looks and tastes better the next day, and stores like a dream in the fridge. In fact, it’s just as fresh a few days later and good for up to a week. That makes it perfect for meal prep, as well as planning ahead for holidays.
I provide nutrition facts as a courtesy. Have questions about calculations or why you got a different result? Please see my nutrition policy.
Add Your Notes Your Notes
Try More Of My Recipes

© Copyright Maya Krampf for Wholesome Yum. Please DO NOT SCREENSHOT OR COPY/PASTE recipes to social media or websites. We’d LOVE for you to share a link with photo instead.
Russian Salad
How To Serve It
This Russian salad is traditionally served for holidays or with grilled meats, so I make it year round. Honestly, I also just love making a batch for the week to keep in the fridge. Here are my favorite ways to serve it:
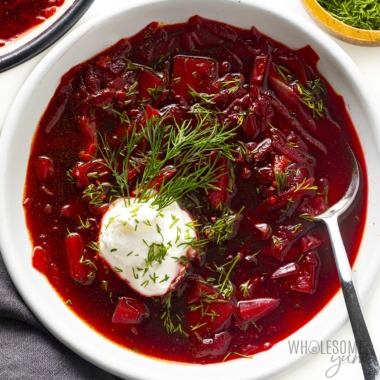
- Eastern European Classics – My family’s faves are chicken fritters, cabbage rolls, reuben casserole, salmon lox, and if we have a lot of beets, borscht soup.
- Simple Dinners – Most often, I serve this alongside simple baked chicken leg quarters, air fryer chicken thighs, pan seared salmon, or sirloin steak.
- Grilled Meats – We love it most with chicken kabobs, lamb kofta, or shish kabobs, but it’s surprisingly good with smash burgers, too.
- Holiday Mains – The ruby red color of this Russian beet salad makes it the perfect festive addition to your holiday spread with leg of lamb, spatchcock chicken, or beef tenderloin.


2 Comments
veronika
0Love the crunch to this salad from pickles and onions, and the best after it’s been chilled for couple hours. Has the best flavor when served the next day. I doubled this recipe, cause I can eat the entire salad in one sitting.
Maya | Wholesome Yum
0I love that, Veronika! That’s exactly why I often double it, and yes, it’s even better the next day. Enjoy!