 Shop
Shop My
My Custom


FREE 5-Ingredient Recipe EBook
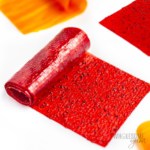
GET IT NOWMy Fruit Leather Recipe Is Like Natural, More Delicious Fruit Roll Ups

If you grew up in the 90s like I did (or maybe even if you didn’t?), you probably remember fruit roll ups that were everywhere. I haven’t had them in decades (artificial colors and so much sugar!), but when my kids started bringing them home from school, I knew it was time to create my own fruit leather as a better alternative. Here’s why this recipe has been all that and more:
- Fruity, chewy, and just a little sweet – The soft, chewy texture is just like I remember, maybe even better because it’s less dry. Mine is less sweet than store-bought versions, but you can adjust the sweetness, too.
- Choose your own fruit – I’ve tested this fruit leather recipe with many kinds of fruit, from berries to mangoes and more. Strawberry is my favorite, as it reminds me of the (processed) ones I enjoyed as a kid.
- 100% natural – No processed ingredients, corn syrup, pectin, juice, colors, or added sugar, just real fruit! My homemade fruit roll ups are also naturally gluten-free, can be low carb if you use berries, and I feel good giving them to my kids.
- Quick and easy – The prep takes only a few minutes, without a dehydrator or other special tools. Plus, I love that this recipe allows me to save fruit that’s about to go bad otherwise.
So if you need a natural snack for your family (or yourself), make this homemade fruit leather with me!


Ingredients & Variations
Here I explain the best ingredients for homemade fruit leather, what each one does in my recipe, and substitution options. For measurements, see the recipe card below.
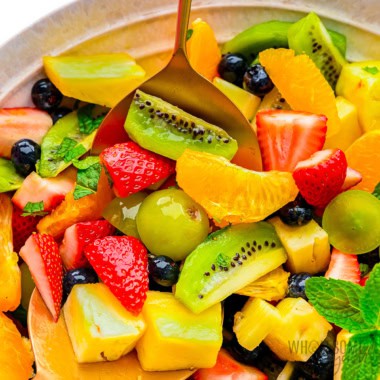
- Fruit – I use strawberries most often. I’ve also used mango, other berries (blackberries, raspberries), stone fruits (such as peaches, plums, or apricots), or other fruit (like apples, pears, kiwi, or bananas). No matter what kind you use, you’ll need one pound for this recipe, which is about 2 to 3 cups of fruit.
- Lemon Juice – It brightens the flavor, but also has a surprise effect of helping the fruit retain its color. Lime juice works fine, too. You could use orange juice for extra sweetness, but I find it doesn’t work quite as well for color retention.
Variations:
- More Flavor – Sometimes I add spices (like cloves, nutmeg, cinnamon, or ground ginger), or extracts (like vanilla or almond extract) to the puree. No specific amount — just taste as you add these.
- More Sweetness – My fruit leather recipe is sweetened with 100% fruit, but if your fruit isn’t as sweet as you like, you can add a few tablespoons of honey, or my personal favorite Besti natural sugar substitute (0 calories and no aftertaste!). I don’t recommend more than 2 tablespoons of liquid sweeteners, because more can prevent your fruit leather from drying out properly.
- Frozen Fruit – Simply defrost it fully in the fridge and drain off any extra liquid before pureeing.
How To Make Fruit Leather
I have step-by-step photos here to help you visualize the recipe. For full instructions, including amounts and temperatures, see the recipe card.
- Puree the fruit. Just blend it in a high-power blender (I have this blender) or food processor, until very smooth. Add lemon juice and blend again.
- Pour onto a rimmed sheet pan. You can line it with either parchment paper or a silicone mat. Spread the fruit puree into a thin layer.


- Bake in the oven. This takes a while, as you need a low temperature to remove excess moisture gradually. The fruit leather is ready when it’s no longer sticky, but let it cool completely to firm up. You can also use a dehydrator instead — see my tips below.
- Peel, cut, and roll. Gently peel the fruit leather off the baking sheet, cut into strips, and roll up. You can roll with or without the parchment paper (I have both options shown below), but doing it with the paper prevents the rolls from sticking to themselves.


My Recipe Tips
- Don’t add liquid to the blender. The fruit leather won’t set if you do, but sometimes this means the blender gets stuck, so I just dislodge with a spatula if needed.
- If the fruit has an edible peel, you can include it when blending. It’s extra fiber and texture!
- Parchment paper or a silicone mat works best for lining the pan. Avoid using wax paper, which is not suitable for the oven, or foil, which will stick.
- If using berries or other fruit with edible seeds, you can strain them through a fine mesh sieve. I usually skip the step, as I like the texture of the seeds, but feel free to strain if you prefer a smoother texture.
- Make sure the fruit puree is distributed evenly before baking. If the thickness of the puree is uneven, the fruit roll up recipe will have a lumpy texture, and the thinner parts may burn before the thicker parts are done. Try to create as thin a layer as possible without making any holes.
- Watch for doneness — baking time can vary. It depends on the type of fruit you use, how much water it has, how thinly you spread the puree, and even humidity. Thick layers can take a very long time to dry out, but over-dried fruit leather will be brittle and crack easily. Keep testing for doneness often after 3 hours.
- If you want to reduce the oven time, you can cook the fruit on the stovetop first. After pureeing, boil for 5-10 minutes to allow some liquid to evaporate. This step can cut your baking time roughly in half.
- Feel free to use a dehydrator if you have one. After pureeing, transfer to your dehydrator’s fruit leather tray (or simply line with parchment paper). Dehydrate for 6-12 hours at 140 degrees F. I usually start testing for doneness after 6 hours.
Fruit Leather (Easy Recipe)
This healthy fruit leather recipe is my homemade version of fruit rollups. It's so easy to make with real, fresh fruit and no added sugar!
Instructions
Tap on the times in the instructions to start a kitchen timer.
-
Preheat the oven to the lowest temperature possible (mine was 170 degrees F). Line a baking sheet with parchment paper or a silicone mat (this is a good size for this recipe).
-
Puree the fruit in a high-speed blender, until very smooth. Add the lemon juice and puree again.
-
Spread the smooth fruit puree onto the lined baking sheet.
-
Dehydrate fruit leather in the oven for 3-4 hours, until the center is not sticky to the touch.
-
Remove from the oven and cool completely on the baking sheet.
-
Slide the parchment paper off the baking sheet onto a cutting board. Using a pizza cutter or knife, cut into five strips lengthwise, then cut across all of them crosswise, to make 10 pieces total.
-
To make fruit roll ups, roll the individual strips, preferably together with the parchment paper to prevent sticking, but without is fine as well.
LAST STEP: Leave a rating to help other readers, or tag me @wholesomeyum on Instagram. I’d love to hear from you!
Maya’s Recipe Notes
Serving size: 1 fruit roll up (7 inches by 2 inches)
- Tips: Check out my recipe tips above to help you get an even doneness and texture, how to adjust the flavor, a time-saving hack I discovered, and more.
- Store: Keep the fruit leather in a sealed container in the fridge for up to 1 week. It’s fine to take these snacks on-the-go for the day without refrigerating — I do it all the time!
- Freeze: For longer storage, these fruit rollups will last for up to 6-8 months in the freezer, although the color fades over time. Thaw overnight in the fridge before enjoying.
- Note on nutrition info: These numbers are based on using strawberries, and will vary depending on the type of fruit you use. If you’re watching sugar intake, I recommend using low carb fruits, such as strawberries, blueberries, raspberries, or blackberries.
📖 Want more recipes like this? Find this one and many more in my Healthy Ebook Bundle!
I provide nutrition facts as a courtesy. Have questions about calculations or why you got a different result? Please see my nutrition policy.
Add Your Notes Your Notes
Try More Of My Recipes


© Copyright Maya Krampf for Wholesome Yum. Please DO NOT SCREENSHOT OR COPY/PASTE recipes to social media or websites. We’d LOVE for you to share a link with photo instead.
Fruit Leather Recipe


72 Comments
Eric Ehramjian
1Is 200 degrees too hot a setting for the oven? That is the lowest setting my stove offers for the oven. Will it affect the texture of the final product or will it just shorten the drying time? Should I be concerned with burning at this temperature?
Maya | Wholesome Yum
0Hi Eric, I think that should work okay, and yes, the time would be shorter. I don’t think it will burn, but I would definitely check on it sooner and you might need to rotate the pan. Please let me know how it goes!
Cathy
1Can you use Apricots? If so, should they be prepared any differently than all the other fruit mentioned?
Barbara
1I have an apricot tree and I always use the very ripe ones for fruit leather. Always turns out great
Tiana Browne
0Can I use frozen fruits or do you think they should be defrosted first?
Maya | Wholesome Yum
0Hi Tiana, I covered this above. Yes, you can, and yes, you need to defrost them and drain any liquid before blending.
Maya | Wholesome Yum
0Hi Cathy, I think you can, but haven’t tried those yet. Please let me know how they turn out if you do!
Meghan
1I made this with just strawberries and I am pretty sure my son would eat all of this in one sitting if he could, haha! Trying a combination of flavors next – thank you for the recipe.
Tiana browne
0Can I add sugar or honey while it’s in the blender?
Maya | Wholesome Yum
1Hi Tiana, Yes, you can add a small amount if needed.
Lorraine Martinez
0Grandma here how young is ok the the fruit I’ll ups 😋
Shannon
0My grandson has eaten them since he was 1. He will be 2 in July
Maya | Wholesome Yum
0Hi Lorraine, Sorry, I’m not sure what you’re trying to say, but I hope the emoji means you enjoyed the recipe!
Tina
0Hi can I use frozen fruit?
Maya | Wholesome Yum
0Hi Tina, Yes, I have this in my variations above, just see my note on how to use it properly in this recipe.
Charles Fogg
0Just bought a dehydrator. What to do with quinces. Bumper crop in UK this year? (Love your low sugar approach.) Charlie. Worcs UK.
Aline
0Blend quinces with sweeter fruit. I only did it once, with leftover medjool dates that I find way too sweet on their own. I didn’t use any exact recipe though, you can wing it for the proportions. I did grate the quinces before blending them, mine were too hard to blend in chunks.
Maya | Wholesome Yum
0Hi Charles, I’m sorry, I don’t have any quince recipes yet. You can probably use them for this fruit leather recipe, but I’d recommend cooking them first until very soft, then blend to a puree. I’d also add a sweetener, since quinces are not really sweet on their own. Please let me know how it goes if you try this!
Mary Heidt
0I love this recipe. I have never had it fail. I leave mine in the oven just a little longer because I live in high altitude. I use a silpat to dry it on then turn it out on parchment paper, roll it, and cut into strips. My other tip is that I buy fresh fruit at its peak, strawberries right now and puree it, sometimes strain the seeds other time not, put it in the freezer in a zip top bag so I can lay it flat then in the winter when I like the oven on, make it then. It is so good and the fruit was at its peak. I have done raspberries, blueberries, and blackberries, I do always strain them, and mango. I am going to try peach and orange this year hopefully. My issue, its addictive. I have a dehydrator but loan it out for deer hunters making jerky. Thanks for the recipe.
Patricia Schat
0How much lemon juice do you use and how many cups of fruit?
Maya | Wholesome Yum
0Hi Patricia, I have the amounts on the recipe card above.
Wholesome Yum D
0Love hearing that, Mary! It sounds like you’ve really made this recipe your own with all those great tips and fruit combos. I love your idea of freezing the fruit at its peak to make it later. That’s so smart! Thanks so much for sharing. I totally get it, it really is addictive!
Barbara
0Can you sift the fruit to remove seeds after pureeing? I think my grandkids would be turned off by the seeds.
Maya | Wholesome Yum
0Hi Barbara Yes, you can strain the seeds out if you prefer.
Heather J. Ryan
0Have you tried this recipe with thawed frozen fruit? I’m thinking to try mangoes.
Maya | Wholesome Yum
0Hi Heather, Yes, you can use frozen fruit! Mangoes are a delicious option.
Linda
0Easy as pie! It’s still in the oven so I don’t know its outcome. But the purée is delicious. I’m hopeful.
Kim
0I cooked my fruit leather to perfection and left it out and it all softened up again. Suggestions ??
Maya | Wholesome Yum
0Hi Kim, I’m not completely sure what you are asking, as fruit leather is supposed to be soft. Do you mean it was so soft that it was wet? If so, it probably still needed to bake for longer.
Jimmy
0Last week I made cherry jelly. Today I took some of that jelly, spread it on the sheet in the dehydrator, and it’s in there right now….about 3 more hours to go.
Megan
0I had some strawberries that were starting to go bad so I used this for them. It turned out great! I also added little honey and some collagen. Super easy!
Kylie
0How much collagen did you add please?
Joey
0I recently had a homemade Orange fruit leather from a farmers market which was amazing (ingredients said they also used apple) but also made me think, could I use/make other citrus only fruit leathers? Would grapefruits work? Or lemon by itself? Or would I need to add some other type of fruit?
Wholesome Yum D
0Hi Joey, I have never used citrus fruit in this recipe but if you do please let me know.
Zane
0I recently bought a dehydrator and tried this recipe! I used a mix of blueberries and strawberries and loved how it turned out!
Cassie
0This was such a hit with the kids! Quick and easy to make and much better than store-bought ones because it’s homemade so you definitely know it’s a healthier choice for them. And I just know I’ll be making this more often now!
Parker
0I can’t believe how easy this was. We have berry bushes growing wild in our neighborhood so this year we are going to collect as many as we can and make a bunch of fruit roll ups! I assume it’s okay to use frozen berries too?
Wholesome Yum D
0Hi Parker, Yes, You can use frozen fruit. Simply defrost it fully in the fridge and drain off any extra liquid before pureeing.
Patty
0We loved this so much!! I made it just fruit the first time, and then followed your tip in post to add spices and woooo it was amazing! I’m thinking I’ll start to add this to my treats boxes over the holiday’s, too. Thank you!!
Patricia
0Who knew it was so easy to make homemade fruit leather?! My kids absolutely loved it and I felt so domestic. 🙂
Mel
0I loved throwing this into my kids home made lunches for school! It was so delicious and I loved knowing it had clean ingredients!
Krissy
0I had some Hood strawberry puree in the freezer from last summer and decided to make these. They turned out so good and the kids loved them!
Jo Ellen
0Hi, just found your recipe. When measuring fruit do you puree first? 1 cup pureed fruit and 1 tea lemon juice?
Wholesome Yum D
0Hi Jo Ellen, The fruit is measured before it’s pureed.
Faith H
0I made this in my dehydrator using blueberries… it turned out absolutely delicious!!! Thank you for the amazing recipe! I think I dehydrated it just a bit too much, so I simply cracked it into large pieces and am calling it “blueberry leather.” Love it!!
Efream
0Mine did not turn out. Does it matter the type of fruit used? Plus they have been in the oven for like 6 hours and still haven’t completely dried out. I have no idea what I did wrong, but I’ll try them again.
Wholesome Yum D
0Hi, What fruit did you use?
Connie Poole
0I’m looking at your fruit leather recipe but I don’t see what temp the oven should be
Wholesome Yum D
0Hi Connie, You should set your oven to the lowest temperature possible (mine was 170 degrees F). You will find that info in step 1 on the recipe card.
HP
0Followed the instructions to the letter. Left with unusable trash–the parchment paper wouldn’t pull off the fruit leather before OR after cooling. The tiny piece I was able to try tasted good, though.
Wholesome Yum D
0HI, Sorry this recipe didn’t meet your expectations. If you try again I recommend using a silicone mat.
Heather
0Will canned fruit (ie peaches) work if it’s well drained??
Wholesome Yum D
0Hi Heather, Yes, I think that should work for you.
Ann
0Would this recipe work if using frozen fruit?
Wholesome Yum D
0Hi Ann, Yes, you have to defrost fruit fully in the fridge and drain off any extra liquid before pureeing.
Jill
0I tried to make these but it ended up burning. I want to try again..loved the idea of no added sugar..but not sure what happened.
Victoria
0How do you store?
Wholesome Yum D
0Hi Victoria, Keep the fruit roll-ups in a sealed container in the fridge for up to 1 week.
Dana
0What a great lunchbox treat for the kids! Now I don’t have to worry about all the extras that are in store bought, and we can make whatever variation sounds good at that time!
Gen
0What a fun idea! My niece loved these.
Jenna
0I loved fruit roll ups when I was a kid but I’ve never tried making them before. I definitely plan on giving this recipe a try. Thanks for sharing.
Toni
0This is so fun to make and eat!! My kids loved it! Thanks!
Jaimie L
0Hi there! I just made a batch of these with strawberries and had such a hard time not eating them all! However, I do have a question: I used parchment paper and noticed it immediately wrinkled, leaving too-thin spots which crackled. Any tips on keeping your parchment paper from wrinkling?
Cristie
0When I was a young cook, I used to think that wax paper was the same as parchment paper, and ruined several recipes. Lol. Be aware that they are very different!
Wholesome Yum D
0Hi Jaimie, Using parchment paper sheets may be a better option for you.
Cori
0Help. Things went horribly wrong. My edges were crispy and most of the inside never hardened. Also had black spots pop up everywhere. Was in the oven almost 5 hours. I just gave up. Super great flavor and my kid loved the crispy parts he was able to eat. Where did I maybe go wrong? Wanna get this one right for him! Thanks so much!
Wholesome Yum D
0Hi Cori, What temp was the oven set at?
Addison
0My kids loved this recipe.
EJ
0What temperature should the oven be set to?
Wholesome Yum D
0Hi EJ, You want to set the oven to its lowest possible temperature. Mine was 170 degrees F.
KT
0What size baking sheet is best to spread out 1 lb of fruit puree for these fruit leathers? I am so intrigued by this recipe!
Wholesome Yum D
0Hi KT, The ones I used were 18×13.