 Shop
Shop My
My Custom


FREE 5-Ingredient Recipe EBook
GET IT NOWI was curious about reverse sear steak for a long time before I finally jumped in a few years ago. It all started when a friend mentioned it at one of our “gymnastics and wine” nights (after our kids’ gymnastics class, they’d play and we’d mingle over wine and food… it was as awesome as it sounds). Following hours of chatting about how to reverse sear a steak, and then a bunch of kitchen tests with my favorite steak seasoning, I’m pretty proud to say I’ve perfected the technique. And I’ve got all the tips for you to replicate it easily. I’m convinced that, when you have the time for it, it’s absolutely the best way to cook a filet mignon — or any thick steak. Make it with me and you’ll see!
Why You Need My Reverse Sear Steak Recipe

- The most tender, super juicy steak ever – There’s really nothing else like it. You probably wouldn’t think of low heat for steak, and before this I always used my stovetop-to-oven steak or grilled steak methods. But trust me when I say, reverse searing will give you the juiciest, most tender steak that melts in your mouth. Other methods don’t even come close.
- Even doneness inside, all the way to the edges – This is the most consistently cooked steak I’ve ever had. Including fancy steakhouses! You know how your steak usually has a slightly more done border near the edges? You’ll never have that with this method.
- Perfect crispy browned crust – You don’t have to miss out on the crust, either! Unlike my air fryer steak that I also love for its juiciness but is missing the crust, my reverse sear method offers both.
- Sounds fancy, but surprisingly easy – You do need time to make this, but the process is very simple and mostly hands-off. And although the result is similar to sous vide, you don’t need special equipment for this one.
- Customize to your doneness level – In my family we like it either medium or medium-rare, but just follow my reverse sear steak time chart to make it to your liking.

What Is A Reverse Sear?
Reverse sear steak is the opposite of how I’d cook most steak recipes. Instead of searing the steak and finishing in the oven, you slowly cook the steak at low temperature in the oven, then sear it in a screaming-hot pan to finish. The end result is nothing short of incredible — juicy and tender inside and with an irresistible crust on the outside.

Ingredients & Substitutions
Here I explain the best ingredients for reverse searing steak, what each one does in my recipe, and substitution options. For measurements, see the recipe card.
- Steak – I reverse sear filet mignon most often, as it’s my favorite cut. Other good choices are top sirloin steak (only the thick kind), ribeye, porterhouse, New York strip, or t-bone. Reverse sear steak only works with thick-cut steaks – at least 1.5 to 2 inches thick! If your steaks are thinner, they will overcook when you sear them after the oven, so those are best cooked using other methods.
- Seasoning – I used and highly recommend my Montreal steak seasoning (with salt included), shown below. The flavor is amazing! But you can also simply use sea salt (or kosher salt) and black pepper.
- Avocado Oil – For searing. Any heat-safe oil will work.
- Butter & Garlic – These are optional, but I add butter and whole peeled garlic cloves to the pan halfway through searing for loads of flavor. Avoid minced garlic, as it will burn!
How To Reverse Sear Steak
I have step-by-step photos here to help you visualize the recipe. For full instructions with amounts and temperatures, see the recipe card.
Season
Pat the steaks dry with paper towels, then season generously with the seasoning on all sides (top, bottom, and edges). I gently rub it in, so that it sticks well, and roll the edges in any spices that falls off.
Optional part: Place the steaks on top of an oven-safe wire rack fitted over a rimmed baking sheet, and refrigerate overnight, uncovered. (You can do this for up to 24 hours.) I highly recommend this step! It dries out the surface of the steak, giving you an even better sear later.
When you’re ready to cook, set the pan out on the counter to bring the steak to room temperature. This will ensure the most even cooking.

Slow Roast
Bake the steaks (on the rack with baking sheet) in the oven, low and slow at 200 degrees F. See my time and temperature chart below to nail the timing on this.
The steaks will not look very different from before after this step (just less bright red), but the magic happens in the next step!

Sear
Heat the oil in a large cast iron pan over medium-high heat, until it’s screaming hot and just barely starting to smoke. For the reverse sear, add the steaks in a single layer and cook until a browned crust forms on the bottom.
Right before flipping, add the butter and whole, peeled cloves of garlic into the pan. Use a large spoon to baste the butter over the steak. Flip and cook until browned on the other side.

Reverse Sear Steak Time Chart
The key is to get the timing right! This will vary based on size and thickness of your steak, as well as your oven. I highly recommend a probe thermometer (I love this one that beeps instantly when it hits the right temperature) to make this hands-off, but a regular meat thermometer will work.
Follow my reverse sear steak temp and time chart as a guide. This is for 1.5 to 2 inch steaks:
| Steak Doneness | Reach This Temp In The Oven | Time In The Oven | Final Temp After Searing |
|---|---|---|---|
| Rare | 110 degrees F | 35-45 minutes | 120-125 degrees F |
| Medium Rare | 120 degrees F | 45-55 minutes | 130-135 degrees F |
| Medium | 130 degrees F | 55-65 minutes | 140-145 degrees F |
| Medium Well | 140 degrees F | 65-75 minutes | 150-155 degrees F |
| Well Done | 150 degrees F | 75-85 minutes | 160-165 degrees F |
Note: The temperature will rise another 10-15 degrees while searing, bringing the steak to its final temperature. Be sure to remove it right away to avoid overcooking!

My Recipe Tips
- Use enough salt. It makes a big difference in flavor! My rule of thumb is 1 teaspoon of salt per pound of beef. When I use my steak seasoning, I need 1 tablespoon per pound to reach that amount.
- Do you have to use a rack for reverse sear steak? You could just use a lined baking sheet, but a rack will give you the most evenly cooked results because it creates air flow. I have and love this wire rack with sheet pan. (I also use this setup for cooking bacon in the oven and bacon wrapped asparagus.)
- Do you have to use cast iron? No, but at least choose a heavy skillet for the best sear. I love my cast iron skillet (have it in multiple colors), because it gets really hot during the searing part and the heat is evenly spread out through the pan.
- Sear in batches if needed. If your steaks are large, cook in two batches to avoid crowding. Set aside half of the butter and garlic for basting the second batch and wipe out the pan in between batches.
- After flipping, use tongs to hold the edges against the pan to sear the sides one at a time. Lift the steak, then hold each edge against the pan. Place back down and repeat with the other steaks. Work quickly, so that they don’t overcook!
- This is the one and only time you don’t have to rest your steak. You know I always recommend resting, but this method is the rare exception. Enjoy right away!
- Can you reverse sear steak on the grill? Yes, I’ve done this on a gas grill. Set the temperature to 200 degrees F and grill over indirect heat instead of using the oven. Then, turn up the heat to the max and sear on both sides over direct heat. You’d have to skip the garlic butter for this method, but you can serve it with my compound butter afterward.
Making Ahead & Reheating
Let’s be real, reverse sear steak is time-consuming and you’re probably using an expensive cut, so make it fresh if you can. But if you manage to have leftovers, you can store them in the fridge for up to 3-5 days. Or freeze them for up to 3 months if you really want to.
Make Ahead:
I was really excited when I discovered this! You can slow roast the steaks 1-2 days before and keep them in an airtight container in the fridge.
When ready to eat, let them come to room temp on the counter again and then sear. They are not as good as fresh, but close!
Best Way To Reheat:
If you need to reheat your steak after it’s already seared, I’ve found that a method works exceptionally well! I use it for all my steaks now when I need to:
- Preheat the oven to a low temperature, 250 or 300 degrees F.
- Place the steaks in a baking dish and add a little broth to the bottom. (This will create steam to keep moisture in.) Seal the top with foil.
- Heat in the oven for about 10-15 minutes, until warm.
- Alternatively, if you really want to keep that crust, wrap the steaks in foil and place directly on the oven grates to reheat. (I don’t recommend a baking dish, as it’s more prone to overcooking.)
Serving Ideas
Now that you know how to reverse sear a steak, serve up this classic meal with some of my classic side dishes. Here are a few of my favorites to pair with it:
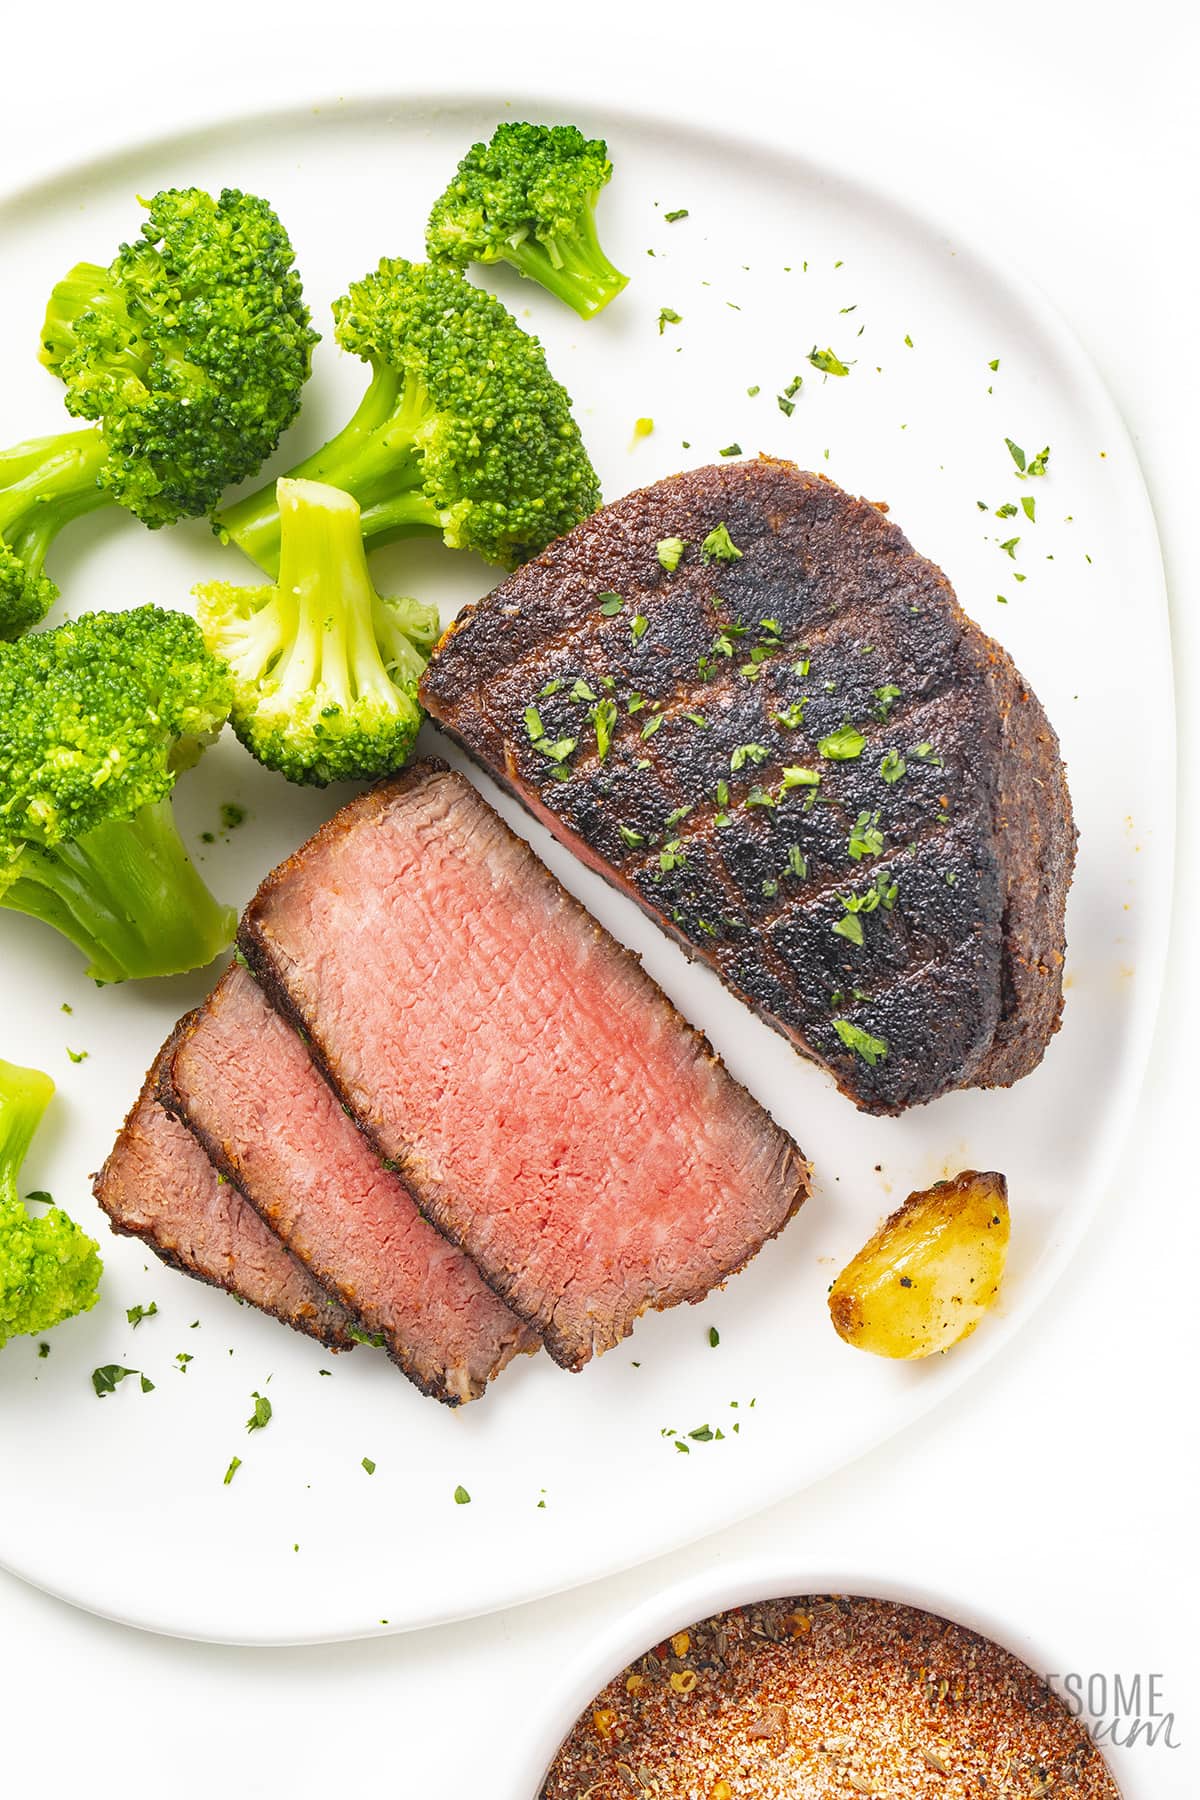
- Veggies – I like to serve my reverse sear filet mignon with steakhouse sides, such as creamed spinach, Instant Pot steamed broccoli (pictured above), roasted asparagus, or roasted brussels sprouts. You can also opt for sauteed zucchini or mixed roasted vegetables.
- Potatoes – For a hearty side, try my oven roasted potatoes, mashed sweet potatoes, or for a healthier option, mashed cauliflower.
- Toppings – Don’t forget the buttery garlic from the pan! You don’t really need anything else, but you can add sauteed mushrooms or even chimichurri sauce if you like.
- Surf And Turf – If you really want to get fancy, serve your reverse sear steak with one of my recipes for lobster tail, crab legs, or shrimp.
Reverse Sear Steak (Perfect Every Time)
Let me show you how to reverse sear a steak perfectly! My reverse sear steak with garlic butter has a juicy, tender center and crispy crust.
Ingredients
Tap underlined ingredients to see the ones I use.
Reverse sear steak:
Instructions
Tap on the times in the instructions to start a kitchen timer.
Dry Brine:
-
Pat the steaks dry with paper towels.
-
Season the steaks generously with steak seasoning on all sides (top, bottom and edges), using a total of 1/2 tablespoon per 8-ounce steak. Gently rub the seasoning into the steaks, so that it sticks well. Roll the edges in any seasoning that falls off.
Optional Drying Step (recommended):
-
Fit an oven-safe wire rack over a baking sheet. Arrange the steaks on top. Place the rack with the steaks, uncovered, into the refrigerator overnight, or up to 24 hours, to dry out the surface of the steak. (This helps get a great sear later.)
-
When you are ready to cook the steak, set the pan out on the counter for 30 minutes to bring it to room temperature.
Slow Roast:
-
Preheat the oven to 200 degrees F (93 degrees C).
-
Place the steaks (with baking rack and baking sheet) into the oven. Roast until the steak reaches your desired temperature:
* 110 degrees for Rare – about 35-45 minutes
* 120 degrees for Medium Rare – about 45-55 minutes
* 130 degrees for Medium – about 55-65 minutes
* 140 degrees for Medium Well – about 65-75 minutes
* 150 degrees for Well Done – about 75-85 minutes
(Note: These are NOT final temperatures, just the temperature that the steaks need to reach in the oven! The temperature will rise an additional 10-15 degrees when searing later.)
-
Use an instant read thermometer, or even better a probe thermometer, to check the internal temperature starting at 25 minutes and every 5-10 minutes after that, until the intended temperature is reached. Once the steaks reach the temperature you want, remove them from the oven immediately and set aside.
Sear:
-
Heat 1 tablespoon (14.8 ml) of oil in a large cast iron skillet over medium-high heat for about 2 minutes, until it’s so screaming hot that it just barely starts to smoke.
-
Add the steaks to the skillet in a single layer. (If your steaks are large, you can do this in two batches.) Cook for 1-2 minutes, until a browned crust forms on the bottom.
If using the optional butter and garlic, add them right before flipping, placing the garlic cloves directly into the butter as it starts to melt. (If cooking steaks in batches, use half the butter and garlic for each of the two batches.)
Allow the garlic to sizzle in the butter and use a large spoon to baste the butter over the steak occasionally while finishing off the sear on the other side. (You can tilt the pan to help gather the butter for basting, keeping the garlic in the butter.)
-
Flip once and cook for 1-2 minutes again, until browned on the other side.
While browning the second side, use tongs to hold the steaks’ sides against the pan to sear the edges one at a time (the other steaks will sear on the 2nd side while you sear the sides of one steak).
-
If working in batches, remove the finished steaks from the pan and cover to keep warm (or serve right away). Wipe down the pan, and reheat with additional oil.
Repeat the searing steps above with the remaining butter and garlic, if using.
-
Serve immediately (no need to rest!). Slice against the grain.
LAST STEP: Leave a rating to help other readers, or tag me @wholesomeyum on Instagram. I’d love to hear from you!
Maya’s Recipe Notes
Serving size: 1 8-ounce steak
I calculated the nutrition info using filet mignon, and did not include the garlic cloves, which are used for flavor and might not be eaten. You can eat them if you like, though!
I provide nutrition facts as a courtesy. Have questions about calculations or why you got a different result? Please see my nutrition policy.
Add Your Notes Your Notes
Try More Of My Recipes


© Copyright Maya Krampf for Wholesome Yum. Please DO NOT SCREENSHOT OR COPY/PASTE recipes to social media or websites. We’d LOVE for you to share a link with photo instead.
How To Reverse Sear A Steak


14 Comments
Colleen
1Made this yesterday- perfect medium rare! I can now make steaks in my apartment.
DEBBRA
0Used your REVERSE SEAR recipe/directions how to do to make T Bone Steaks.
Super results in every way—juicey- tender- done perfectly at medium. My hubby said “better than Roadhouse and LONG Horn”. HOME RUN
I did tenderize and put in fridge with no cover- just Kosher salt and pepper and alittle Old Bay seasoning. Compound butter with garlic Super.
Wholesome Yum D
0I love to hear that, Debbra! I’m so glad the reverse sear method worked so well for you and what a compliment from your husband! Better than Roadhouse and LongHorn? Total home run indeed. 🙂
ahsan
0this is amazing dish
CC
0I would so love to do this recipe but living in an apartment with a smoke detector directly over the kitchen will definitely have everybody running for the door and calling the Fire Department! But it looks so good!
Maya | Wholesome Yum
0You should still be able to make this! Make sure you turn on your stovetop fan when searing. If you’re still concerned about it, you can skip the garlic butter part.
Theresa
0Can I bake the steak to the desired temperature and then wait a couple of hours before searing it? I’d like it as a quick meal after a couple of hours at the beach.
Maya | Wholesome Yum
0Hi Theresa, Yes, you can! Just refrigerate them after the oven step, then bring them to room temperature again before you sear them on the stovetop. It’s not quite as good as fresh, but pretty close.
Natasha
0I made this recipe and it turned out amazing! It was evenly pink inside, so tender and delicious!
Kristyn
0This makes for the perfect date night in meal! It’s juicy, tender, & delicious!!
Toni
0This recipe is so perfect and really easy to follow! Thank you! I will definitely recommend this recipe to my friends!
Lisa
0Looks awesome!
Justine
0I have heard this is the best way to cook a steak, but wasn’t sure exactly how to do it.
Nellie Tracy
0Great method! So delicious!!