 Shop
Shop My
My Custom


FREE 5-Ingredient Recipe EBook
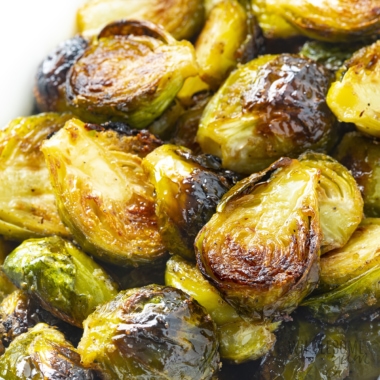
GET IT NOWThese Smashed Brussels Sprouts Are My Veggie Spin On Smashed Potatoes

These smashed brussels sprouts are super crispy and cheesy, and honestly, just fun to smash. I created them as a lighter spin on cheesy smashed potatoes, and while they don’t actually taste like those, here’s why they’re incredible in their own way:
- Crispy outside, tender inside – Smashing before roasting means more surface area touches the pan, so compared to classic roasted brussels sprouts, you get more of those crispy parts. A.k.a. the best parts!
- Savory, cheesy flavor – I think cheese makes any vegetable better, including earthy brussels sprouts. The inside of these is a little sweet, and the outside is salty and cheesy. Plus, the cheese itself gets browned and crisp.
- Easy and healthy – You need just 5 common ingredients, plus salt. My process for making smashed brussels sprouts is a little similar to smashing potatoes, but you get a helping of greens instead. Best of both worlds.
I’ve been making sprouts like this for years, but recently made some tweaks (mainly the timing, flipping, and amount of parmesan) to make it even better. I also put it in my Healthy Holiday Cookbook, as my whole family loves it for holidays.
Whether it’s an everyday fall weeknight or a holiday meal, I highly recommend adding this smashed brussels sprouts recipe to your menu. Make it with me!


Reader Review
“I never had luck with roasting the perfect brussels sprouts, until I came to your recipe! This time, I followed the instructions and cooked them stove top as you described. I loved that they turned out so crispy and so crunchy. Add a little hot sauce on mine to make it extra spicy. They were beyond delicious. Will be making them again.” –Katie
⭐⭐⭐⭐⭐
Ingredients & Substitutions
Here I explain the best ingredients for my smashed brussels sprouts recipe, what each one does, and substitution options. For measurements, see the recipe card.
- Brussels Sprouts – I recommend fresh brussels sprouts for this recipe. Although I’ve made it using frozen brussels sprouts, they turned out more mushy inside and less crispy on the outside. Look for sprouts that are similar in size for even cooking.
- Oil – I like the flavor of olive oil here, but avocado oil works, too.
- Parmesan Cheese – I started making these smashed brussels sprouts with finely shredded parmesan, but now I find that grated parm like this sticks to them better. And since it’s a fine powder, it leaves a crispier coating that reminds me of breadcrumbs! If you’re not gluten-free, feel free to toss some actual breadcrumbs into the mix with the cheese.
- Seasonings – I use sea salt for both boiling and roasting, plus garlic powder (don’t use fresh garlic cloves, they’ll burn!) and a pinch of cayenne pepper for a little kick. You can swap in black pepper for milder heat.

How To Make Smashed Brussels Sprouts
I have step-by-step photos here to help you visualize the recipe. For full instructions with amounts and temperatures, see the recipe card.
- Boil the sprouts. Add them to a large pot of water with salt (I use my Dutch oven), and boil until bright green and tender, but not fully cooked. (See my tips below.) Run cold water over the sprouts to stop the cooking process, then drain in a colander and pat dry with paper towels.
- Toss with seasonings. In a large bowl, drizzle brussels sprouts with olive oil, and sprinkle with garlic powder, parmesan, sea salt, and cayenne pepper. Toss to coat.


- Smash brussels sprouts flat. Brush a large sheet pan with more oil or spray with cooking spray. Arrange the sprouts in a single layer and smash them with the bottom of a mason jar or glass.
- Sprinkle on more parmesan. This is optional, but I always do!
- Roast until crispy. Place smashed brussels sprouts in the oven and roast until they are crispy and golden brown. Flip halfway through — I used to not, but now I find they brown more evenly if I do!


My Tips For Crispy Results
- Don’t boil the sprouts too long. You want them just soft enough to smash, but still with a little bite, otherwise the end result will turn out mushy. How long this takes can vary depending on the size of your sprouts. I check that they’re ready by inserting a sharp knife into one of the sprouts — it should go in with just a little resistance.
- Don’t rely on the color to know when you’re done boiling. The sprouts do turn bright green, but this happens before they get soft. Keep boiling until they pass my knife test (above).
- Want a shortcut? Grab steam-in-bag brussels sprouts! A reader asked me about this, so I had to try it. They work great as long as you only steam for about half the time on the bag. The entire time is too long, since we’re roasting them after!
- Make sure the sprouts are completely dry after boiling. Any lingering water can create steam and stop them from getting crispy.
- Adjust the salt to your taste. One reader told me these were too salty for her, but I’ve made them many times and think it’s just right. The parmesan is salty, so keep that in mind. If you’re concerned about it, you can add the salt last when adding the seasonings, start with less, and taste one sprout to see if you want more.
- Add the parmesan cheese after the other seasonings. I find it sticks better if I toss the sprouts with the oil and spices first. Then add the parm and toss again.
- Use either a foil-lined or unlined sheet pan. With my favorite non-stick baking sheet, I skip the foil entirely and it’s still easy to clean. Foil works, too, but sticks easily — just make sure to oil it well. Parchment paper reduces browning, so I wouldn’t recommend it.
- Make sure all your smashed brussels sprouts touch the sheet pan. If they’re too crowded or on top of each other, they’ll steam and won’t crisp up. I always start with the sprouts about 2 inches apart, since they spread after I smash them.
- Watch the oven time. How long it takes can vary depending on so many factors: the size of your sprouts, your oven, your pan, and how dark you like the sprouts. (I like mine pretty browned and extra crispy, but you can reduce the roasting time by 5-10 minutes if you like yours less dark.) Check on them to avoid burning the cheese!
- Want a similar flavor without the smashing effort? I think it’s fun, but you can try my parmesan brussels sprouts without that step.
Smashed Brussels Sprouts (Crispy & Easy)
My crispy smashed brussels sprouts have a cheesy, golden outside and tender inside. An easy, healthy side dish with 5 simple ingredients!
Instructions
Tap on the times in the instructions to start a kitchen timer.
-
Preheat the oven to 425 degrees F (218 degrees C).
-
Boil a large pot of boiling water with 2 teaspoons of sea salt. Carefully add the brussels sprouts, return to a boil, and boil for 8-10 minutes, until tender (soft enough to insert a knife or fork). Run the sprouts under cold water or plunge into an ice bath to prevent overcooking. Drain and pat dry with a paper towel.
-
In a large bowl, toss the brussels sprouts together with the olive oil, garlic powder, remaining 1/2 teaspoon of sea salt, and cayenne pepper. Add 5 tablespoons (about 1/3 cup) of the parmesan cheese (if using) and toss again.
-
Spray a large baking sheet with cooking spray or brush with oil. Arrange the sprouts in a single layer, with about 1.5-2 inches of space between them.
-
Using the bottom of a glass or mason jar, push down on the sprouts to smash them flat. Sprinkle the remaining 3 tablespoons of grated parmesan cheese on top (optional).
-
Roast smashed brussels sprouts for 25-30 minutes, flipping halfway through, until golden and crispy on both sides.
LAST STEP: Leave a rating to help other readers, or tag me @wholesomeyum on Instagram. I’d love to hear from you!
Maya’s Recipe Notes
Serving size: 1 cup
- Tips: Check out my recipe tips above to help you get consistent, crispy results and make smashing easier.
- Flavor variations: Check out my flavor variations for ways I’ve made these with lemon, balsamic, bacon, or honey. All so good.
- Storage: Keep leftovers in an airtight container in the refrigerator for up to 3-4 days. They do get more mushy, but I still enjoy them.
- Meal prep: You can boil the brussels sprouts, smash them, and toss them with the seasonings a day ahead. Just store them in the fridge and roast when you’re ready to eat. This tastes much better than reheating the roasted ones!
- Reheat: I like to pop the smashed brussels sprouts in my air fryer at 320 degrees F — this lower temperature with air flow is the best way to crisp them up again without burning the cheese. But you can also place them in the oven at 350 degrees F, or lightly pan fry.
- Freeze: You can freeze these, but they’ll be a lot more mushy after thawing. If you still want to, they’ll last up to 3 months in the freezer.
📖 Want more recipes like this? Find this one and many more in my Healthy Ebook Bundle!
I provide nutrition facts as a courtesy. Have questions about calculations or why you got a different result? Please see my nutrition policy.
Add Your Notes Your Notes
Try More Of My Recipes


© Copyright Maya Krampf for Wholesome Yum. Please DO NOT SCREENSHOT OR COPY/PASTE recipes to social media or websites. We’d LOVE for you to share a link with photo instead.
Smashed Brussels Sprouts
Flavor Variations
My smashed brussels sprouts recipe has a garlic parmesan flavor, which I love most. If you want to change it up, here are a few variations I’ve made:
- Lemon – For a little zing, add a tablespoon of lemon juice or a teaspoon of lemon zest with the seasonings.
- Balsamic – Add 1-2 tablespoons of balsamic vinegar together with the oil. These are like my balsamic brussels sprouts, except smashed and made with parmesan.
- Bacon – I love brussels sprouts and bacon together! Chop up some raw bacon and toss it onto the sheet pan before roasting the smashed brussels sprouts.
- Honey – Another reader suggestion, you guys are the best! Add 1-2 tablespoons of honey (or my natural sugar-free honey) with the seasonings for a mix of sweet and savory. I recommend roasting for a bit less time with this version, as the honey will make for faster browning.

Ways I Serve These
Serve these crispy smashed brussels sprouts with a main protein, and you’re good to go! Here are my favorite options to plate with them:
- Chicken – I like to bake chicken legs or even half a chicken together with the sprouts, or pan sear chicken breast while they’re roasting. If you add lemon juice like my variation above, my creamy lemon chicken pairs nicely.
- Beef & Pork – My smashed brussels sprouts recipe is the perfect side with NY strip, pan seared pork chops, air fryer filet mignon, or pork tenderloin. It makes my dinner feel even fancier!
- Seafood – For a lighter weeknight meal, whip up my pan seared salmon, baked cod, or shrimp scampi.
- Dipping Sauce – These are already flavorful on their own, but I’ve also enjoyed them dunked in garlicky aioli or drizzled with lemon butter sauce.


107 Comments
Janet Sorensen
0Can this recipe be prepared the day before? I would like to do everything except roast them ahead of time.
Maya | Wholesome Yum
0Hi Janet, Yes, you can do that!
Susan
0This is another recipe I was really looking forward to, but that didn’t work well for me. It started with the parmesan sticking to my bowl rather than the sprouts. Unfortunately, I planned to do this with your bacon wrapped chicken tenders, which needed a hotter oven. I cooked them for less time because of the extra heat, but the parmesan did not do well during the baking process – it ended up somewhat burnt. Not a lot, but enough to make it taste bitter. I reduced the amount of garlic powder by half, and it was plenty. I’m not sure I want to make these again, because it seems like even with the correct oven temperature, cooking them longer would still result in the parmesan having a burnt flavor. Maybe it’s just my taste buds…
Maya | Wholesome Yum
0Hi Susan, I recommend trying to make them at the correct temperature, which should allow them to bake without burning. If the parmesan sticks to the bowl, you can just sprinkle any that’s left over the sprouts before roasting. You could also toss with oil and seasonings first and add the parmesan last, or use grated parmesan which will stick less.
Jessica
0Hi! I have a question about step 2, do you add the brussels to cold water and then bring to a boil for 10 mins? Or boil the water first and then add brussels and boil for 10 mins?
Thanks!
Wholesome Yum D
0Hi Jessica, Bring the water to a boil first and then add the brussels.
Noel
0Lovely snack.
Peter
0Is it possible to use the steam-in-bag brussels sprouts for this? Would be really convenient if we could get a package from Aldi and use that as the starter. (I’ll give it a try, but curious if anyone has already tried it.)
Maya | Wholesome Yum
0Hi Peter, Thank you for the suggestion, this is a great idea! Just don’t steam them for the full amount of time on the bag. You want them to be a little underdone because they will go in the oven afterward.
Glenda
0Vegetables never tasted so good! I love how simple the recipe is to prepare and the flavor is delicious.
Amy L Huntley
0The crispy outside and tender inside is perfection! So much flavor too. One of my very favorite veggies!
Renate
0My husband doesn’t like many vegetables this is one of it, after I served him this recipe he liked it so much I promised him to make it real soon again.
Also great snacks when having friends over.
Raquel
0Such a great recipe and so simple! Will be making these again for our holiday dinner.
Bev
0This recipe missed the mark for us. Cooking times were way long yielding mushy and burnt sprouts. Another reviewer mentioned burnt parmesean but I chose not to include the cheese for dietary reasons.
Maya | Wholesome Yum
0Sorry to hear that, Bev! It’s likely that your sprouts were smaller than mine, so that would cause them to cook more quickly. You can adjust the cook times based on the other doneness indicators listed in the recipe next time.
Andrea
0Brussel Sprouts are my FAVORITE vegetable and with this recipe, I have found a great new way to make them! Love this!
Kristyn
0These are seriously the best!! I love how crispy they are & the little kick from the cayenne adds great flavor!
Ashley
0These are delicious and such a fun way to do Brussels sprouts!
Robin Donovan
0Great recipe. I’ll never make Brussels sprouts any other way again!
Taylor
0These have the absolute best flavor and texture! If you’re a fan of regular roasted brussels sprouts, you are going to love this version!
Doris Layhe
0Even my son that doesn’t like Brussels loved these! Great recipe.