
 Shop
 My
 Custom




These Smashed Brussels Sprouts Are My Veggie Spin On Smashed Potatoes

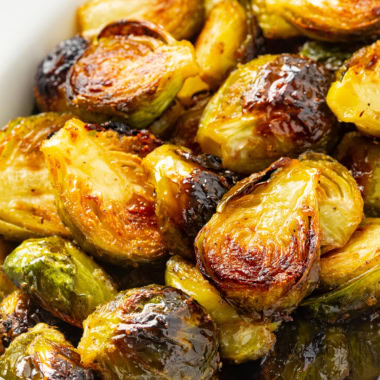
These smashed brussels sprouts are super crispy and cheesy, and honestly, just fun to smash. I created them as a lighter spin on cheesy smashed potatoes, and while they don’t actually taste like those, here’s why they’re incredible in their own way:
- Crispy outside, tender inside – Smashing before roasting means more surface area touches the pan, so compared to classic roasted brussels sprouts, you get more of those crispy parts. A.k.a. the best parts!
- Savory, cheesy flavor – I think cheese makes any vegetable better, including earthy brussels sprouts. The inside of these is a little sweet, and the outside is salty and cheesy. Plus, the cheese itself gets browned and crisp.
- Easy and healthy – You need just 5 common ingredients, plus salt. My process for making smashed brussels sprouts is a little similar to smashing potatoes, but you get a helping of greens instead. Best of both worlds.
I’ve been making sprouts like this for years, but recently made some tweaks (mainly the timing, flipping, and amount of parmesan) to make it even better. I also put it in my Healthy Holiday Cookbook, as my whole family loves it for holidays.
Whether it’s an everyday fall weeknight or a holiday meal, I highly recommend adding this smashed brussels sprouts recipe to your menu. Make it with me!


Reader Review
“I never had luck with roasting the perfect brussels sprouts, until I came to your recipe! This time, I followed the instructions and cooked them stove top as you described. I loved that they turned out so crispy and so crunchy. Add a little hot sauce on mine to make it extra spicy. They were beyond delicious. Will be making them again.” –Katie
⭐⭐⭐⭐⭐
Ingredients & Substitutions
Here I explain the best ingredients for my smashed brussels sprouts recipe, what each one does, and substitution options. For measurements, see the recipe card.
- Brussels Sprouts – I recommend fresh brussels sprouts for this recipe. Although I’ve made it using frozen brussels sprouts, they turned out more mushy inside and less crispy on the outside. Look for sprouts that are similar in size for even cooking.
- Oil – I like the flavor of olive oil here, but avocado oil works, too.
- Parmesan Cheese – I started making these smashed brussels sprouts with finely shredded parmesan, but now I find that grated parm like this sticks to them better. And since it’s a fine powder, it leaves a crispier coating that reminds me of breadcrumbs! If you’re not gluten-free, feel free to toss some actual breadcrumbs into the mix with the cheese.
- Seasonings – I use sea salt for both boiling and roasting, plus garlic powder (don’t use fresh garlic cloves, they’ll burn!) and a pinch of cayenne pepper for a little kick. You can swap in black pepper for milder heat.
FREE 5-Ingredient Recipe EBook
GET IT NOW
How To Make Smashed Brussels Sprouts
I have step-by-step photos here to help you visualize the recipe. For full instructions with amounts and temperatures, see the recipe card.
- Boil the sprouts. Add them to a large pot of water with salt (I use my Dutch oven), and boil until bright green and tender, but not fully cooked. (See my tips below.) Run cold water over the sprouts to stop the cooking process, then drain in a colander and pat dry with paper towels.
- Toss with seasonings. In a large bowl, drizzle brussels sprouts with olive oil, and sprinkle with garlic powder, parmesan, sea salt, and cayenne pepper. Toss to coat.


- Smash brussels sprouts flat. Brush a large sheet pan with more oil or spray with cooking spray. Arrange the sprouts in a single layer and smash them with the bottom of a mason jar or glass.
- Sprinkle on more parmesan. This is optional, but I always do!
- Roast until crispy. Place smashed brussels sprouts in the oven and roast until they are crispy and golden brown. Flip halfway through — I used to not, but now I find they brown more evenly if I do!



My Tips For Crispy Results
- Don’t boil the sprouts too long. You want them just soft enough to smash, but still with a little bite, otherwise the end result will turn out mushy. How long this takes can vary depending on the size of your sprouts. I check that they’re ready by inserting a sharp knife into one of the sprouts — it should go in with just a little resistance.
- Don’t rely on the color to know when you’re done boiling. The sprouts do turn bright green, but this happens before they get soft. Keep boiling until they pass my knife test (above).
- Want a shortcut? Grab steam-in-bag brussels sprouts! A reader asked me about this, so I had to try it. They work great as long as you only steam for about half the time on the bag. The entire time is too long, since we’re roasting them after!
- Make sure the sprouts are completely dry after boiling. Any lingering water can create steam and stop them from getting crispy.
- Adjust the salt to your taste. One reader told me these were too salty for her, but I’ve made them many times and think it’s just right. The parmesan is salty, so keep that in mind. If you’re concerned about it, you can add the salt last when adding the seasonings, start with less, and taste one sprout to see if you want more.
- Add the parmesan cheese after the other seasonings. I find it sticks better if I toss the sprouts with the oil and spices first. Then add the parm and toss again.
- Use either a foil-lined or unlined sheet pan. With my favorite non-stick baking sheet, I skip the foil entirely and it’s still easy to clean. Foil works, too, but sticks easily — just make sure to oil it well. Parchment paper reduces browning, so I wouldn’t recommend it.
- Make sure all your smashed brussels sprouts touch the sheet pan. If they’re too crowded or on top of each other, they’ll steam and won’t crisp up. I always start with the sprouts about 2 inches apart, since they spread after I smash them.
- Watch the oven time. How long it takes can vary depending on so many factors: the size of your sprouts, your oven, your pan, and how dark you like the sprouts. (I like mine pretty browned and extra crispy, but you can reduce the roasting time by 5-10 minutes if you like yours less dark.) Check on them to avoid burning the cheese!
- Want a similar flavor without the smashing effort? I think it’s fun, but you can try my parmesan brussels sprouts without that step.

Smashed Brussels Sprouts (Crispy & Easy)
 By
My crispy smashed brussels sprouts have a cheesy, golden outside and tender inside. An easy, healthy side dish with 5 simple ingredients!


Instructions
[ See step photos See my tips ]Tap on the times in the instructions to start a kitchen timer.
-
Preheat the oven to 425 degrees F (218 degrees C).
-
Boil a large pot of boiling water with 2 teaspoons of sea salt. Carefully add the brussels sprouts, return to a boil, and boil for 8-10 minutes, until tender (soft enough to insert a knife or fork). Run the sprouts under cold water or plunge into an ice bath to prevent overcooking. Drain and pat dry with a paper towel.
-
In a large bowl, toss the brussels sprouts together with the olive oil, garlic powder, remaining 1/2 teaspoon of sea salt, and cayenne pepper. Add 5 tablespoons (about 1/3 cup) of the parmesan cheese (if using) and toss again.
-
Spray a large baking sheet with cooking spray or brush with oil. Arrange the sprouts in a single layer, with about 1.5-2 inches of space between them.
-
Using the bottom of a glass or mason jar, push down on the sprouts to smash them flat. Sprinkle the remaining 3 tablespoons of grated parmesan cheese on top (optional).
-
Roast smashed brussels sprouts for 25-30 minutes, flipping halfway through, until golden and crispy on both sides.
Did you make it? Leave a review or tag me @wholesomeyum on Instagram!
Maya’s Recipe Notes
Serving size: 1 cup
- Tips: Check out my recipe tips above to help you get consistent, crispy results and make smashing easier.
- Flavor variations: Check out my flavor variations for ways I’ve made these with lemon, balsamic, bacon, or honey. All so good.
- Storage: Keep leftovers in an airtight container in the refrigerator for up to 3-4 days. They do get more mushy, but I still enjoy them.
- Meal prep: You can boil the brussels sprouts, smash them, and toss them with the seasonings a day ahead. Just store them in the fridge and roast when you’re ready to eat. This tastes much better than reheating the roasted ones!
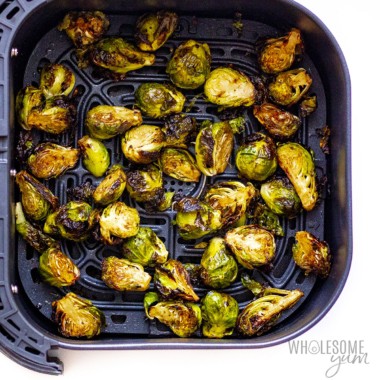
- Reheat: I like to pop the smashed brussels sprouts in my air fryer at 320 degrees F — this lower temperature with air flow is the best way to crisp them up again without burning the cheese. But you can also place them in the oven at 350 degrees F, or lightly pan fry.
- Freeze: You can freeze these, but they’ll be a lot more mushy after thawing. If you still want to, they’ll last up to 3 months in the freezer.
📖 Want more recipes like this? Find this one and many more in my Healthy Ebook Bundle!
I provide nutrition facts as a courtesy. Have questions about calculations or why you got a different result? Please see my nutrition policy.
Add Your Notes Your Notes
Try More Of My Recipes


© Copyright Maya Krampf for Wholesome Yum. Please DO NOT SCREENSHOT OR COPY/PASTE recipes to social media or websites. We’d LOVE for you to share a link with photo instead.
Smashed Brussels Sprouts
Flavor Variations
My smashed brussels sprouts recipe has a garlic parmesan flavor, which I love most. If you want to change it up, here are a few variations I’ve made:
- Lemon – For a little zing, add a tablespoon of lemon juice or a teaspoon of lemon zest with the seasonings.
- Balsamic – Add 1-2 tablespoons of balsamic vinegar together with the oil. These are like my balsamic brussels sprouts, except smashed and made with parmesan.
- Bacon – I love brussels sprouts and bacon together! Chop up some raw bacon and toss it onto the sheet pan before roasting the smashed brussels sprouts.
- Honey – Another reader suggestion, you guys are the best! Add 1-2 tablespoons of honey (or my natural sugar-free honey) with the seasonings for a mix of sweet and savory. I recommend roasting for a bit less time with this version, as the honey will make for faster browning.

Ways I Serve These
Serve these crispy smashed brussels sprouts with a main protein, and you’re good to go! Here are my favorite options to plate with them:
- Chicken – I like to bake chicken legs or even half a chicken together with the sprouts, or pan sear chicken breast while they’re roasting. If you add lemon juice like my variation above, my creamy lemon chicken pairs nicely.
- Beef & Pork – My smashed brussels sprouts recipe is the perfect side with NY strip, pan seared pork chops, air fryer filet mignon, or pork tenderloin. It makes my dinner feel even fancier!
- Seafood – For a lighter weeknight meal, whip up my pan seared salmon, baked cod, or shrimp scampi.
- Dipping Sauce – These are already flavorful on their own, but I’ve also enjoyed them dunked in garlicky aioli or drizzled with lemon butter sauce.
















109 Comments
annbrent88
0I just tried your recipe for smashed Brussel sprouts. It was tasty but sadly it didn’t turn out very well. I think I will try to make them again and change up a couple of things. 1-4 minutes less boiling time, ice bath at the ready (I messed it up). Crush sprouts flatter, although they were still firm they were too wet…. I dried them off gently with paper towel. And less sprouts per cookie sheet. These are all my own mistakes and not criticisms about your recipe or the effort you undertake to be able to confidently publish it on your site. I will try again another time…. they do taste VERY good. The cayenne was a nice touch. Thank you for all you hard work! I look forward to perusing your site for other great recipes. Many thanks, signed… not giving up… -Ann
Maya | Wholesome Yum
0Hi Ann, I’m sorry to hear you had issues with the recipe. The boiling time can vary depending on the size of the sprouts, but yes, you’ll want to have your ice bath ready. If you forget, run them under ice cold water under the sink. Also, make sure you dry them very well. I’m glad they still tasted good!
Bre
0Hi! Sound delicious. Can this be prepped the day before?
Maya | Wholesome Yum
0Hi Bre, Yes, but they will be more mushy than fresh. I have some meal prep suggestions above to do some parts ahead that will give you a better result.
Kim
0Should I use grated Parmesan cheese out of a can or should I use fresh?
Maya | Wholesome Yum
0Hi Kim, Either one will work!
Vane Hugo
0Could you make this up until the roasting point and freeze them in that state until you want to roast and serve at another time?
Maya | Wholesome Yum
0Hi Vane, Yes, you can. The texture just won’t be as good as fresh, it would be similar to using frozen brussels sprouts to begin with.
Joan
0This was so delicious! I didn’t have fresh sprouts so I used frozen and it worked out fine.
Mela
0I love this recipe! My output came out crispy on the edges and savory 🙂 simple ingredients yet a flavorful dish.
Martha
0This was a delicious recipe! I love simple seasonings on vegetables that bring so much flavor. Anything parmesan + garlic blend is a winner in my book. Going to make them again tonight for dinner since I bought a big bag of brussel sprouts from Costco!
Ann
0These brussles sprouts were delicious! I love how easy this recipe was but it still had a lot of flavor. Will make again!
Holly
0Can I use frozen brussel sprouts for this recipe?
Maya | Wholesome Yum
0Hi Holly, Yes, you can, but they’ll turn out more mushy than fresh ones.
Amy
0Loved these I cubed up some leftover ham and sprinkled on top. Amazing it was my lunch would be good with crumbled bacon also.
Cheryl
0Excellent side dish or alone
Thank you
Lorraine Donahue
0This may be partly due to the large size of my sprouts, but patting them dry did absolutely nothing. I had to squeeze them with all my might to get most of the water out. (cheesecloth might be better than paper towels.) But there was still too much water in them, so essentially the baking was really steaming. The outer leaves were crisp, but the insides were mushy.
Jaine
0I made these last year. They were fantastic!
Denise H.
0This recipe got my picky eaters (husband and kids) to enjoy a green veggie.
Jeff the Chef @ Make It Like a Man!
0I love these sprouts! They came out beautifully and I devoured them.
joanna mattman
0Can you make this ahead of time and reheat? Will it remain crispy? Thanks. Joanna
Maya | Wholesome Yum
0Hi Joanna, You can boil and smash the brussels sprouts ahead of time, but for best results I recommend roasting them fresh. You can still reheat leftovers later, but they are not as crispy as fresh ones.
Gail
0Love Brussel sprouts but very few in my family do. So it was nice to see the different ways you have to make them interesting and tasty. Can you use frozen in your recipes? The reason I ask is that I purchase fresh veggies when available, but can’t eat them all at once. We have small refrig so I some time freeze before the fresh veggies go bad. They don’t always cook up as well, sometime mushy. Wasn’t sure if that was due to freezing them. Should I cook frozen veggies differently after being frozen? Can hardly wait to make these tonight!
Maya | Wholesome Yum
0Hi Gail, Yes, frozen vegetables usually turn out more mushy when you cook them. You can use frozen brussels sprouts for my smashed brussels sprouts recipe if you like, though. I also have a recipe for roasting frozen brussels sprouts.
Carlie Lewis
0Can I deep fry instead of roast?
Maya | Wholesome Yum
0Hi Carlie, I haven’t tried that but you probably could.
Heather M Australia
0Marvelous! Gave to my 30yr old son who devoured them, & later told me he would not eat brussel sprouts! Ha, he couldn’t believe it when I said I told you that was what they were when you ate the whole tray! I’m about to try it again, with all the extra hints under my belt. Should be perfect this time! Hey, those folks who burnt them, folow the recipe & watch your oven. This recipe deserves honours! Brussel sprouts are known as the best of leafy green veges, but we all know it’s hard to get others to eat them.xx
Dianne
0I made these and absolutely loved them! My family loved them also! Thanks!
Liz
0Not edible. Incomplete recipe. 3rd time trying to give an honest review and they keep getting deleted.
Maya | Wholesome Yum
0Hi Liz, Sorry to hear you had issues with the recipe. I’m not sure what you mean by “incomplete recipe” though – the full recipe is on the recipe card above. I’d be happy to help you troubleshoot if you can provide more detail about where you had trouble or what didn’t turn out.
Liz
0The fact that I’ve left FIVE reviews that disappeared while “waiting for moderation” says you do delete reviews. This makes it seem like you’re doing this to bolster your reviews.
You don’t say to boil the water then add the sprouts. You say that only in a comment below (if people are asking you that should be a clue your recipe is incomplete). Then you only say to line the pan in the blog post. No one should have to read your life story or 40 comments to get the full recipe. Not including all the steps in a recipe is wrong. Can you imagine if you had to read every page of a cookbook, including the reviews on the back, and the inside page about the chef just to put together a simple recipe? That would be silly. What you’ve done is the same. Then you censor reviews and deny it.
This is the second time I’ve posted this. Since you don’t agree with it you delete it. That is censorship. That is deleting an honest review.
Sarah berro
0Added the parmesan after boiling as the recipe suggested. It all burnt in the oven. I typically add parmesan in the last 3-5 minutes for this reason but gave these directions a go for some reason. They also were not crispy enough, which could be due to my oven and such. But I think boiling them for 10 minutes may be too long as they were quite mushy once out of the water. Will try again with those adjustments and see if it works.
Maya | Wholesome Yum
0Hi Sarah, Sorry to hear they didn’t turn out like you expected. It’s normal for the parmesan to darken and get crispy, but you can add it in the last few minutes if you prefer it more melty instead. The boiling time (as well as the roasting time) can vary depending on the size of your sprouts, so I recommend checking on them. I’ve added some tips to the post above that might help.
Maya | Wholesome Yum
0Liz, All our comments get moderated to avoid spam and profanity, so may take some time to approve. I don’t see any others pending from you, but we do limit star reviews to one per person as this represents the number of people that tried the recipe (one person spamming a recipe with multiple reviews is not helpful to anyone and our goal is to be helpful to all readers). Your 1-star review was published, and sorry to hear the recipe was unclear. Thanks for explaining what was confusing. I have updated the blog post to clarify for others, the brussels sprouts get added while boiling the water, not after. Thank you for bringing this to my attention.
Lydia Barber
1Please do not listen to her and read all the other comments. I cook all the time and I also know you have the option to click on Jump to Recipe. This is a great recipe and very easy to follow. 🙂
Carol L
0Liz IS right about the lining the pan. It is NOT in the recipe card. I feel like her, I don’t read the entire post. Mostly because of your format and the bright bold colored for so much of it. (in the recipe card as well, but not as much), but also because it does have too much ‘extra stuff’ that I don’t need (as Liz said) So I go only to the recipe card. Often it does not contain all the information. Not just your blog, others as well.
I am not being critical as Liz, but then, my comments weren’t deleted for whatever reason (your reason seems valid, but still).
So don’t bash me, I’m just saying that Liz’ criticism of the contents of the recipe card are correct. Some information in the post is NOT included in the recipe card.
Maya | Wholesome Yum
0Hi Carol, Lining the pan is not on the recipe card because it’s not required and I do not line mine, as shown in my pictures. I included a tip giving other options if that’s your preference, and sharing my experience with them. Including everything from my post on the recipe card would defeat the purpose of the conciseness of the recipe card. I’m sorry but if you choose not to read what I put a lot of time and effort into writing to ensure success, that is not on me. Also, to clarify, I did not delete any of Liz’s comments. All the ones I received from her are published above. She was upset that they were not moderated fast enough, as I have a family and other responsibilities of running this website, so it takes time to get to moderating them. Thank you for stopping by and I hope you get a chance to try the recipe, hopefully with my tips in mind for best results.