 Shop
Shop My
My Custom


FREE 5-Ingredient Recipe EBook
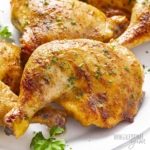
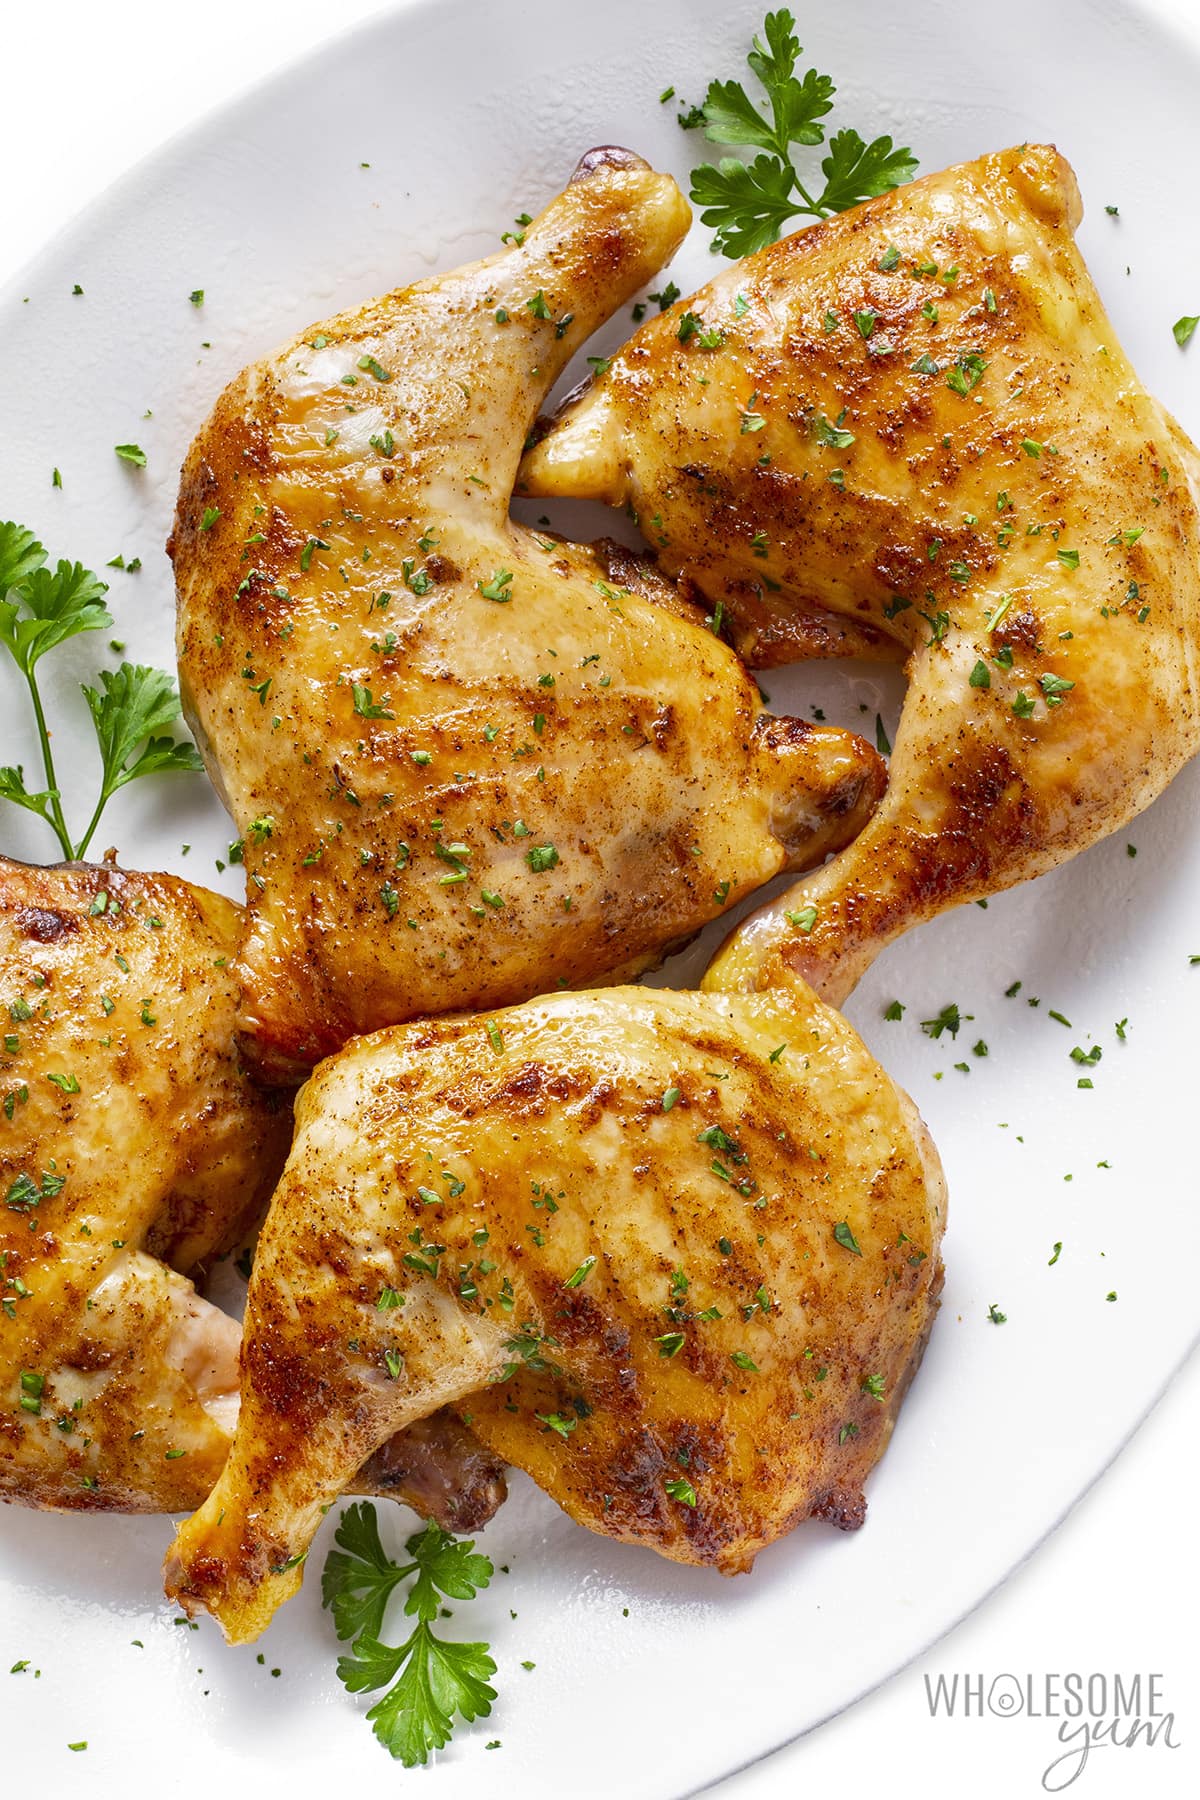
GET IT NOWMy Crispiest, Juiciest Baked Chicken Leg Quarters

I’ve been baking chicken drumsticks and chicken thighs for decades, but when I realized a few years ago that chicken leg quarters are a more cost-effective alternative for literally the same thing, I felt like I discovered a secret. (Now I just feel silly… am I the only one that didn’t know?!) I make these baked chicken leg quarters all the time now — here’s why:
- Juicy and tender with crispy skin – Golden and crispy outside, practically fall-off-the-bone juicy inside. It’s the best.
- Effortless flavor – Chicken leg quarters are entirely dark meat, which means loads of flavor! Don’t get me wrong, a healthy baked chicken breast can be juicy, but it can’t beat dark meat in the flavor department.
- Quick and easy – I season the chicken with pantry basics (chances are you have them on hand) and pop them in the oven. The prep takes just minutes!
- Cost effective – This cut of chicken is such a good value. Just like whole chicken wings are cheaper than ones that are cut, chicken quarters cost less than thighs and drumsticks separately.
Serve these chicken leg quarters with a healthy side dish and you’ve got a winner of a chicken dinner. Make them with me!

Ingredients & Substitutions
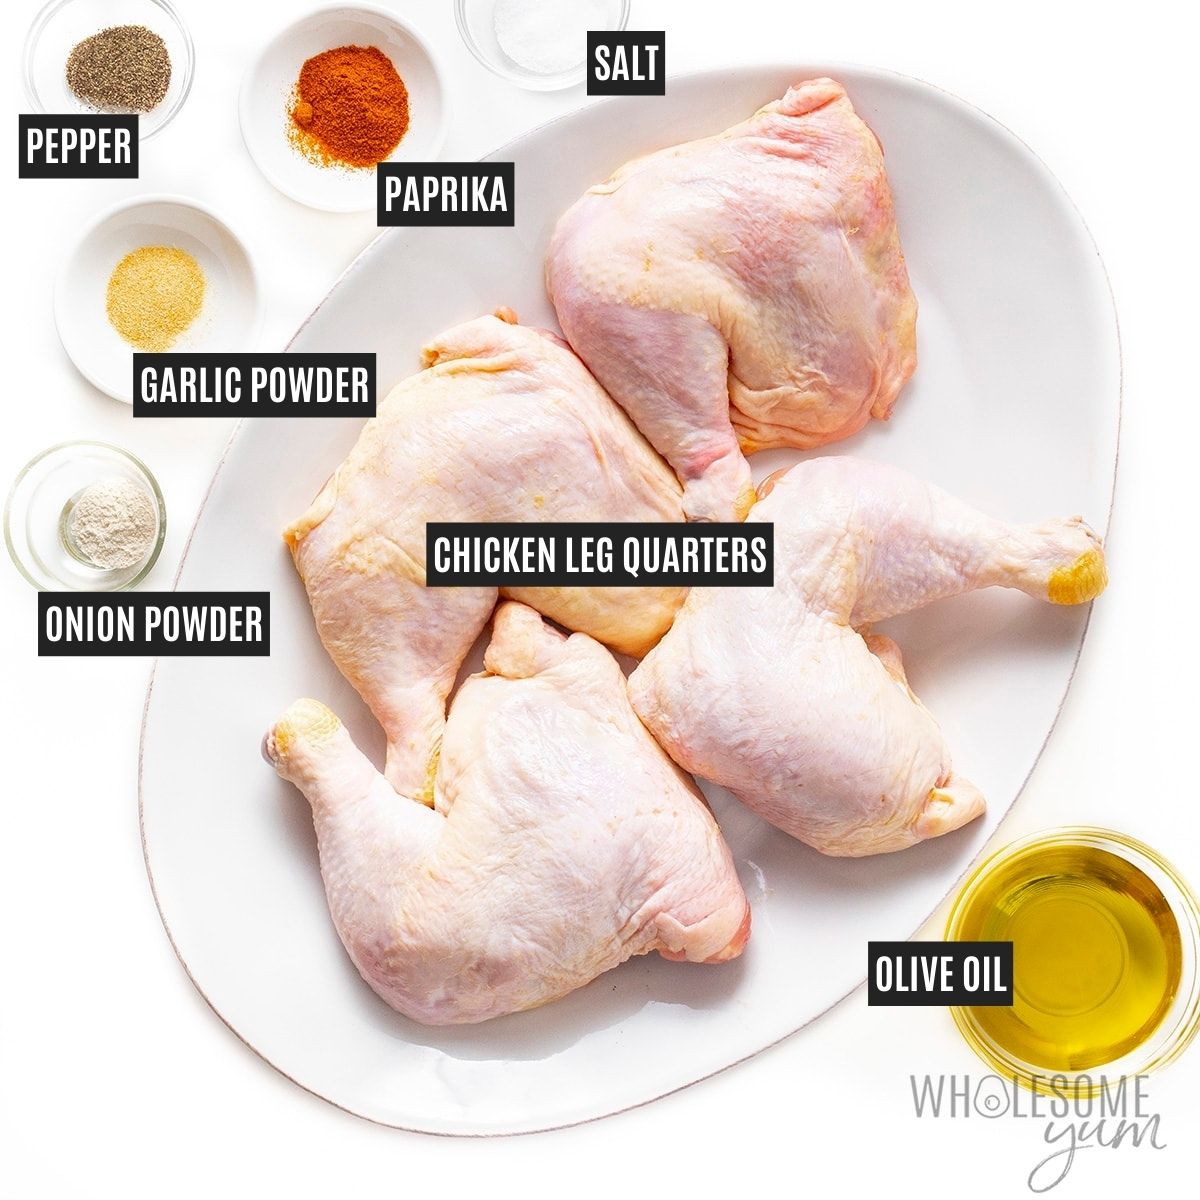
Here I explain the best ingredients for my crispy baked chicken leg quarters, what each one does in the recipe, and substitution options. For measurements, see the recipe card.
- Chicken Leg Quarters – Sometimes I see them called chicken quarters or chicken hindquarters at the grocery store. They are simply whole chicken legs (thighs and drumsticks) that also have a piece of the back attached.
- Olive Oil – Oil adds flavor, helps the seasonings stay on, and most importantly, gets the skin crispy. Any heat-safe oil works — sometimes I use avocado oil instead.
- Spices – You can season these with any spices you’d normally use for chicken. My go-to blend is paprika, garlic powder, onion powder, sea salt, and black pepper. If you like a kick, 1/4 teaspoon of cayenne pepper makes a nice addition. Or if you want some comforting flavor, use my homemade poultry seasoning.
How To Cook Chicken Leg Quarters
I have step-by-step photos here to help you visualize the recipe. For full instructions, including amounts and temperatures, see the recipe card.
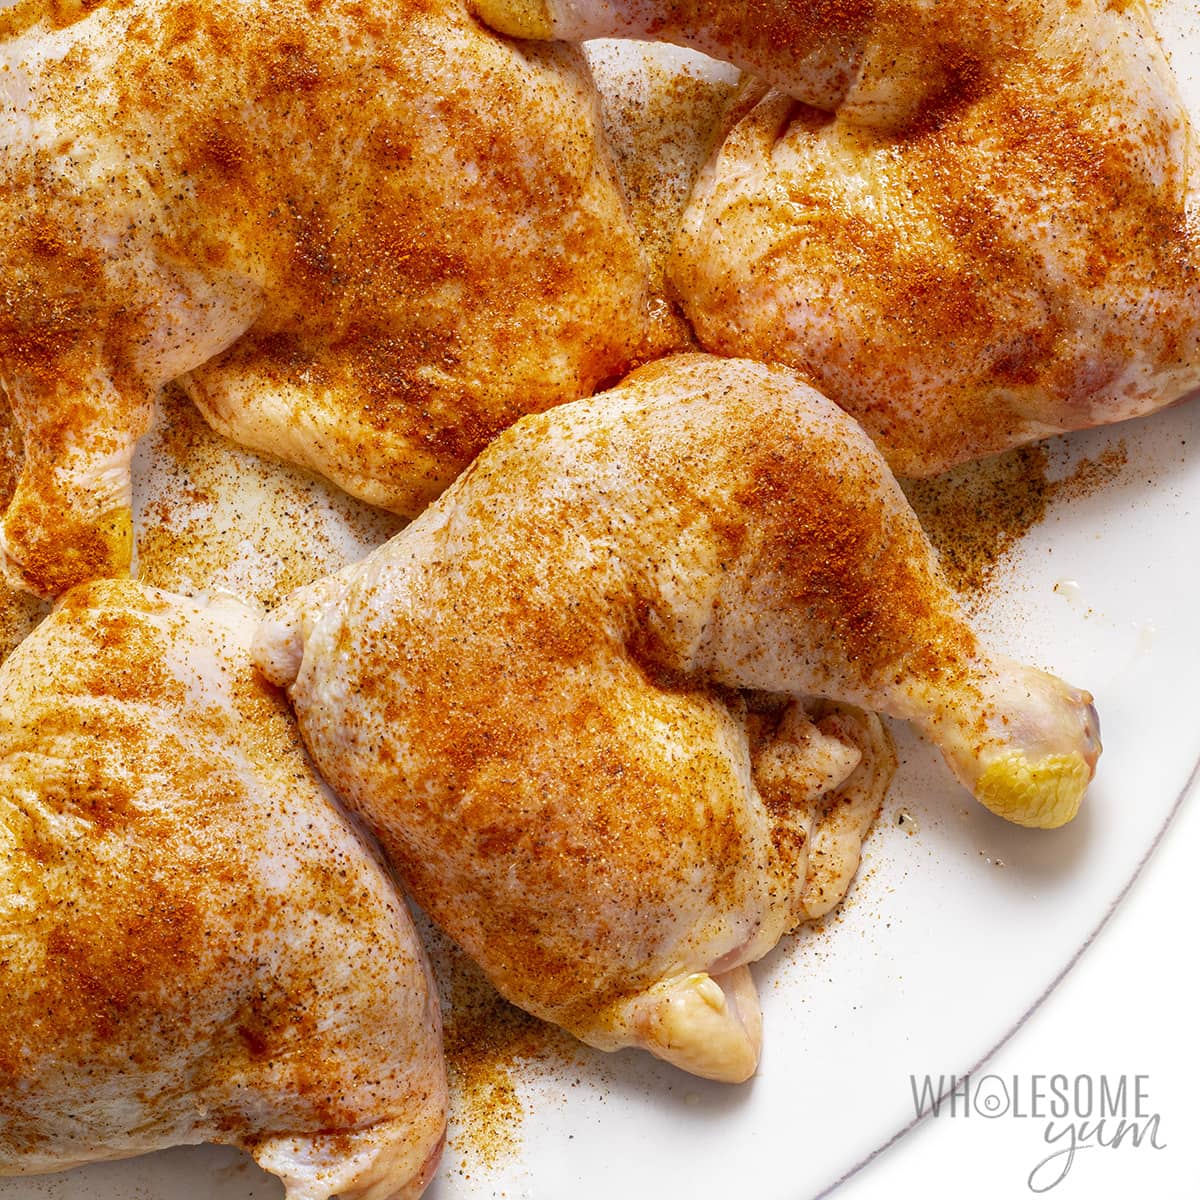
- Prep and dry. Preheat your oven. Pat the chicken dry with a paper towel to remove excess moisture. This allows the skin to get crispy later!
- Season. Brush the chicken with olive oil. Season with paprika, garlic powder, onion powder, salt, and pepper. Make sure to get both sides!
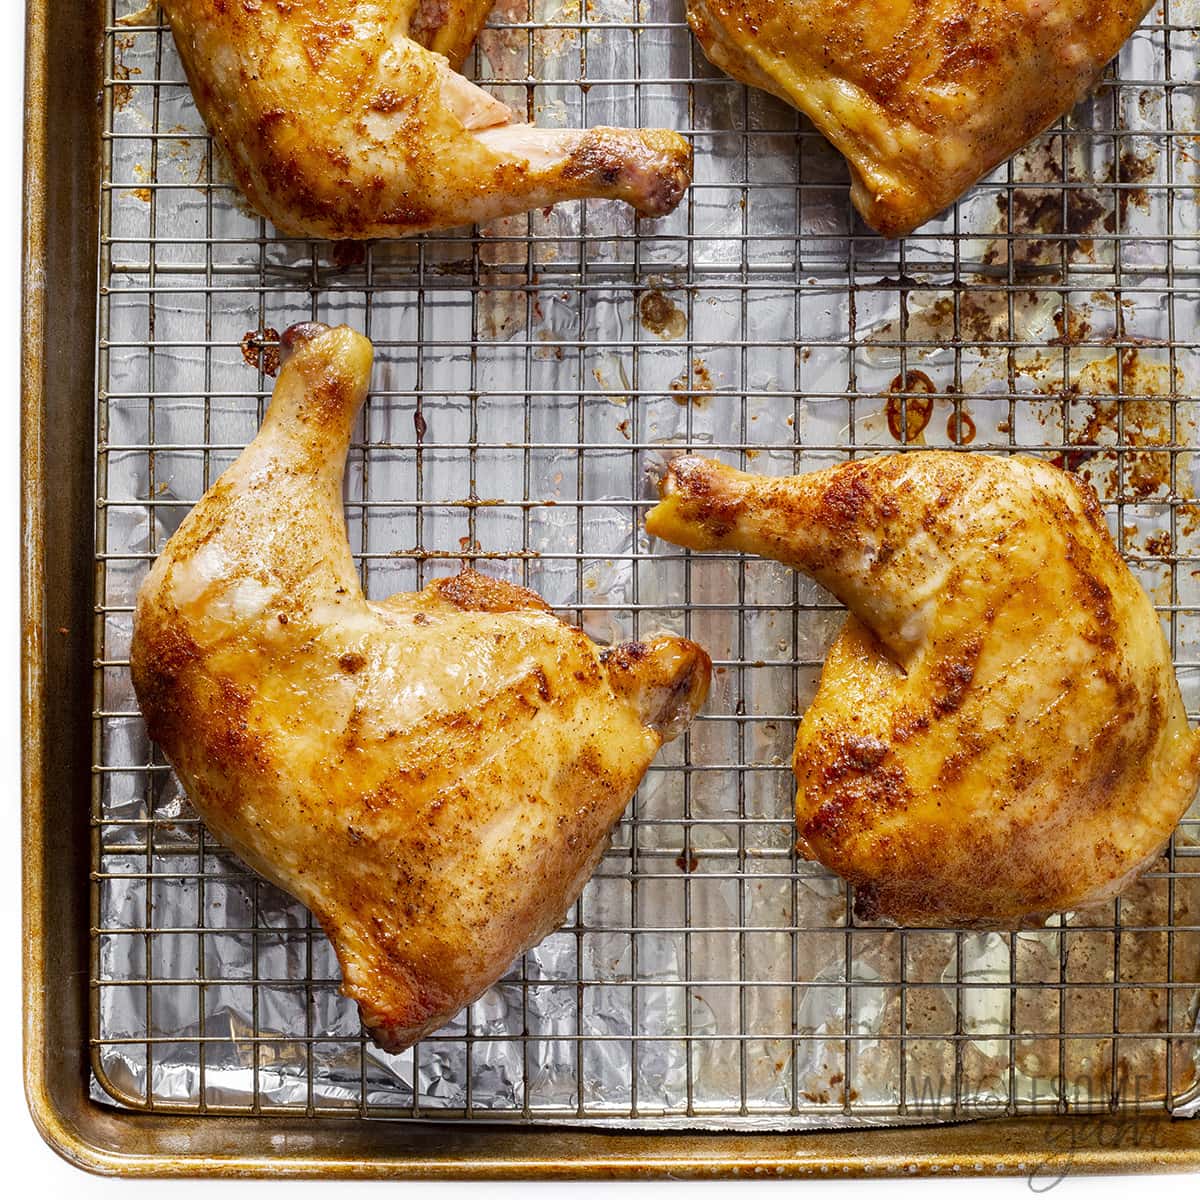
- Bake. Arrange the chicken on an oven-safe rack fitted over a baking sheet (I love this thing!), skin side down. Bake chicken leg quarters in the oven, flipping halfway through, until crispy and cooked through.
- Rest. Let the chicken rest for 5 minutes before serving. This helps the juices settle so that the chicken won’t be dry.
You can serve the chicken quarters whole, but they are very large. So, in my family we usually cut them apart (separate the thighs and drumsticks), and everyone chooses the cut they prefer.
My Recipe Tips
- You can pre-mix the spices. I find that it can save time to mix them in a small bowl and then season the chicken with the mixture all at once. The flip side is it’s one more dish to wash, so it depends on your needs.
- Want extra crispy skin? Mix a couple teaspoons of baking powder with the spices, like I do for my other baked chicken recipe.
- Baking on a rack isn’t a must, but improves results. I have this set and it allows air flow all around the chicken while baking. Translation: even cooking and crispier skin! But if all you have is a regular sheet sheet pan, that’s totally fine as long as it’s not crowded.
- Line the pan with aluminum foil (underneath the rack) if you like. Lining the pan is not required, but makes for easier cleanup.
- Bake skin-side-down first. It’s best to have the chicken leg quarters skin-side-up last, because this keeps the skin crispy. When I cooked them skin side down last, the skin was softer.
- Use a meat thermometer for perfect results. Cooking times can vary depending on the size of your chicken quarters. I like this instant-read thermometer, but actually use this probe thermometer the most because it beeps when ready and I don’t have to keep checking. It’s hard to overcook dark meat, so don’t stress if you don’t have a thermometer, but having one allows you to take advantage of my next tip…
- Cook to 170 degrees F for the juiciest results. Like all chicken recipes, baked chicken quarters are safe to eat once they reach 165 degrees F. However, because leg dark meat has more connective tissue than white meat, it will be more tender if you cook it to 170-175 degrees F. I always do this for dark meat and you’ll taste the difference!
- Broil if you need to crisp the skin more. I don’t usually need to, but you can place the chicken under the broiler for a few minutes at the end.
- Can you air fry them? Absolutely! I bake the chicken for this recipe, but if you want an even faster method, you can air fry chicken leg quarters, too.
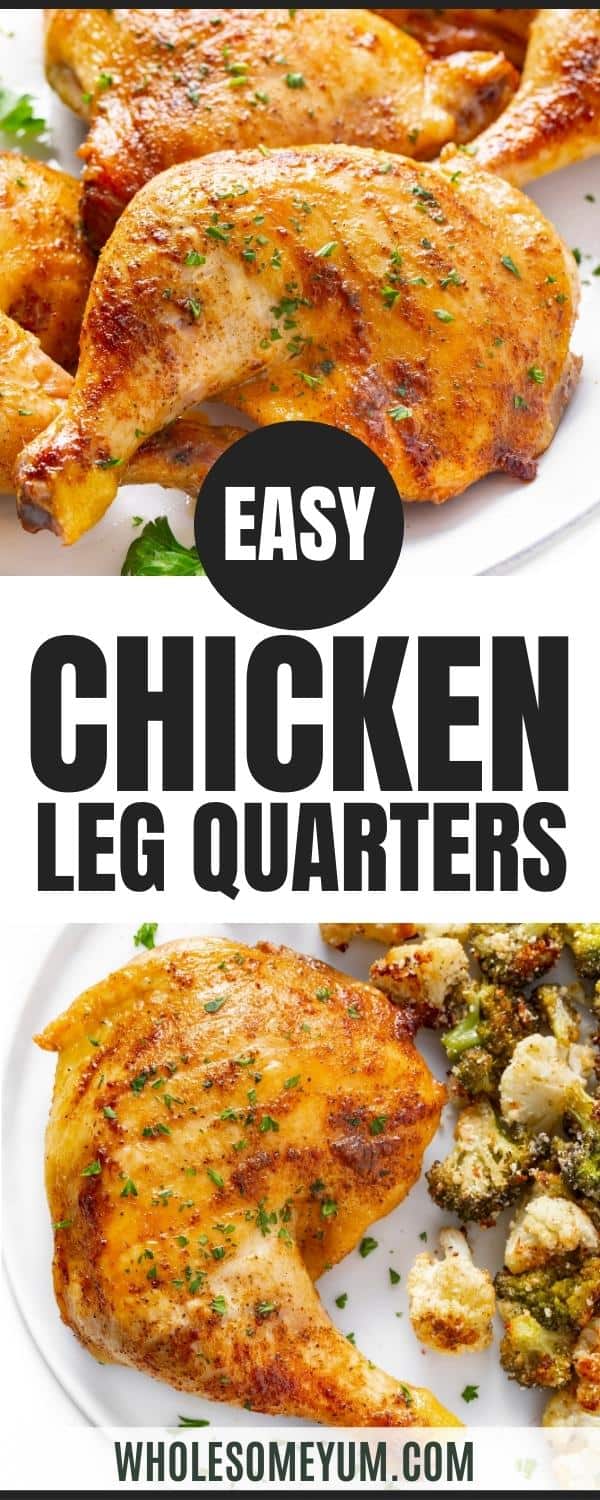
Baked Chicken Leg Quarters (Crispy & Juicy)
My easy recipe for baked chicken leg quarters in the oven makes juicy, crispy chicken every time. You need just 5 simple ingredients!
Instructions
Tap on the times in the instructions to start a kitchen timer.
-
Preheat the oven to 400 degrees F (218 degrees C). Line a baking sheet with foil and place an oven safe rack on top.
-
Pat the chicken leg quarters dry with paper towels, which will help them get crispy.
-
Brush the chicken quarters with olive oil on both sides. Season both sides with paprika, garlic powder, onion powder, salt, and pepper.
-
Arrange the chicken on the rack, skin side down. Bake the chicken leg quarters in the oven for 15 minutes. Flip and bake for another 20-30 minutes, until the internal temperature reaches 170 degrees F (74 degrees C).
-
Optional step: If they are not crispy enough for your liking, place under the broiler for 2-3 minutes to crisp up the skin even more.
-
Rest for 5 minutes before serving.
LAST STEP: Leave a rating to help other readers, or tag me @wholesomeyum on Instagram. I’d love to hear from you!
Maya’s Recipe Notes
Serving size: 1 chicken leg quarter
- Tips: Check out my recipe tips above to help you get the juiciest chicken leg quarters, ways to crisp up the skin more, how to make cleanup easier, and more.
- Storage: Keep leftovers in an airtight container in the refrigerator for up to 3-4 days. The skin does soften, so I usually remove the meat from the bones and repurpose it for soups or salads.
- Reheat: If you want to reheat the chicken leg quarters whole, the best method is the oven at 350 degrees F. You can place them under the broiler in the last few minutes if the skin isn’t crisp.
- Freeze: You can freeze the cooked chicken in zip lock bags for up to 3 months, or raw chicken quarters for up to 6-12 months. Thaw in the fridge overnight.
I provide nutrition facts as a courtesy. Have questions about calculations or why you got a different result? Please see my nutrition policy.
Add Your Notes Your Notes
Try More Of My Recipes


© Copyright Maya Krampf for Wholesome Yum. Please DO NOT SCREENSHOT OR COPY/PASTE recipes to social media or websites. We’d LOVE for you to share a link with photo instead.
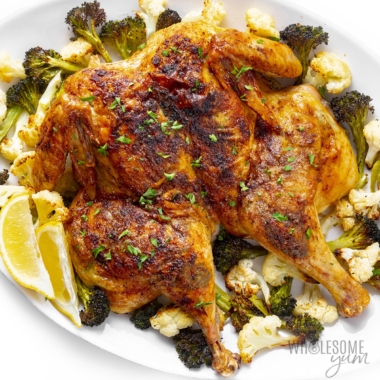
Baked Chicken Leg Quarters
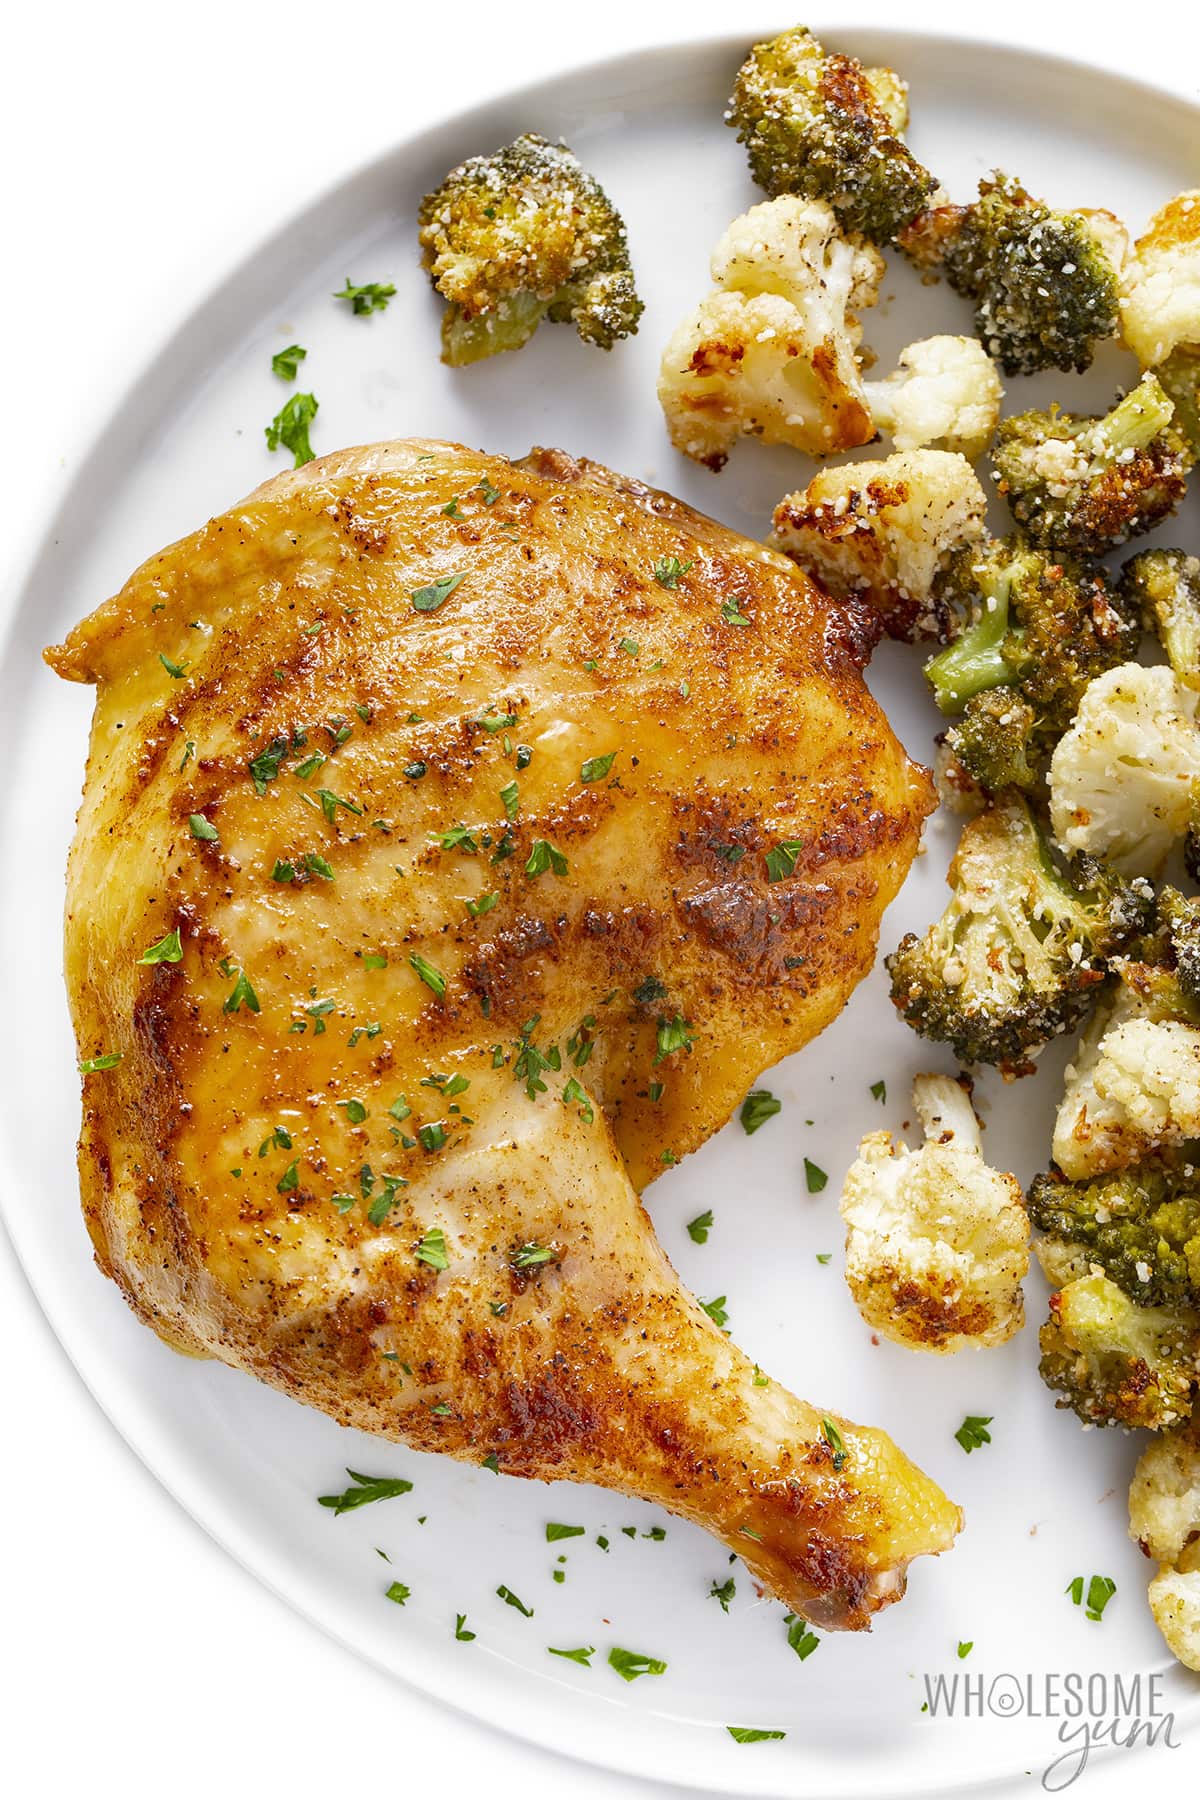
Serving Ideas
Somehow, these baked chicken leg quarters are flavorful and neutral in flavor at the same time. Does that make any sense? The point is they go with anything. Here are some of my favorite sides to serve with them:
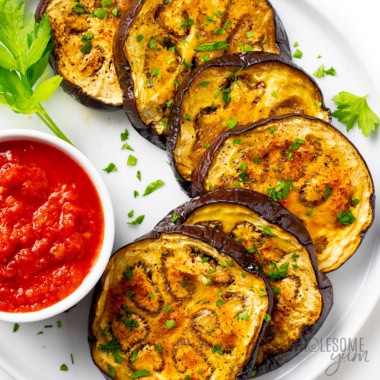
- Vegetables – Chicken and veggies is literally the meal I make most often. Particularly with chicken leg quarter recipes, though, vegetables can balance the heavy main dish. I like to saute eggplant, air fry cauliflower, or whip up some patty pan squash while I have the chicken quarters in the oven. But you can also roast broccoli, broccoli and cauliflower (pictured above), or asparagus first and just cover to keep warm.
- Potatoes – For a more comforting meal, make my Instant Pot sweet potatoes or even Greek lemon potatoes. My family’s go-to is simple, buttery air fryer potatoes — my kids ask for them often.
- Salads – For a lighter meal, try my creamy cucumber salad, earthy beet salad, or simple arugula salad.
More Baked Chicken Recipes
If you love chicken as much as I do, check out my other easy baked chicken recipes:


202 Comments
Joe
0I love the blend of spices makes a good rub for smoking too
Jana
0Simple and delicious!
Charlie
0THANK YOU! for the sweet sweet relief from poorly laid out Internet recipe madness! I was actually just here for time and temp but I actually learned a couple things in my hasty scanning 😅
Maya | Wholesome Yum
0Awww, that means a lot, thank you Charlie! Enjoy the chicken!
Linda
0Maya—Can this be grilled? Thanks!!!
Maya | Wholesome Yum
0Hi Linda, Yes, you can definitely grill them. I haven’t tried this yet (now I want to!), but it would be similar to my grilled chicken thighs recipe. It will probably take longer per side, since the chicken quarters are bigger than thighs alone.
Bonnie
0Hi, you may have mentioned this in your recipe and I keep overlooking it but when baking in the oven, should I place it in the oven closer to lower part of oven or closer to the upper level of oven? Thanks
Wholesome Yum D
0Hi Bonnie, I recommend baking them in the middle part of your oven.
Elsie
0Loved how simple and delicious this recipe is!!
Sandra G
0I tried your recipe- with a few caveats one being I only had a toaster oven to use. I use a premade blend (roasted chicken seasoning). Best darn chicken- ever!!!
Rod
0Great, juicy, tender, amazing flavour.
patricia
0I made these chicken leg quarters last night for dinner. Oh, they were so good! I only made 2 instead of 4 thinking that would be enough for the 2 of us for couple nights. Surprise, they were so good we each ate the whole leg quarter. Might just go for a repeat tonight!
Thanks for your recipe. The added spices really add to the flavor of the meat.
Randy L Halford
0Liked the recipe although I didn’t use onion powder.
Margy
0This was so delicious! My now go-to chicken recipe!
Edward Mietzner
0I made this recipe tonight and it turned out perfect I don’t believe it could be and more juicy it truly was delicious. Thank you for the recipe.
Evelyn
0Bake at what temperature?
Wholesome Yum D
0Hi Evelyn, You can find this info in step #1– Preheat the oven to 400 degrees F.
Enna
0Because my quarters were large, I baked these chicken legs for 45 minutes. Then because they were still “bleeding”, I put them on to broil for 20 minutes or more at different times because they were still bleeding.
Wholesome Yum D
0Hi Enna, Sorry this recipe didn’t meet expectations. All ovens are different so it sounds like you needed some extra time to get the chicken fully cooked.
Erin Smith
0The only think I changed was using some of the herbs and spices under the skin as well as on the skin. Came out perfect.
baltisraul
0Wanted just a tad more crispy, so did 425 degrees and did both side for 20 min. Extremely juicy quarters!
Marc Joplin
0Definite amateur cook here. The recipe was simple to follow, although at the completion of cook time, much blood and pink meat existed. I ended up cooking on both sides for another 20 minutes per side. In all fairness, these were extremely large chicken leg quarters. Recipe made for delicious moist chicken. Thank you!
Mark Cameron
0This is a good recipe for those who have limited pantry items. Paprika, sea salt, pepper, onion powder and garlic powder should be in everyone’s spice rack. It’s always easier though to have a pre-mixed container of these ingredients on hand and ready. It’s better to use a shaker than your fingers to measure how much spice is going on to each piece. Nobody likes too much salt.
Beverly crawley
0I’ve been looking for a recipe for awhile that can help me bake chicken. I found this today. I’m baking my chicken now.
Brenda
0I have basically been making my similar version of this baked chicken for decades. It’s my go-to twice a week, especially when I don’t want to think too hard about making a menu for the week or don’t have a grocery list ready. But to those who feel it needs to be broiled, the way my recipe has evolved is to set oven temp to 425 and cook the leg quarters for 40 to 45 min for smaller leg quarters, 50 minutes if they are larger/plumper leg quarters.
Solomon salsberg
0The last 5 min broiler option is what I saw in the comments. I wash an dry and cut off extra fat, rest an dry in refrigerator, pat dry, pre heat oven while bringing chicken to Lil above room temperature, season, I use parchment an no rack(aluminum bad) kin up 20 min down in fat for 10 min. Skin up broil for as long as needed for internal temp you want. But look for crispyness not burn, I make a lot to be reasoned for other types of dishes so I use digital stick thermometer and highest temp gets eaten first..
Aaron
0Do yourself a favor and turn on the broiler for the last 3-5 minutes.
ERIN LANNING
0Loved it and it was very easy. i put the spicy on a little early to let them “soak” in. delicious!
Nick
0Easy recipe great taste and consistency.
charlene martin
0It had a good flavor I added thyme I couldn’t get it crispy.
Wholesome Yum D
0Hi Charlene, Sorry this recipe didn’t meet your expectations. Did you pat the chicken leg quarters dry with paper towels?
Jan Craddock
0Should I cover them with a lid or foil? Or not at all
Maya | Wholesome Yum
0Hi Jan, No, don’t cover the chicken.
Marilyn Anderson
0Very delicious
Donna
0Easy-peasy! And super delicious! Just adjust the ingredients as to your taste. For me, little more paprika, sea salt, frequent basting with olive oil.
Diana Anderson
0Was so surprised how good this was! I’m very picky when it comes to chicken!
Cabo Joe (Joachim)
0Being a chef, it is not hard to find something wrong with your recipe. I looked and looked and could not find anything I did not like. Good job. Just use more different spices. Greetings from Cabo.
Jo Anderson
0This was so good. I will only cook my chicken this way from now on. Even my “I only eat fried chicken” nine year old loved it.
Margaret A Ratigan
0Mine turned out very chewy and not at all crispy.
Wholesome Yum D
0Hi Margaret, Drying the chicken helps the skin get crispy.
Kathy
0Best Chicken recipe! 2nd time I used it. Easy and delicious.
Thank you
Veronica
0Do you put the chicken directly on the oven rack, and the pan underneath the rack to catch the juices? I think that’s what is meant, I didn’t see anything in the comments, but I do have a rack that goes in the baking sheet so I may try that, for the crispy skin.
Maya | Wholesome Yum
0Hi Veronica, You use a baking sheet with rack like this, don’t put directly on the oven rack.
Deborah
0BTW. Mine had skin on both sides which doesn’t matter as long as you are baking it on a rack and the meat isn’t touching the pan where all the juices can make the skin soggy.
Deborah
0Yum! Had to make recipe in stages due to time. A.M. Dried chicken well and applied about 1/2 t. olive oil to each piece to coat. Sprinkled the spices generously on chicken (included lemon pepper), except salt and pepper. Put in fridge for the day. PM put chicken on wire rack atop cookie sheet, and broiler pan both lined with foil. Applied course kosher salt and pepper just before cooking. Cooked an extra 10-15 mins according to reviewers. Wow. Crunchy tender flavorful chicken. Thanks so much for this recipe. Will be making again soon.
Denise
0Smash hit and easy!
Rebecca
0This came out delicious! I did my own seasonings but followed the method of cooking, it took about 10 extra minutes before my leg quarters came to temp but the chicken was juicy and the skin was crispy . It really was so good!
Bernard
035 mins is not enough time to cook the chicken. Everything was ready but the chicken. I ended up feeding my children vegetables and no chicken because they were hungry.
Jess
0Maybe put the chicken back into the oven?
Wholesome Yum D
0Hi Bernard, Sorry this recipe didn’t meet expectations. All ovens are different so it sounds like you needed some extra time to get the chicken fully cooked.
Daisy
0Maya,
Perhaps you might consider adding something to the recipe about taking the chicken out of the refrigerator at least 30 minutes in advance?? That might have helped Bernard.
Maya | Wholesome Yum
0Thanks for the tip, Daisy! I don’t have that in the recipe because it’s not what I do (I do it for steak but usually not chicken), but yes, that would reduce the cook time. The timing really depends on the size of the chicken quarters, too, which is why I always recommend going by the internal temperature. 🙂
delia g.
0Do I have to cover the chicken while baking?
Wholesome Yum D
0Hi Delia, No, you don’t have to cover the chicken while baking.
Meg
0Like many people below say, this recipe took 4x the cooking time as suggested which made for a late dinner. Make sure you use a meat thermometer. Plan for more time. Otherwise a solid recipe.
Jenni
0You cooked chicken quarters for 2 hours? You might want to calibrate your oven.
JCH
0Easy and delicious affordable meal. We made this with roasted root vegetables. This will be on the regular meal plan rotation!
Martha
0This was GREAT! Seasoning was perfect! I did have to increase the cooking time, because the leg quarters I had were very large.
Sally Roach
0Did you put fresh parsley on top of your chicken?
Wholesome Yum D
0Hi Sally, The parsley is just a garnish added after baking. You can add it or not.
Alanna
0What if the chicken leg quarters are frozen, what is the best way to remove the red?
Wholesome Yum D
0Hi Alanna, The red spots in the chicken after cooking come from the chicken being frozen. The chicken is fully cooked and safe to eat if the internal temperature reaches 165 degrees.
Mauriann Woods
0I used the same ingredients & they came out perfect & delicious!!! After this I will not be frying chicken. I realize that the breast will take longer. Thank you Thank you Thank you.
Kim Quinn
0The breast will take LESS time. The white meat cooks quicker and will dry faster. It is ready when temp is 165. But remove it from the oven when it reaches 158-160 and cover loosely with foil. Let rest 10-15 mins and it will rise to temp. Juices will stop boiling inside the meat and relax. Juice stays in the meat instead of pooling on your plate.
Laura
0This was super yummy! I ended up cooking my chicken until 180 degrees because the juice was still red before that, but it was super tender and the skin was crunchy! My toddler loved it and kept asking for more. ?
DGS
0I made this today and it was very tasty and juicy. It wasn’t crispy as I was hoping but I didn’t want to over cook it and dry out the chicken and I did bump up the temp to 415 degrees for the time listed on each side in the recipe. I think if this was done with an Air Fryer it would be perfect. And since I rent, I am sure even a better quality stove might make a difference too. But overall, I will do this again, thank you for posting it for viewers to use. One thing I may try next time is to sprinkle some Lemon Pepper seasoning on it too.
Sherry Healey
0This recipe is perfection. Tasty, healthy, quick and easy!
Bailey gore
0Easy and delicious
Donna
0Followed recipe exactly. Was amazing family loved it! Thank you for sharing.
Janet
0The picture definitely shows parsley but there is no parsley in the recipe. I can’t rate it as I haven’t tried it yet.
Maya | Wholesome Yum
0Hi Janet, The parsley is just garnish added after baking. You can add it or not.