 Shop
Shop My
My Custom


FREE 5-Ingredient Recipe EBook
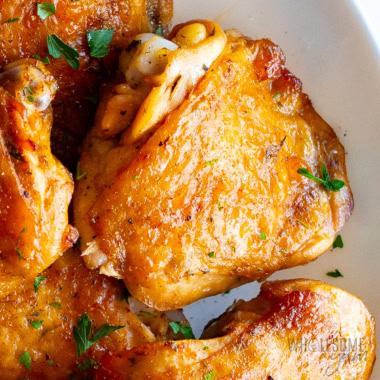
GET IT NOWPan Fried Chicken Thighs, Meet My Comforting Pan Sauce

If you’re like me, there’s always a night when you’ve got an extra package of chicken hanging out in the fridge. These pan fried chicken thighs are one of my go-to chicken recipes to use them up on busy weeknights. Here’s why:
- Big, savory flavor – The chicken has plenty of seasoning, but the buttery pan sauce makes the dish. Plus, it’s quicker than the sauces in my other chicken thigh recipes, like paprika chicken or creamy garlic chicken.
- Tender and juicy – My favorite part is how fall-apart tender these pan fried chicken thighs turn out. And the skin is lightly crispy (see my tips below for more on this, though).
- Fast and easy, with no oven step – These take just 20 minutes, much faster than baking chicken thighs. And unlike many recipes, there’s no transferring to the oven to finish. Perfect if you’re making another dish in the oven (or it’s just too hot to use it)!
Whether it’s a fresh salad, roasted veggies, or comfort food, these pan seared chicken thighs fit right in with any meal. Grab your skillet and make them with me!

Ingredients & Substitutions
Here I explain the best ingredients for my pan seared chicken thighs recipe, what each one does, and substitution options. For measurements, see the recipe card.
- Chicken Thighs – Bone-in, skin-on chicken thighs will give you the juiciest results. You can use boneless skinless chicken thighs, but they’ll cook faster. If you want to use chicken breast, use my pan seared chicken breast recipe instead!
- Spices – I kept it simple with sea salt, paprika, garlic powder, onion powder, and black pepper. For a stronger flavor, swap in a tablespoon of lemon pepper, poultry seasoning, blackened spices, or even fajita seasoning. Keep the salt if your seasoning is unsalted.
- Olive Oil – For searing. Avocado oil works, too.
- Butter – For the buttery pan sauce. I used unsalted butter since we’re adding salt to the sauce. For a dairy-sensitive option, use ghee or even butter flavored coconut oil.
- Chicken Broth – I recommend reduced-sodium broth, so your sauce doesn’t turn out too salty. Feel free to use homemade broth or bone broth for extra flavor.

How To Cook Chicken Thighs In A Pan
I have step-by-step photos here to help you visualize the recipe. For full instructions with amounts and temperatures, see the recipe card.
- Season the chicken. Pat dry with paper towels first, then season both sides with sea salt, paprika, garlic powder, onion powder, and black pepper.
- Crisp up the skin. Heat the olive oil in a large skillet over medium-high heat. Add the chicken skin side down, in a single layer. Pan sear chicken thighs, flipping once, until golden and crispy on the outside. (The inside won’t be cooked through yet.)
- Make the butter sauce. Add the butter and chicken broth to the pan around the chicken. Avoid them directly on the skin! Let the butter melt.
- Cover until cooked through. Reduce the heat to medium low, cover, and heat until the pan fried chicken thighs are cooked through. Let them rest before serving with the pan sauce.


My Recipe Tips
- Start with the skin side down. This way, you can render some of the fat in the pan and make the skinless side easier to brown.
- Don’t crowd the pan, and flip only once. Cook in batches if needed. Crowding can lead to uneven cooking, and flipping too often will prevent a nice sear.
- I usually fry chicken thighs at medium-high, but this may be too hot for your stove or pan. If you find that the skin gets brown but isn’t actually crispy, it means not enough of the fat has rendered. Turn down the heat to prevent burning, and keep cooking to crisp the skin more.
- The skin crisps up beautifully in the skillet, but it does soften a bit after you cover the chicken. Sadly, pan fried chicken thighs don’t really cook through if you don’t cover them (trust me, I’ve tried!). Make sure to get the skin extra crisp before covering, this does help a little.
- If you don’t want the skin to soften even a little, don’t cover and transfer the skillet to the oven to finish cooking instead. This is what I do for my other cast iron chicken thighs. Or make my crispy baked chicken instead. Bottom line, this is not the recipe for ultra crispy skin, its strength is that it’s juicy.
- For juicier pan seared chicken thighs, I highly recommend an internal temperature of 170 degrees F. For dark meat like thighs, that’s when the collagen breaks down and the meat becomes extra tender! I use and love this meat thermometer that reads super fast.
- Don’t forget to let the chicken rest. This gives the juices time to settle, so the chicken stays juicy and tender when you cut into it.
Pan Fried Chicken Thighs (So Juicy)
Make my juicy pan fried chicken thighs in 20 minutes, with simple ingredients and no oven step! You'll love the flavorful, buttery pan sauce.
Instructions
Tap on the times in the instructions to start a kitchen timer.
-
Pat the chicken thighs dry with paper towels.
-
Season chicken thighs on both sides with sea salt, paprika, garlic powder, onion powder, and black pepper.
-
Heat the olive oil in a large skillet over medium-high heat. Add the chicken in a single layer, skin side down. Sear chicken thighs for 3-5 minutes, until the bottom side is golden brown and crispy.
-
Flip the chicken and sear for 3-5 more minutes, until golden brown on the other side.
-
Add the chicken broth and butter to the pan, around the chicken but not directly over the skin. Move the butter around, until melted.
-
Reduce heat to medium-low and cover the pan with a lid. Cook chicken thighs on the stovetop for 4-8 more minutes, until the internal temperature reaches at least 165 degrees F, preferably 170 degrees F (77 degrees C) for juicy chicken thighs.
-
Remove the chicken from the pan and transfer to a plate. Rest for 5 minutes before serving with the pan sauce.
LAST STEP: Leave a rating to help other readers, or tag me @wholesomeyum on Instagram. I’d love to hear from you!
Maya’s Recipe Notes
Serving size: 1 chicken thigh
- Tips: Be sure to check out my recipe tips above for best results. I’ve got some notes on how you want to arrange the chicken, when to flip, etc.
- Important note on crispy skin: The skin does soften a bit after you cover the chicken, but it won’t cook through well if you don’t. If you want extra crispy skin, make my cast iron chicken thighs (they use a different method) instead.
- Store: Let the chicken cool, then cover and store in an airtight container in the fridge for up to 3-4 days. I like to shred the leftovers and toss them into a green goddess salad or chicken Caprese salad!
- Meal prep: Season the chicken the day before and store in the refrigerator.
- Reheat: Warm it up in a skillet on the stove, bake at 300 degrees F wrapped in foil, or pop it in the microwave on low power.
- Freeze: Wrap the pan fried chicken thighs tightly and freeze for up to 3 months. Thaw overnight before reheating.
I provide nutrition facts as a courtesy. Have questions about calculations or why you got a different result? Please see my nutrition policy.
Add Your Notes Your Notes
Try More Of My Recipes


© Copyright Maya Krampf for Wholesome Yum. Please DO NOT SCREENSHOT OR COPY/PASTE recipes to social media or websites. We’d LOVE for you to share a link with photo instead.
Pan Fried Chicken Thighs

Serving Ideas
There are so many dishes that go well with these pan fried chicken thighs! I like them with:
- Starches – My roasted potatoes, creamy mashed cauliflower, quick frozen cauli rice, or even mixed root vegetables are all perfect for soaking up extra pan sauce.
- Veggies – I like to repurpose the same pan I used for pan seared chicken thighs to saute zucchini (pictured above) or even saute cabbage. You can also cook your sides at the same time if you toss broccoli in the air fryer or asparagus in the oven.
- Salads – Lately I’m obsessed with this fall salad! For a light and colorful combo, whip up my broccoli cauliflower salad or Israeli salad.
More Stovetop Chicken Recipes
If you like my pan fried chicken thighs, check out more of my favorite chicken dishes you can make on the stove:


21 Comments
Steve
1I made 27 errors (I have an app called “we keep track of your failings”) and the darned chicken still turned out great. The spicing was surprisingly good.
Gwen Bents
1Moist and full of flavor! Had my skillet too hot, a little past golden brown, so I know now!! Sauce was delicious!! My husband really liked it.
Merry Monnier
0I have not found one recipe here that my family does not love. 💕
Wholesome Yum D
0That’s so wonderful to hear, Merry! I’m so glad your family is loving the recipes.
Kevin H Thomas
0I followed directions and it turned out just like you said – delicious and juicy!
Wholesome Yum D
0I’m glad it turned out so well for you, Kevin! Juicy and delicious is always the goal — thanks for trying it!
C. J.
0I made this with boneless thighs. I also used Kinder’s Butterfly Poultry Blend, Kinder’s Woodfire Garlic, Fiesta Smoky Swine Seasoning, Lemon Pepper, Garlic Powder and Louisiana Cajun Seasoning. I like seasoned food. SO GOOD! Thanks for the recipe!
Karen
0The chicken is definitely juicy, but there is no way the skin stays crispy after cooking it with the pan covered. The pictures of the chicken in this post are not after cooking it according to the directions. I guess the solution is to cook the thighs longer but without covering with the lid.
Maya | Wholesome Yum
0Hi Karen, Sorry this recipe didn’t meet your expectations. I never, EVER take my photos of a dish cooked differently that what the recipe says. My pictures are of the finished dish and I did cover it. The skin did stay somewhat crispy, but was softer than before covering, as I noted in the post. If you want it more crisp, I recommend that you make my cast iron skillet chicken thighs instead, or just use the recipe on this page but transfer to the oven to finish instead of covering.
JimJoe
0why did I not listen to my gut. Putting the lid on steamed the beautiful crust and made it all soggy. Silly recipe step.
Maya | Wholesome Yum
0Hi Jim, I did note in the post that covering softens the skin, but without an oven step, this is necessary for the chicken to cook through. You can make my cast iron chicken thighs instead that involves transferring to the oven if you want to keep the skin crispy.
Maria
0This dish did not turn out well at all. It was looking great until I added the chicken broth and then I immediately regretted the decision. It ruined the crust (I didn’t pour it over it, beside it) and covering the chicken made it taste like boiled chicken. I wish I had read the reviews before making this and wasting dinner.
Maya | Wholesome Yum
0Hi Maria, Sorry to hear that my pan fried chicken thighs were not what you expected. I did note in the post that covering softens the skin, but I tried to clarify a bit more. The focus of this recipe is extra juicy meat. If you want an extra crispy skin, I recommend making my cast iron skillet chicken thighs instead, which use a different method to keep the skin crispy. Hope this helps!
Henry
0Tried this recipe a second time. I adjusted my temperature and dialed back the cook time and everything came out good. EXCEPT ……putting the cover on…. once you put the cover on it ruins the crispy skin and turns it soggy. Other than that the meat was juicy and flavorful but I had throw away perfectly seasoned skin because it was all soggy and gross.
Renee
0My chicken became soggy and rubbery by putting the lid on. Otherwise the seasoning flavor was good. My family was disappointed because they wanted crispy chicken. Probably won’t use this recipe again.
Maya | Wholesome Yum
0Hi Henry and Renee, Sorry I missed your comments earlier! I’ve clarified in the post that the skin softens after covering, and to use my cast iron chicken method that transfers to the oven if you want to keep the skin extra crispy. Hope this helps for the future in case you see this!
Cole
0Insanely tasty and juicy, especially considering how low effort this recipe calls for. Will use again and again.
Sara F
0The only way I will make chicken thighs from now on! Just perfect, thank you!
jess
0This is super simple and just as tasty! thank you so much for sharing this recipe to ease my chicken cooking nerves.
Kristyn
0These are so juicy & tasty!! We make them a lot & pair them with so many things!
Kennedi
0This recipe was fast, easy, and delicious. We will definitely make it again.