 Shop
Shop My
My Custom


FREE 5-Ingredient Recipe EBook
GET IT NOW- Why I Make This Roasted Cauliflower Recipe Almost Every Week
- Ingredients & Substitutions
- The Best Way To Cut Cauliflower
- How To Roast Cauliflower In The Oven
- Tips For Best Results
- Roasted Cauliflower (Easy Recipe) Recipe card
- 8 Seasoning Variations
- Serving Ideas
- More Roasted Cauliflower Recipes
- Recipe Reviews
Why I Make This Roasted Cauliflower Recipe Almost Every Week

We all probably have those side dishes we reach for when we’re not sure what to make. Mine is this roasted cauliflower. It’s a simple staple, but I can never resist a good roasted veggie — and you can change up the seasonings so that it doesn’t get boring. Here’s why I make different versions of this easy side dish almost every week:
- Simple staple recipe – Being a big cauliflower fan, I think everyone should know how to roast cauliflower! Unlike some of my other cauliflower recipes where the vegetable is standing in for a starch, this one isn’t anything fancy. And that’s the beauty of it.
- Crisp tender with golden, caramelized edges – With the right temperature and my quick tips, the outside gets golden and caramelized, while the inside is perfectly crisp tender and a little sweet. My favorite part is the little crispy edges where it touched the pan!
- Simple ingredients – You only need 3 of them, plus salt and pepper, for the basic version. I usually have these on hand (you probably do, too), which is why I make this roasted cauliflower recipe so often, but there are endless ways to customize it!
- Quick & easy prep – Toss everything in a bowl, spread out on a sheet pan, and pop the cauliflower in the oven while you prepare your main dish for dinner.
- Healthy side dish – It’s fresh, naturally gluten-free, low carb, and just simply a great way to eat more vegetables.
If you need a simple side for dinner tonight, this oven roasted cauliflower is perfect. Make it with me!


“This was SO much more delicious than I expected! I made sure that when I chopped the cauliflower, I put the flat/cut side down on the pan and it ended up getting so nicely browned… we loved it! Thank you!”
-Erin
Ingredients & Substitutions
Here I explain the best ingredients for roasting cauliflower, what each one does in the recipe, and substitution options. For measurements, see the recipe card.
- Cauliflower – You can either cut a whole cauliflower head or you can use pre-cut cauliflower florets. The same method also works for roasting broccoli, romanesco, or broccoli and cauliflower together. These simple seasonings also work for cauliflower steaks, or as part of my beef casserole.
- Oil – Adds flavor, helps the seasonings stick, and promotes caramelization. You can use regular mild olive oil (I like this one), extra virgin olive oil, or even avocado oil.
- Seasoning – My basic version of oven roasted cauliflower is simple — garlic powder (optional), sea salt, and black pepper — but I often change it up with the seasoning variations below.

The Best Way To Cut Cauliflower
If you don’t opt for a bag of precut florets, here is the quick method I use for chopping up a whole head. You don’t even have to remove the leaves and stems — they will come off when you cut away the core.
- Quarter. Cut the cauliflower into four wedges.
- Remove the core. Cut away the core from each quarter.
- Cut into florets. Medium florets, about 1.5 inches in diameter and 1.5 to 2 inches long, are ideal for roasting cauliflower.


How To Roast Cauliflower In The Oven
I have step-by-step photos here to help you visualize the recipe. For full instructions with amounts and temperatures, see the recipe card.
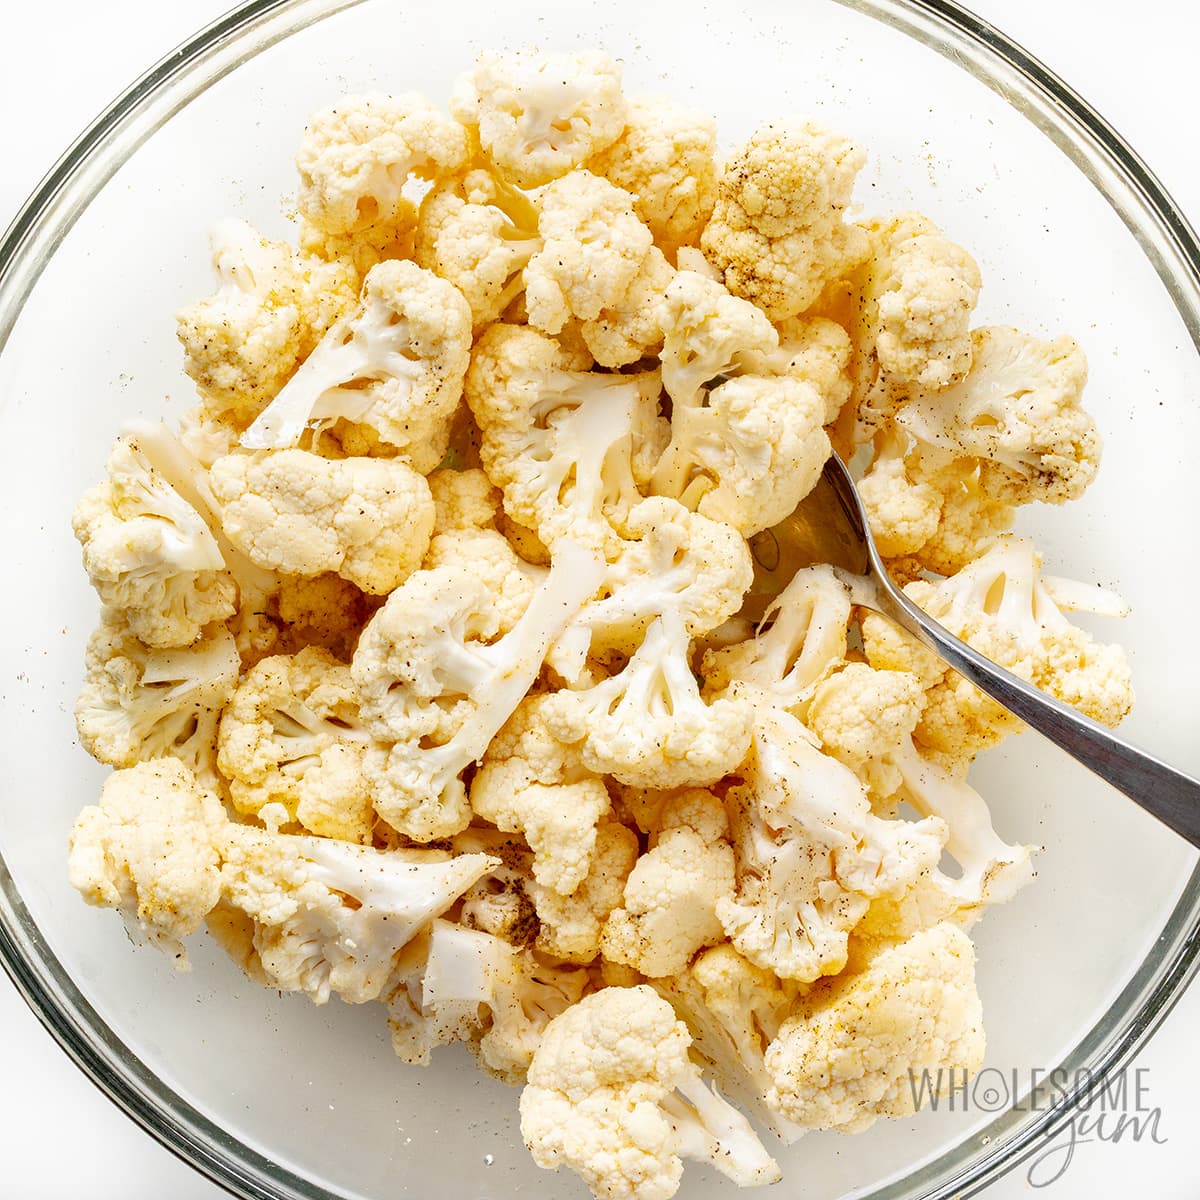
- Season. Place the cauliflower florets in a large bowl. Drizzle with olive oil, and sprinkle with garlic powder (if using), salt, and pepper. Toss to coat.
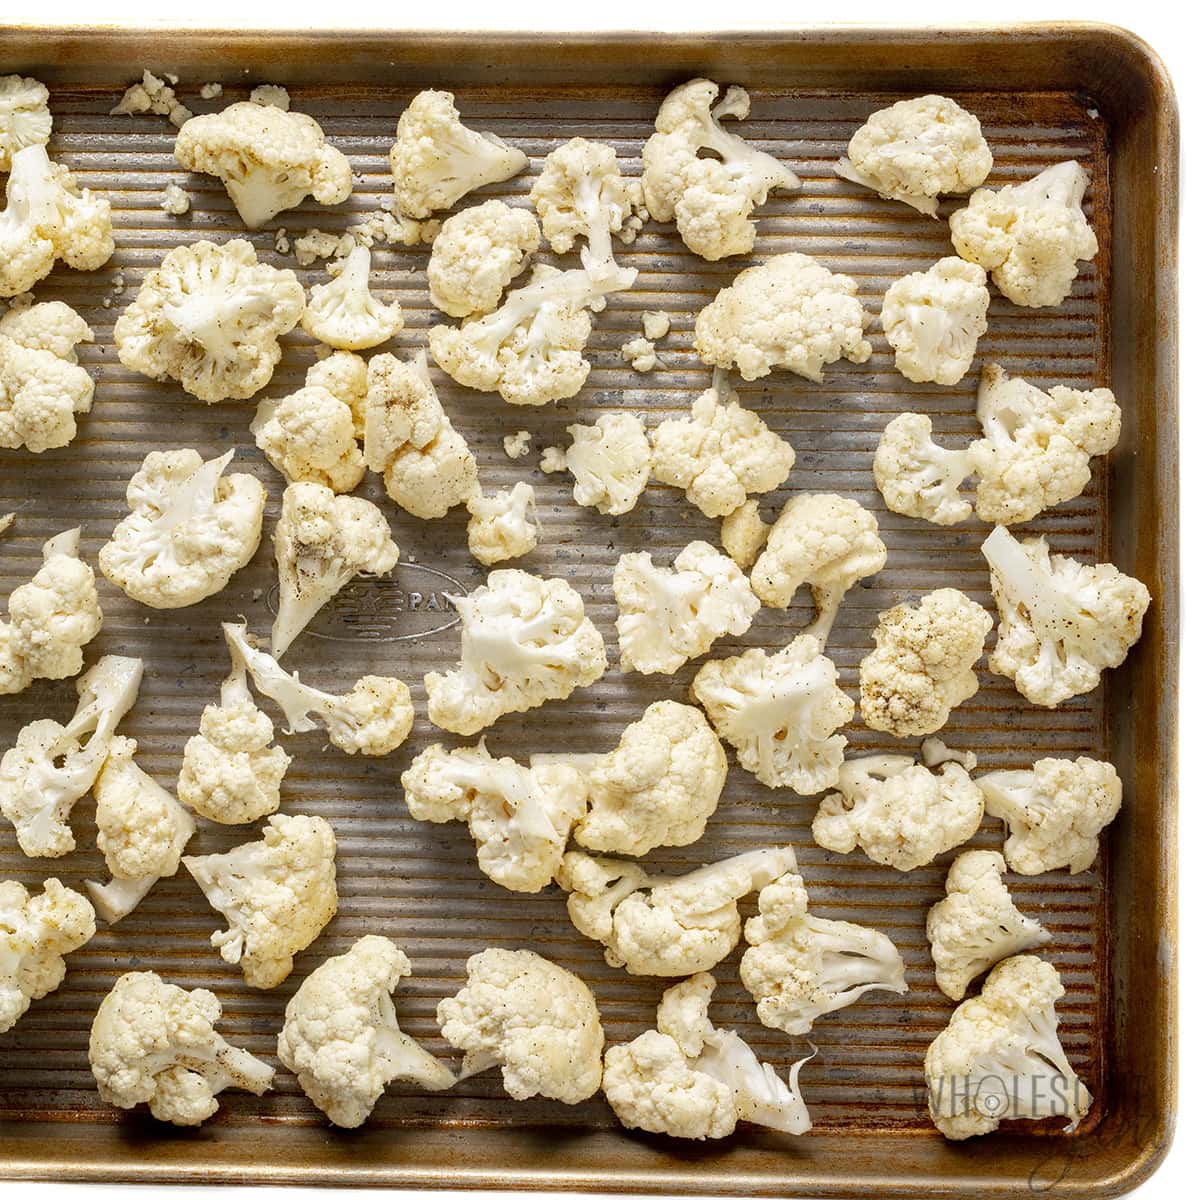
- Arrange. Spread the florets in a single layer on a large rimmed baking sheet.
- Roast. Bake cauliflower in the oven, tossing halfway through, until tender and browned on the edges. I like to garnish my oven roasted cauliflower with fresh parsley for a pop of color, but that’s totally up to you.

Tips For Best Results
- Dry the cauliflower well after washing. Water is the enemy of browning!
- Make your florets the same size, and not too large. Even sizes ensure that they cook at the same rate. Also, small to medium pieces brown and caramelize better (and faster), which I think is a great thing all around!
- Each floret should be touching the pan, so make sure your pan is large enough. This will ensure even cooking, best texture, and caramelization. I suggest this tip for almost all my roasted vegetable recipes, and oven roasted cauliflower is no exception.
- You get more caramelization with the flat/cut sides against the pan. This isn’t strictly required, but keep this in mind if you love those caramelized parts like I do.
- You can line the pan if you like, I recommend using foil rather than parchment paper. Parchment paper will reduce browning. I usually just skip lining altogether, because my favorite sheet pans (pictured above) have a great nonstick surface. If yours isn’t great or you use foil, you can coat the pan lightly in oil to prevent sticking.
- What if your roasted cauliflower is tender but not browned enough? This happens to me sometimes when my florets are too small. The fix is easy: Just pop it under the broiler for a couple of minutes to brown.
- Can you roast frozen cauliflower? Yes, you can, right from frozen. I usually roast it unseasoned for 10 minutes first, then toss with oil and seasonings, and roast again until browned and tender. The texture isn’t quite as good as fresh, but it’s still delicious!
Roasted Cauliflower (Easy Recipe)
My roasted cauliflower recipe is tender, caramelized, and so easy to make in the oven! I've included 8 different seasoning ideas.
Instructions
Tap on the times in the instructions to start a kitchen timer.
-
Preheat the oven to 400 degrees F (204 degrees C).
-
Place the cauliflower in a large bowl. Drizzle with olive oil, and sprinkle with garlic powder (if using), salt, and pepper. Toss to coat.
-
Arrange the cauliflower in a single layer on a large baking sheet. (Do not crowd the pan – each floret should be touching the pan.) You can use a non-stick sheet pan like this, or line any type of sheet pan with foil and coat lightly in oil to prevent sticking.
-
Roast cauliflower in the oven for 25-30 minutes, tossing halfway through, until browned on the edges. (Cook time is for florets about 1 inch in diameter and 1.5-2 inches long; it will vary with larger or smaller florets.)
LAST STEP: Leave a rating to help other readers, or tag me @wholesomeyum on Instagram. I’d love to hear from you!
Maya’s Recipe Notes
Serving size: 1 cup
- Tips: Check out my recipe tips above to help you get perfectly cooked, caramelized roasted cauliflower.
- More seasoning options: See my seasoning variations below for more ideas.
- Storage: Keep leftovers in an airtight container in the fridge for up to 3-5 days.
- Reheat: For the best texture, reheat the cauliflower in the oven at 350 degrees F, until warm. The microwave works in a pinch, but I don’t love the more mushy texture you get. You can also repurpose leftovers for my cauliflower cheese soup instead.
- Freeze: For already roasted cauliflower, I like to spread on a sheet pan and flash freeze until solid, then transfer to a freezer bag for storage. It will last in the freezer for up to 3 months, and this method prevents the florets from sticking together. I don’t recommend freezing cauliflower raw, as the enzyme activity will ruin the texture, so you’d have to blanch it if you want to freeze before roasting.
I provide nutrition facts as a courtesy. Have questions about calculations or why you got a different result? Please see my nutrition policy.
Add Your Notes Your Notes
Try More Of My Recipes


© Copyright Maya Krampf for Wholesome Yum. Please DO NOT SCREENSHOT OR COPY/PASTE recipes to social media or websites. We’d LOVE for you to share a link with photo instead.
Oven Roasted Cauliflower Recipe
8 Seasoning Variations
While I make this roasted cauliflower recipe often, I’m always experimenting with different seasonings for it. Here are some yummy variations for you to try:
- Lemon, Garlic, & Paprika – Prepare the same seasoning mix I use in my air fryer cauliflower recipe: Add 3/4 teaspoon sweet or smoked paprika, 2 teaspoons lemon juice (or 1/2 to 1 teaspoon lemon zest), and include the garlic powder above.
- Italian Seasoning – Add 1/2 teaspoon of homemade Italian seasoning.
- Parmesan Cheese – Prepare the same Parmesan herb sauce I use for whole roasted cauliflower, and drizzle on the cauliflower before roasting. You can also simply toss the florets with 1/4 cup of grated parmesan instead.
- Buffalo – If you want your oven roasted cauliflower spicy, make the recipe as usual, then toss in the sauce from my buffalo cauliflower recipe.
- Curry Spiced – Add 1/2 to 1 teaspoon of curry powder.
- Chili Lime – Mix 1/4 teaspoon sea salt, 1 teaspoon chili powder, 1 teaspoon smoked paprika, 1/2 teaspoon onion powder, 1/2 teaspoon garlic powder, and 1/8 teaspoon cayenne powder together. Sprinkle the seasoning mix on the cauliflower florets and roast. Finally, garnish with fresh cilantro.
- Mexican – Use 1 teaspoon of my homemade taco seasoning in place of garlic powder.
- Gochujang – Try my gochujang cauliflower for a saucy version that’s sweet, buttery, and spicy all in one.

Serving Ideas
Oven roasted cauliflower goes with just about anything. It’s one of the reasons it’s so common at my house — I can pair it with whatever recipes I’m testing, as well as staples I make over and over. Here are some of the ones I’ve served with it:
- Beef – Cauliflower pairs perfectly with all kinds of steaks, including sirloin steak, filet mignon (my personal fave), ribeye, or New York strip. For special meals, some of my faves are Instant Pot beef short ribs (I can cook them in parallel with the roasted cauliflower!), juicy beef tenderloin, or sirloin tip roast.
- Chicken – Keep it simple with my popular crispy baked chicken legs, or make air fryer chicken breast while roasting cauliflower in the oven. If you prefer your chicken with sauce or want something fancier, try my Crock Pot chicken cacciatore, garlic butter chicken, or creamy mushroom chicken.
- Pork – This is a great option for a satisfying dinner without breaking the bank. Pair this oven roasted cauliflower with simple pan seared pork chops, cheesy stuffed pork chops, or even my pork steak recipe.
- Seafood – I often make baked cod, baked salmon, or baked shrimp for fuss-free weeknight meals, as they come together quickly. For special occasions, try my baked sea bass, lobster tails, or even halibut.
- Sauces – Sometimes I dip these florets in garlic aioli, pesto sauce, spicy mayo, marinara, or tahini sauce.
More Roasted Cauliflower Recipes
For more ways to enjoy this veggie, try one of my other roasted cauliflower recipes next:


94 Comments
erin
1This was SO much more delicious than I expected! I used melted coconut oil instead of olive oil because that is what I had on hand. I made sure that when I chopped the cauliflower, I put the flat/cut side down on the pan and it ended up getting so nicely browned…we loved it! Thank you!
Jules
0These directions were PERFECT! I made this with smaller florets for the pizza casserole but needed the specific instructions to roast and the cauliflower came out AMAZING!!!
Wholesome Yum D
0Jules, so glad the instructions helped, that’s exactly what I aim for! Smaller florets for a pizza casserole is such a great idea, and I love that the cauliflower turned out amazing for you.
Vicki L
0My favorite way to cook cauliflower have used this recipe (my go to) for a couple of years.
Wholesome Yum D
0That’s so great to hear, Vicki! I love that this has been your go-to for cauliflower for years, thanks for sticking with it!
Lindsay Phillips
0One of my favorite recipes of all time! Can’t wait to try the air fryer cauliflower next!
Maya | Wholesome Yum
0I’m so happy it’s one of your favorites, Lindsay! Hope you love my air fryer cauliflower, too.
Francis J Flynn
0excellent recipe so easy! Enjoyed cauliflower!
Maya | Wholesome Yum
0Thank you, Francis! I’m glad you enjoyed it.
Maryanne
0Easy to make and so delicious. Will make again.
Maya | Wholesome Yum
0Thank you, Maryanne! Enjoy!
Kristen
0Who knew my daughter liked cauliflower? My cauliflower came out exactly like yours in color. It tasted amazing! I did use fresh garlic just because I had some extra time.
Sabrina McGee
0This sounds yummy!! I can’t wait to try it
Jody
0This is a great simple recipe. I added onion powder and smoked paprika. It was delicious
Maya | Wholesome Yum
0Thanks, Jody! Yes, the seasonings are easy to customize. Enjoy!
Helen Sohne
0This is not only my favorite and easiest way to make cauliflower, it is so tasty and satisfying that I don’t miss potatoes! I know it will serve 4 but unless it’s a huge cauliflower, my husband and I often finish it all. But to be fair, I buy organic and they’re usually not too large!
Maya | Wholesome Yum
0I’m so glad you like this recipe, Helen! Yes, it’s 4 1-cup servings but you can easily have more in a serving!
Diane Flanagan
0I am making your cauliflower recipe today. You have some really delicious recipes that I will be trying out. Thank you!
Maya | Wholesome Yum
0Thank you, Diane! Let me know how they all turn out.
Therese J
0Great way to enjoy cruciferous veggies! I used mild olive oil, and added onion granules to the garlic/salt/pepper, roasting cauliflower and broccoli. We all loved it. Thanks!
Lana
0Roasted cauliflower is so yummy and easy. My daughters and I loved it! Still working on getting my son and husband on board but they like very few vegetables.
Marianne Guzzardo
0Love the directions in detail and of course this recipe! Ty so much.
Niki
0How can I do this in a Air Fryer?
Wholesome Yum D
0Hi Niki, Here is my air fryer cauliflower recipe.
Susan
0Loved this roasted cauliflower! Actually made a second batch and when tossing halfway through, added some dried granulated onion pieces which gave a little bit of crunch. Ate these instead of potato chips. Was going to put some in the fridge for later but it’s all gone. On my way to buy more cauliflower! Thank you Maya.
Jill
0If I mention baked cauliflower for supper all 5 boys say yes!!! I don’t even have to make this one anymore because they want to make it and get the first bite out of the oven! So delicious! The only problem is I never get leftovers for lunch the next day. I use 2 heads of cauliflower.
LaVonne Sarati
0Made this and recipe as is with garlic seasoning for the first time as I have used other spices. It was very good and cauliflower was cooked to perfection but I didn’t expect differently being I have numerous recipe favorites that I have thoroughly enjoyed. So another 5 stars for taste and presentation! ⭐️
Brandy Ferris
0This roasted cauliflower recipe makes a delicious addition to nightly dinners! We love to make this at home for a side dish that everyone loves. 🙂
LaVonne Sarati
0I have enjoyed roasting cauliflower for months and usually I use adobo, creole seasoning and s&p. I had never used garlic before on my roasted veggies. However this was a delicious change and the cauliflower roasted as expected—crispy edges and tender but not overcooked at the temperature and timeframe recommended. Nice recipe.??
Hope
0I make it every week for at least three times 🙂 we can’t have enough of it.
Kristin Shepherd
0Best cauuliflower ever! I never liked cooked cauliflower until now! Even my nieces and nephews loved it! Loved how it caramelized which gave it sweet flavor. Tasty way to get veggies. Only 97 calories and low carb. Can’t wait to try all 6 seasoning variations.
Christine
0Recipe was great! I made this at my in-laws who had no olive oil so I substituted butter. It was delicious. My husband raved and wants it again tonight!
Sharon
0I plan on trying this. It sounds yummy. Great way to have another way to fix cauliflower.
Cathy
0What a simple way to make my last favorite vegetable into my new favorite!
I was able to have my little niece make this with me so she added to her healthy food too.
C
0I make this often-it’s easy and delicious. There’s usually no leftovers!
Lea
0This recipe was amazing. Will definitely be making it again.
Teresa
0I used broccoli instead of cauliflower. The recipe was easy and delicious.
Terri
0I am brand new to cauliflower since I usually don’t eat it, but I tried this recipe two days ago. It was delicious. It made a large amount since I used the whole head of cauliflower. I put the left overs in the refrigerator and ate it again the next day. Thank you so much for sharing these recipes. They are so good and I will be cooking it again. It was fast and easy and very healthy.
Deb
0A great way to prepare cauliflower. Our current favorite seasoning is simple-garlic powder and Italian seasoning.
Easy, flavorful, and my husband is learning to like vegetables! Win, Win!
I have tried many of Maya’s recipes. I usually search Wholesome Yum first when looking for savory recipes. The photos, precise directions, tips and variations tell me that these are well tested recipes and they have made navigating our low carb lifestyle easier (and yummier!)
Nancy
0Will try this today. Always happy to find easy was to incorporate veggies into diet.
Brenda
0I had a head of cauliflower in the refrigerator and was wondering what to do with it. This recipe is wonderful! I added a bit of lemon juice, and it was over the top! Perfect side to a steak and salad!
Lynn
0Boom Roasted! It has been quite awhile since I have roasted anything because I just dont like the taste. Decided to twist things up last night and tried this recipe out. Game changer. Served it up along side a pork steak (recipe of Maya’s). Followed the recipe exactly as stated and it turned out tastefully wonderful. Can’t say enough good words to describe this cauliflower. Thank you for allowing me to try roasting again. Yum!
Jean Linger
0This recipe is the best!
Aline Shinder
0This was a perfect side to our steak. Perfectly roasted at 25 minutes. The crunchy edges with the still juicy cauliflower seasoned to just the right degree.
Barbara Weisbeck
0I really loved the roasted cauliflower, it was delicious, I used garlic, smoked paprika and cracked black pepper.
Perfect main, side or snack.
Annie
0Making the recipe now. So easy to follow and my family has loved it every time I make it. It is a quick and yummy way to get veggies on the table on a busy weekday.
Carol OConnor-Eisenberg
0Made the roasted cauliflower for dinner this evening. The two of us ate the entire recipe. Added some Italian seasoning. Delicious.
Jody
0This is a great side and very yummy. I made this to have along side a keto curry. It is very easy to make and very versatile.
Kiriakitsa
0Amazing! Very simple to make. I sprinkled some parmesan cheese on top and it was awesome.
Jacqueline
0This makes eating your vegetables easy!!! So delicious!
Stacy
0I cannot wait to try this, I have been hip to cauliflower for awhile but never actually went and made it myself, thank you for sharing!
Cathie Self
0I make this quite often I often add broccoli. When I’m in a pinch – I use frozen cauliflower/broccoli. (98 cents a bag at Wal-Mart) Fast and economical.
Ree
0Wow!! I love cauliflower in any recipe!! Great substitute for many other “clean” Recipes. I did mine in my AF added more spices like Turmeric & Red pepper flakes to add to the heat!! It was amazing!!
Monique
0Love love this recipe. I did add Parmesan to mine. Makes it even crunchier.
mark king
0Pretty good. Issue with ling pan with foil. Better to line with non-stick pad instead. Overall very good.
Lorina
0So yummy! Easy to make and so good, this will definitely go into the monthly rotation. I added a small amount of ground red pepper ? just to give it a little kick.
Thank you for sharing this tasty recipe! ?
Kelly
0I am not a cauliflower fan but this hit it out of the park for me!! Added some fresh rosemary from the garden and the entire pan disappeared between us! Love your site, thank you Maya!
Toni
0I love it! This is my new favorite way to enjoy cauliflowers!
Sha
0I will never go wrong with this oven roasted cauliflower! Even the picky liked it! It is indeed tender and scrumptious. One of my go-to recipe to served with steak!
Daisy
0This recipe is the bomb. It’s super easy to make and it tastes so good. My kids love it, and it’s a great way to get them to eat cauliflower. The cauliflower gets crispy on the outside and tender on the inside, just like chicken skin. The flavor is savory and delicious, but not too strong.