 Shop
Shop My
My Custom


Free Printable: Low Carb & Keto Food List
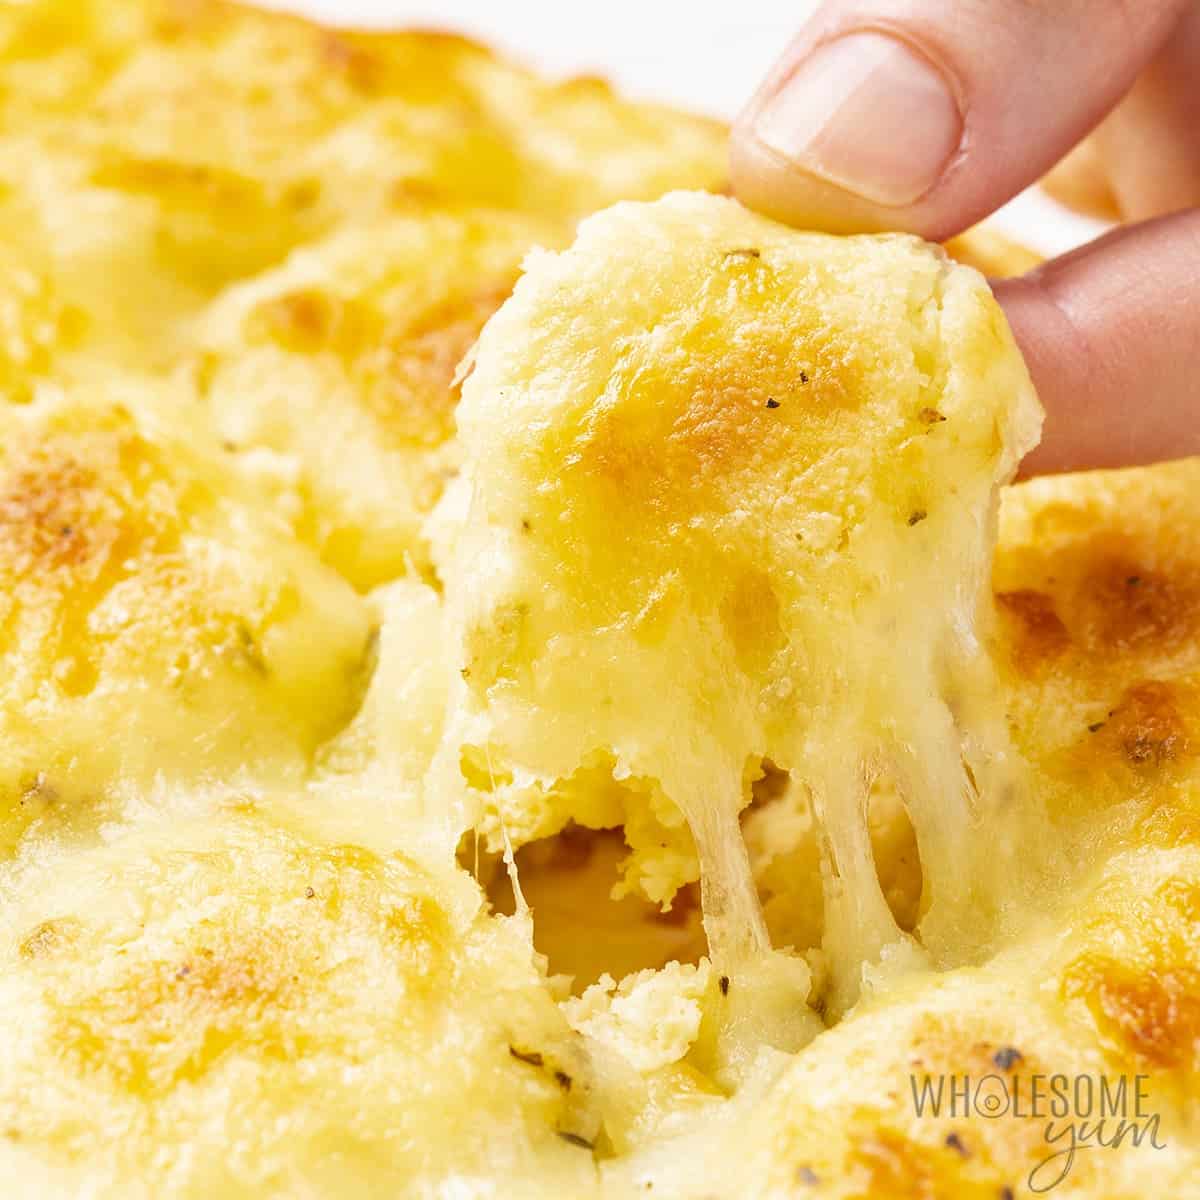
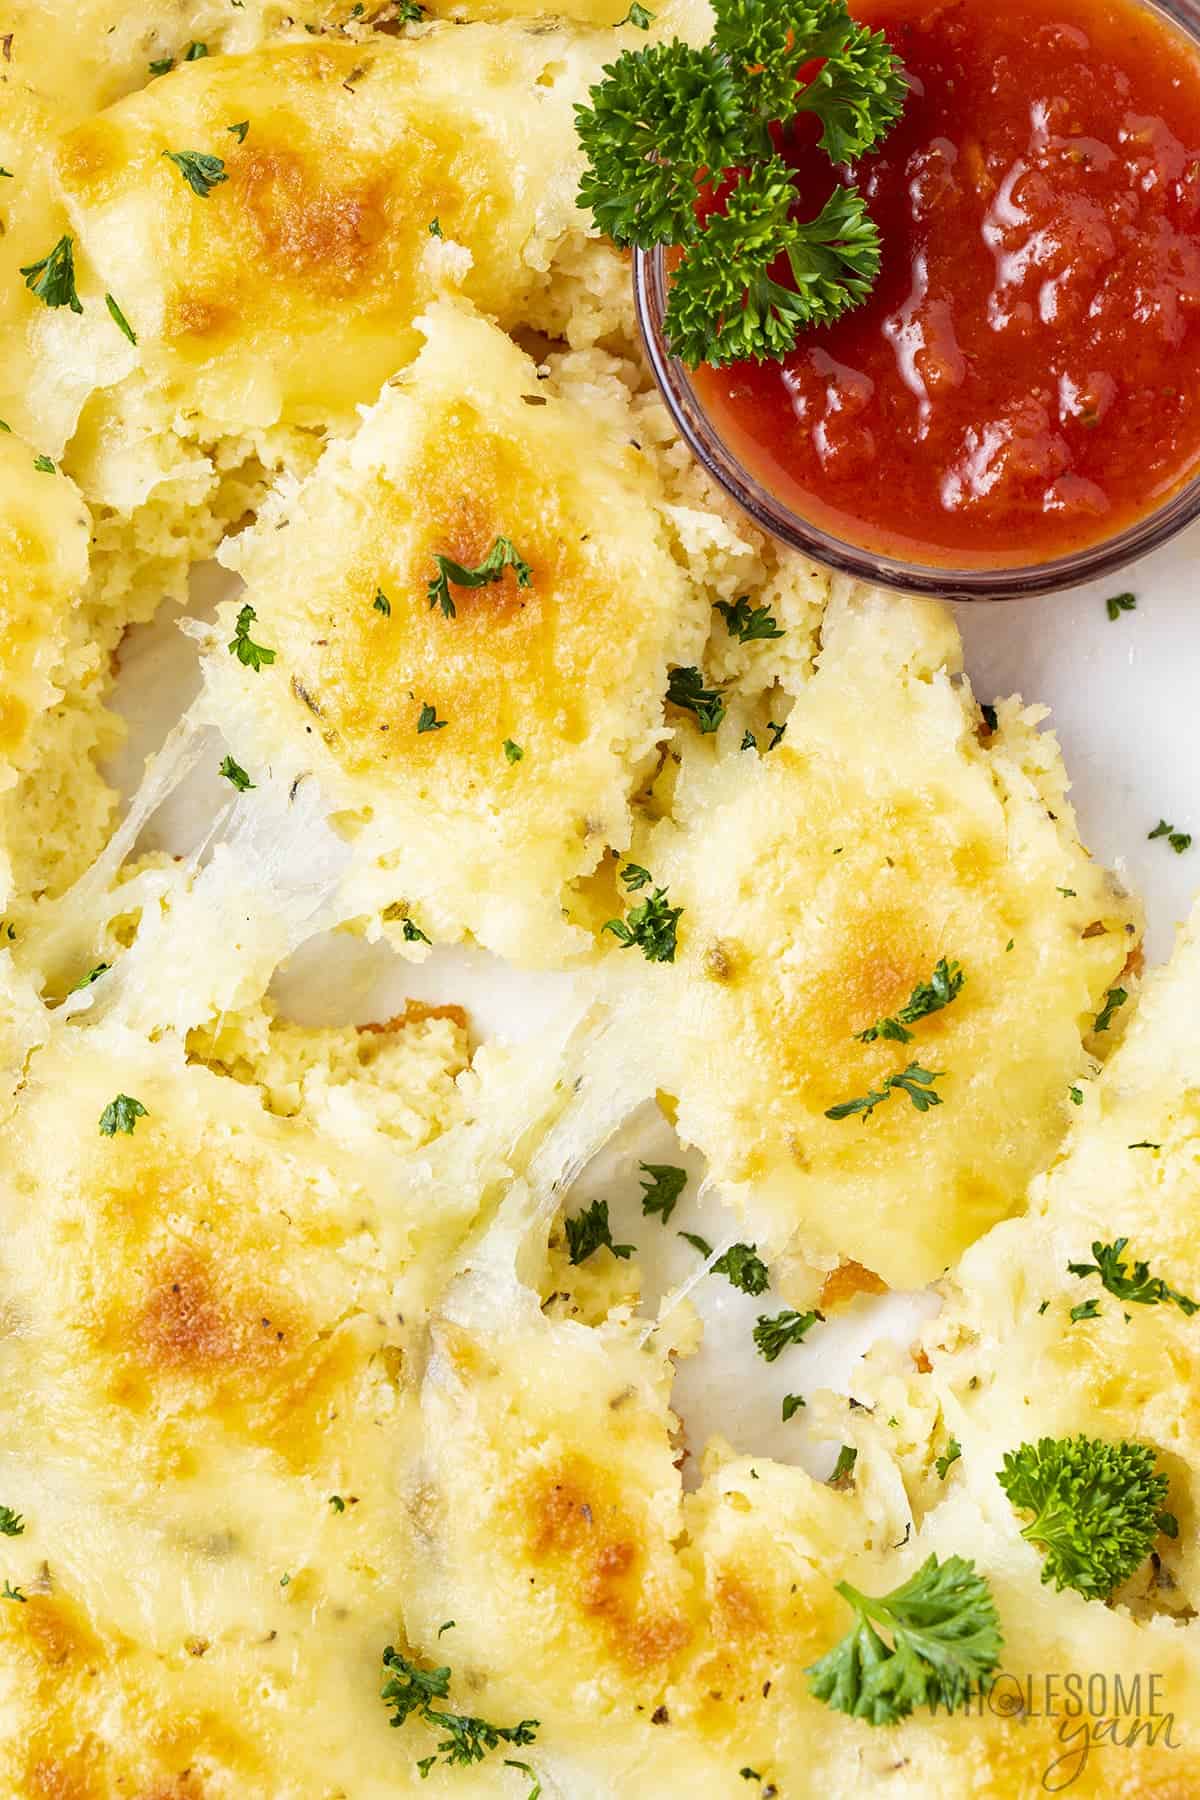
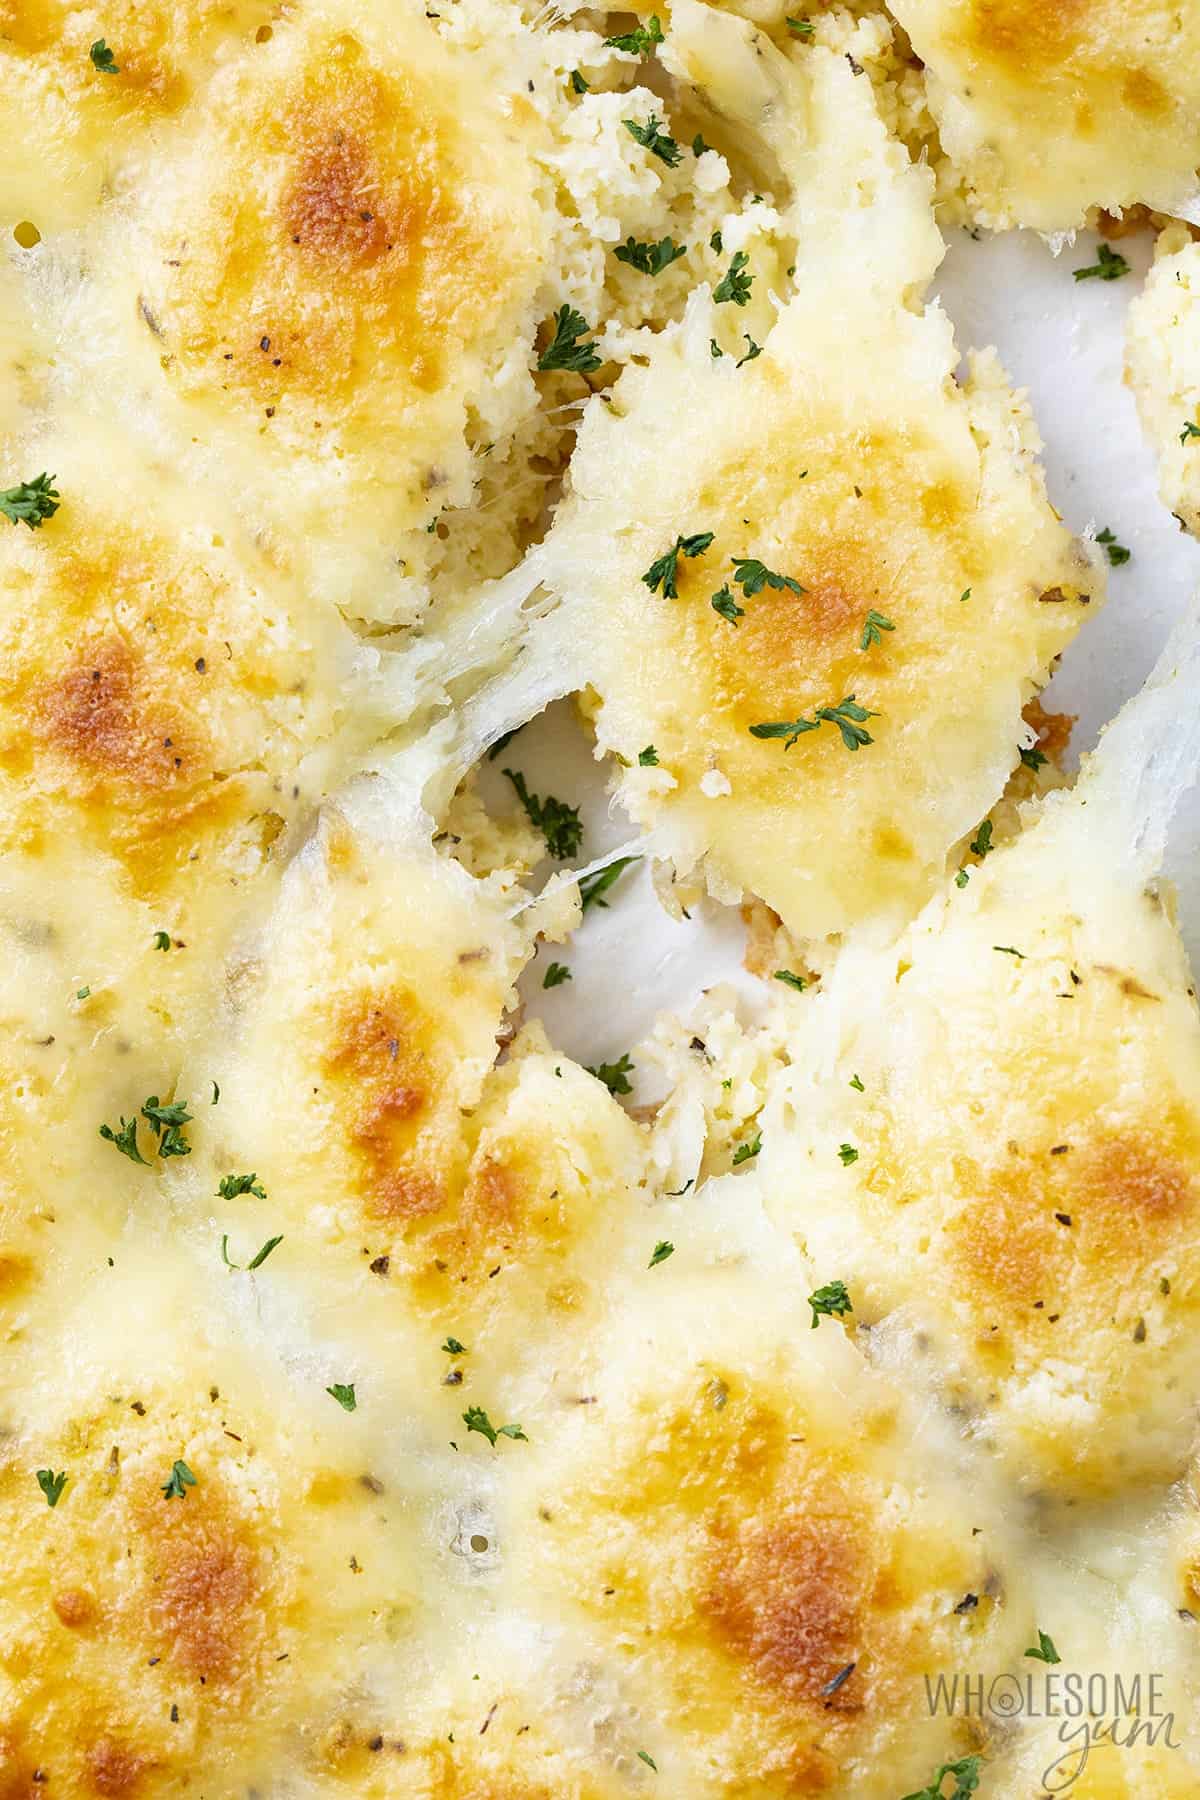
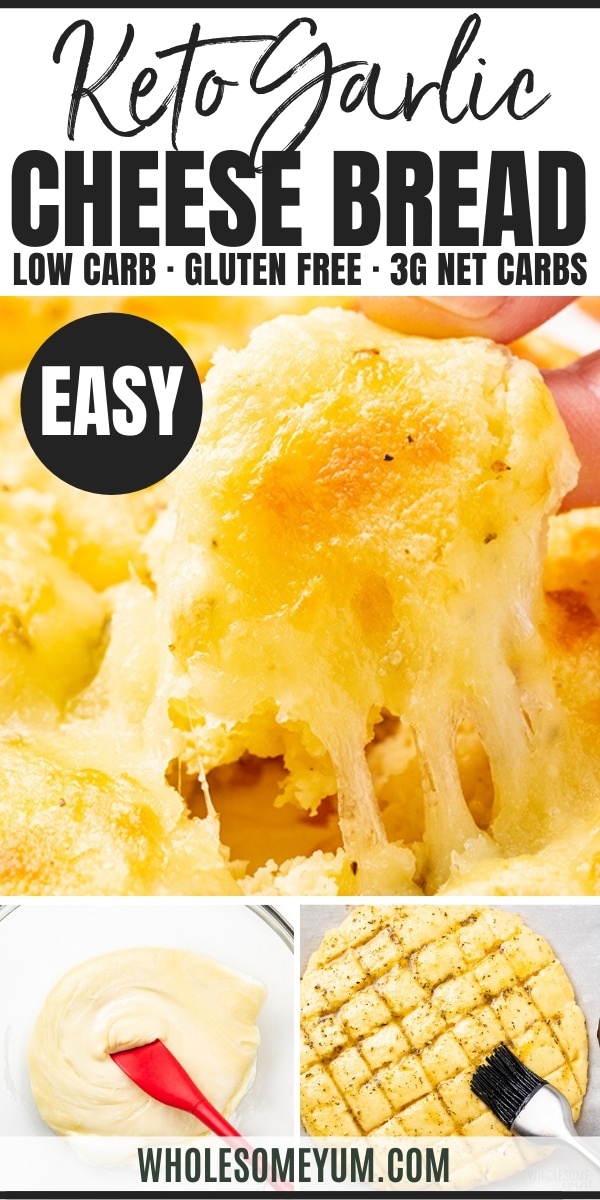
Get It NowI’ve been very excited to share this low carb keto cheese bread recipe with you. It’s another fathead dough recipe, but this time we’re turning it into keto garlic cheesy bread! And I have a feeling that it will become a favorite addition to your keto pizza nights. Don’t forget the marinara sauce for dipping!
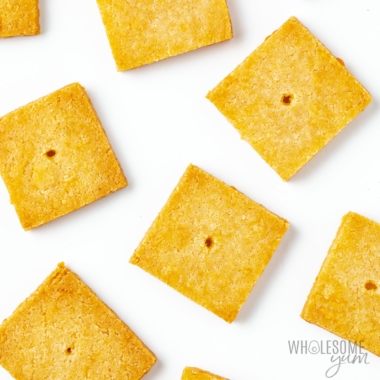
I’ve created this keto cheese bread with almond flour to resemble traditional cheesy pull-apart bread. I think it’s more fun to eat, but you could just do the cheese topping on top too (like I do for cauliflower breadsticks).
Why You Need My Keto Cheese Bread Recipe

- Cheesy, garlicky flavor
- Chewy, bread texture with gooey cheese throughout
- Only 20 minutes active prep time
- Just 3g net carbs per serving (which is 4 pieces!)
- Grain-free, gluten-free, low carb, and keto friendly

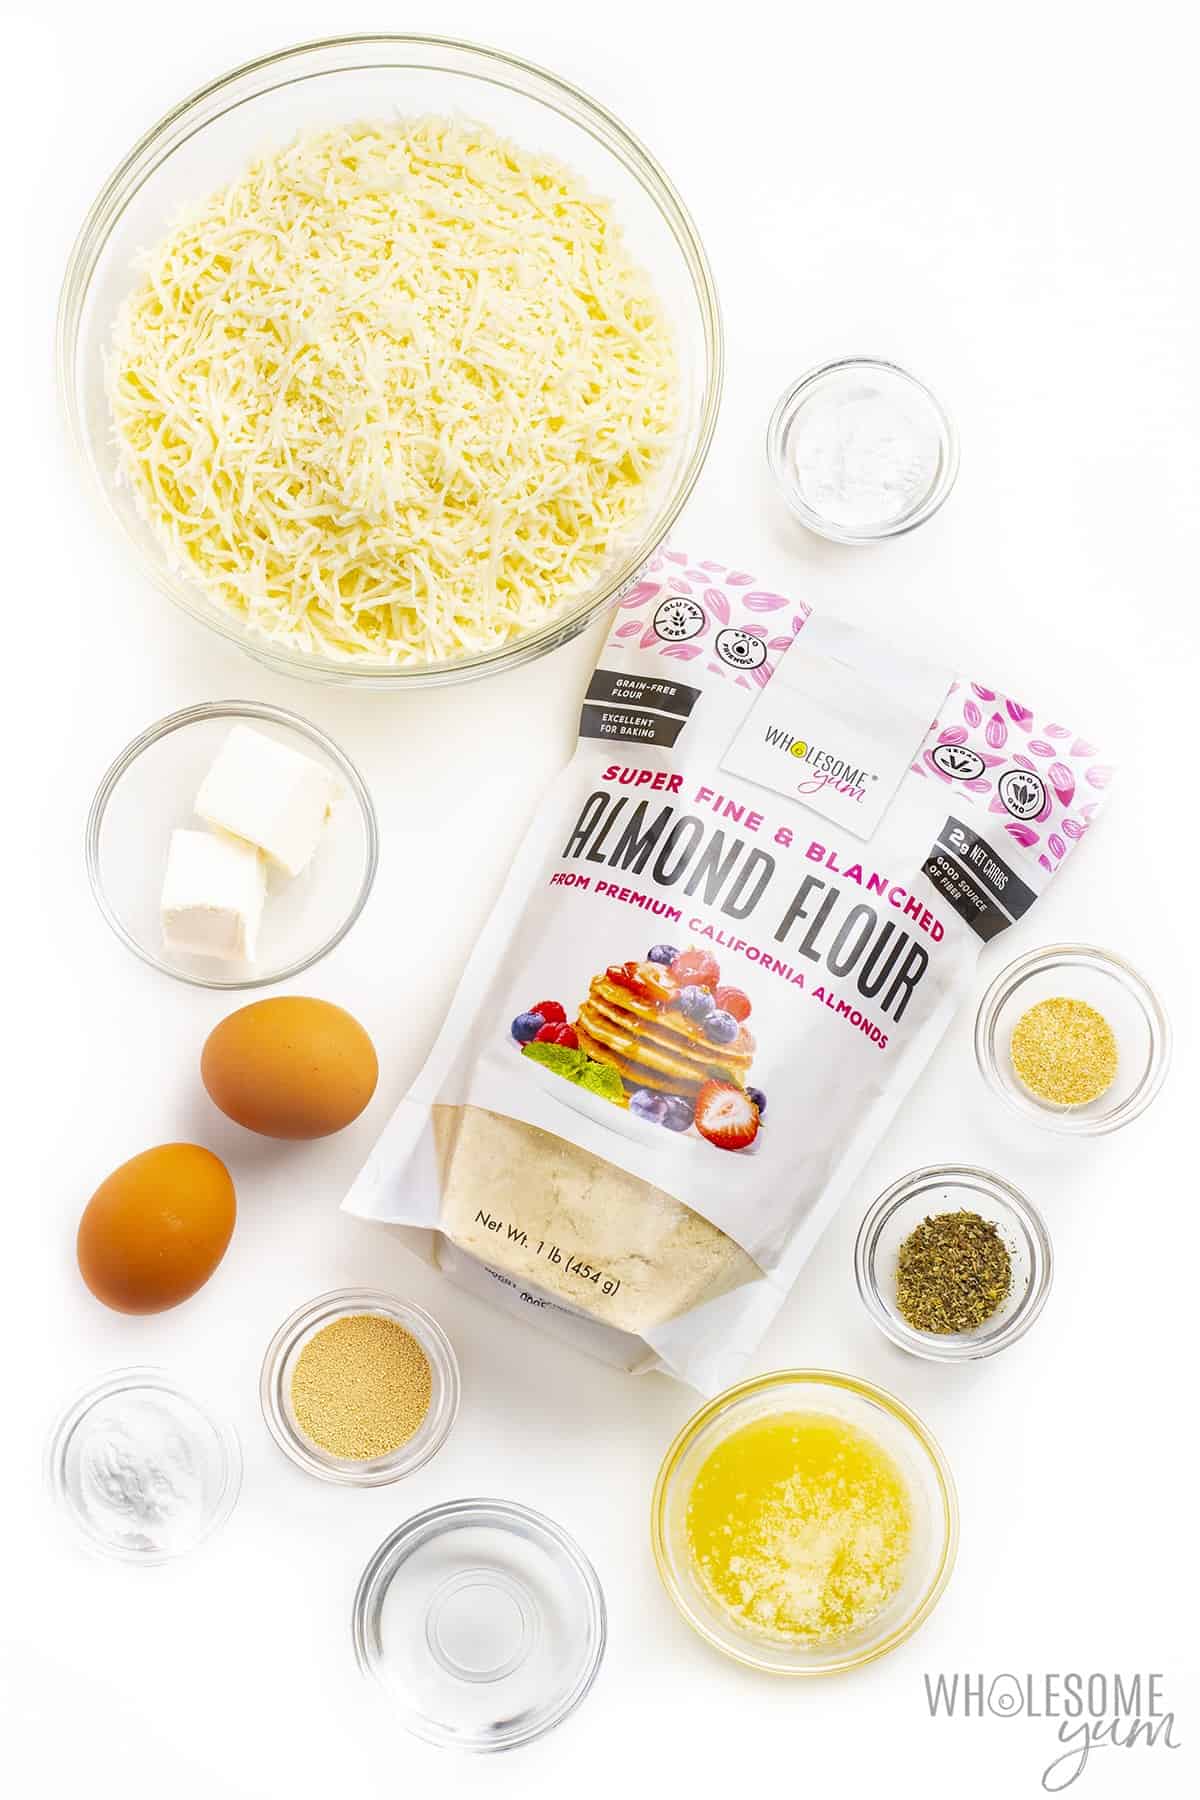
Ingredients & Substitutions
Here I explain the best ingredients for my keto cheesy bread recipe, what each one does, and substitution options. For measurements, see the recipe card.
Fathead Dough:
- Mozzarella Cheese – Use shredded low-moisture, part-skim mozzarella. Avoid fresh mozzarella (the very soft kind that often comes in a ball shape), which has too much moisture.
- Cream Cheese – Full-fat plain is best, but low-fat or neufchatel would work.
- Wholesome Yum Blanched Almond Flour – Many brands are too coarse, which will yield gritty bread. Wholesome Yum brand almond flour is the finest out there, for the best texture in your keto cheese bread.
- Baking Powder – To help the bread rise a bit, though it won’t rise a ton. Be sure you’re using baking powder, not baking soda; the latter will result in bitterness and no rising due to the lack of acid in the recipe to react.
SWAP: For a nut-free option, make keto cheese bread with coconut flour instead of almond flour.
To do this, replace the 1 1/2 cups of almond flour with 1/2 cup Wholesome Yum Coconut Flour and add 2 extra eggs (for a total of 4) to the dough. Otherwise, the recipe will be the same, but you may end up with a smaller dough disc, so may need less mozzarella to stuff inside and/or garlic butter to brush on top.
Optional Yeast Ingredients:
- Active Dry Yeast – One packet, like this one. All the ingredients in this section are optional, if you want more lift and the flavor of yeast.
- Water – It needs to be lukewarm, like a baby’s bathwater, to activate the yeast properly.
- Inulin Powder – This is a prebiotic fiber used to feed the yeast, and it’s required if you’ll be including yeast in your keto cheesy bread. Keto sweeteners and sugar substitutes will NOT work, as yeast does not consume them like it would sugar. You can get inulin here (and use it for other yeast recipes, such as keto yeast bread, and for making keto chocolate), but regular sugar or coconut sugar would work as well. The yeast will consume most, if not all, of it, so the carb count in the final bread shouldn’t be much higher.
Garlic Butter Topping & Cheese Filling:
- Butter – Unsalted.
- Italian Seasoning – Use your favorite brand or make homemade Italian seasoning for all your healthy Italian recipes.
- Garlic Powder – I used this for convenience, but you can also use 2 cloves (or more!) of minced or crushed garlic instead. If you do, it’s best to stuff it into the cuts with the shredded cheese instead of mixing it with the melted butter, because it may burn on top of the bread but will be fine inside the cuts.
- Mozzarella Cheese – Preferably the same kind as used for the dough above, but other keto cheeses that melt well would work. Harder cheeses are not recommended for a pull-apart bread like this one, though you could add a sprinkle of parmesan cheese on top if you like.
How To Make Keto Cheese Bread
I have step-by-step photos here to help you visualize the recipe. For full instructions with amounts and temperatures, see the recipe card.
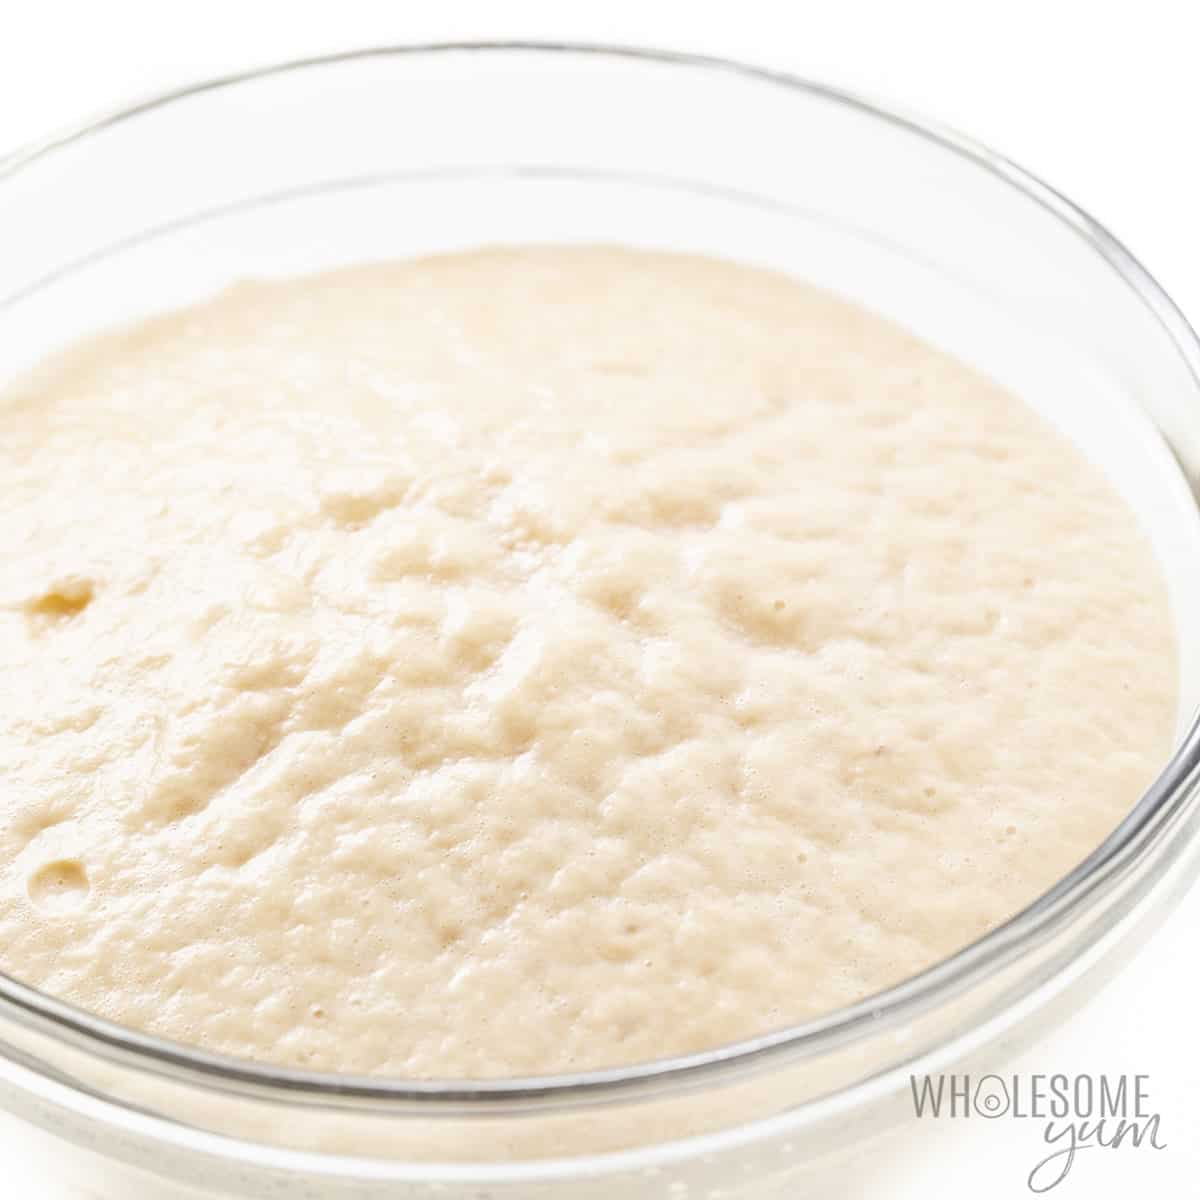
- Bloom yeast. The yeast in this keto cheesy garlic bread is optional, but I highly recommend it as it adds classic flavor. Stir the warm water, inulin, and yeast in a small bowl to bloom.
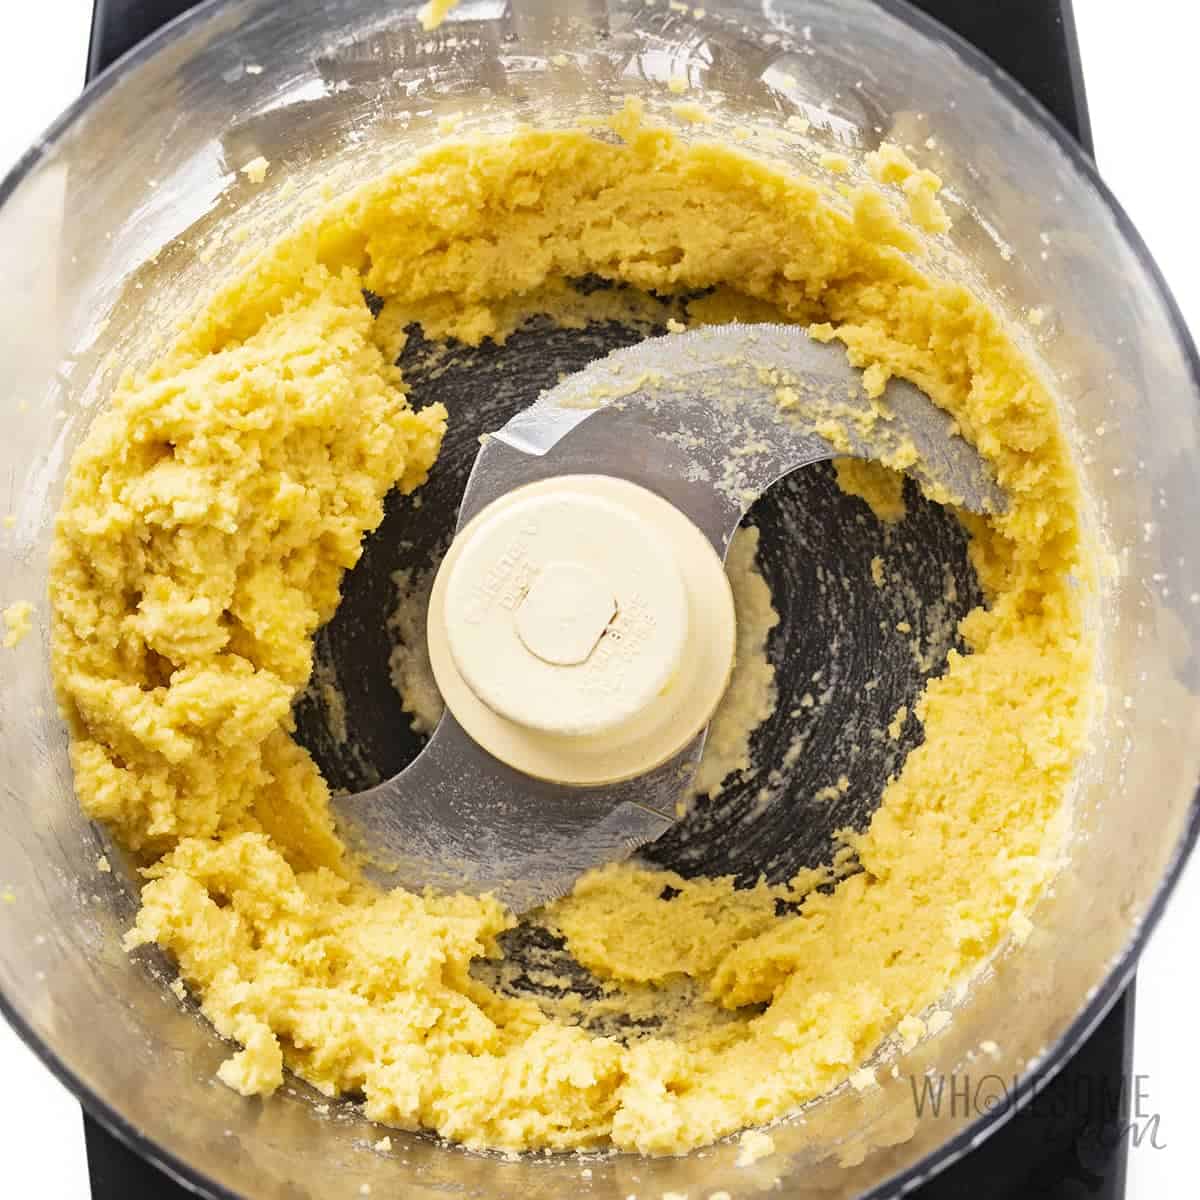
- Start the dough. Process almond flour, baking powder, and eggs in a food processor.
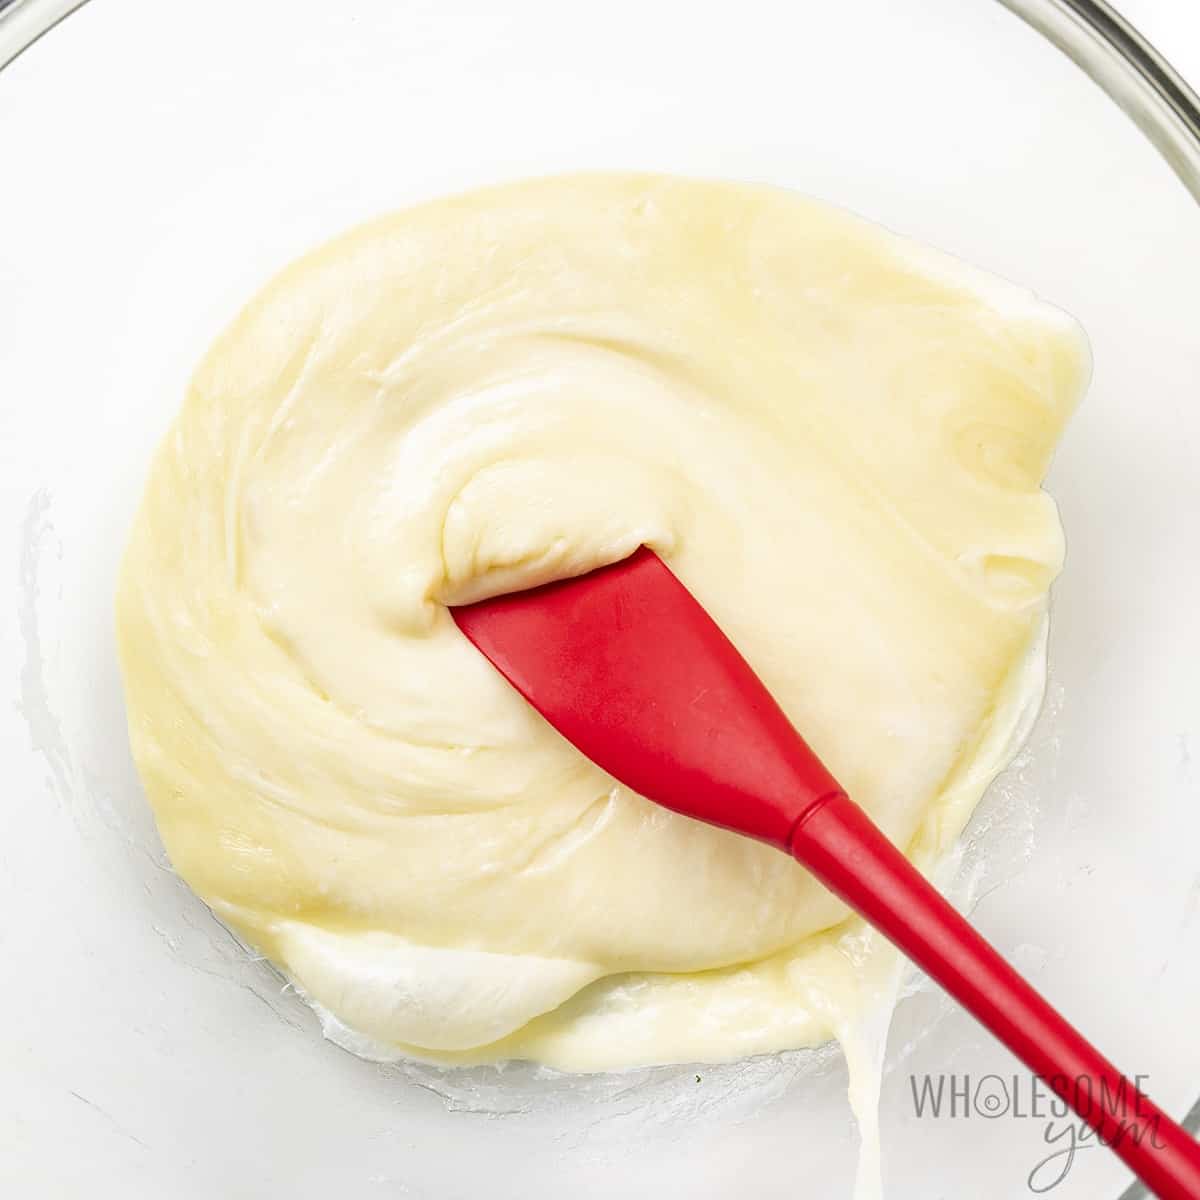
- Melt the cheeses. Melt mozzarella and cream cheese together in a microwave or double boiler.
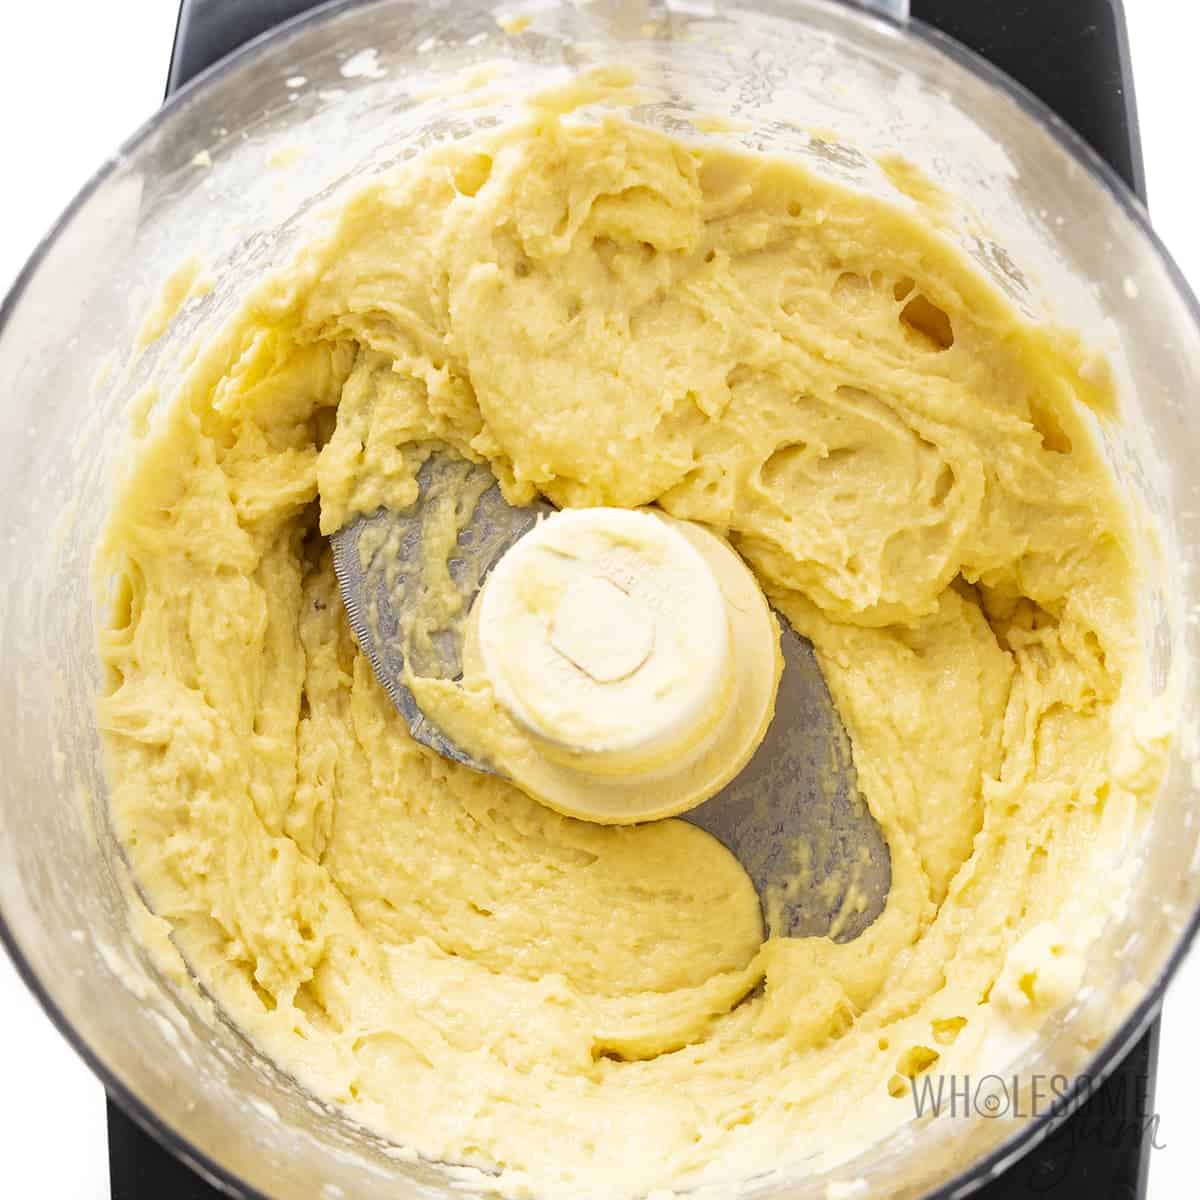
- Add cheese to dough. Before the cheeses cool (they should still be stirrable as shown above), add them to the mixture in the food processor and process until a dough forms.
- Add yeast. When the yeast is frothy and puffy, add it to the food processor and pulse until combined. If the dough is sticky, chill in the fridge to make it less sticky.
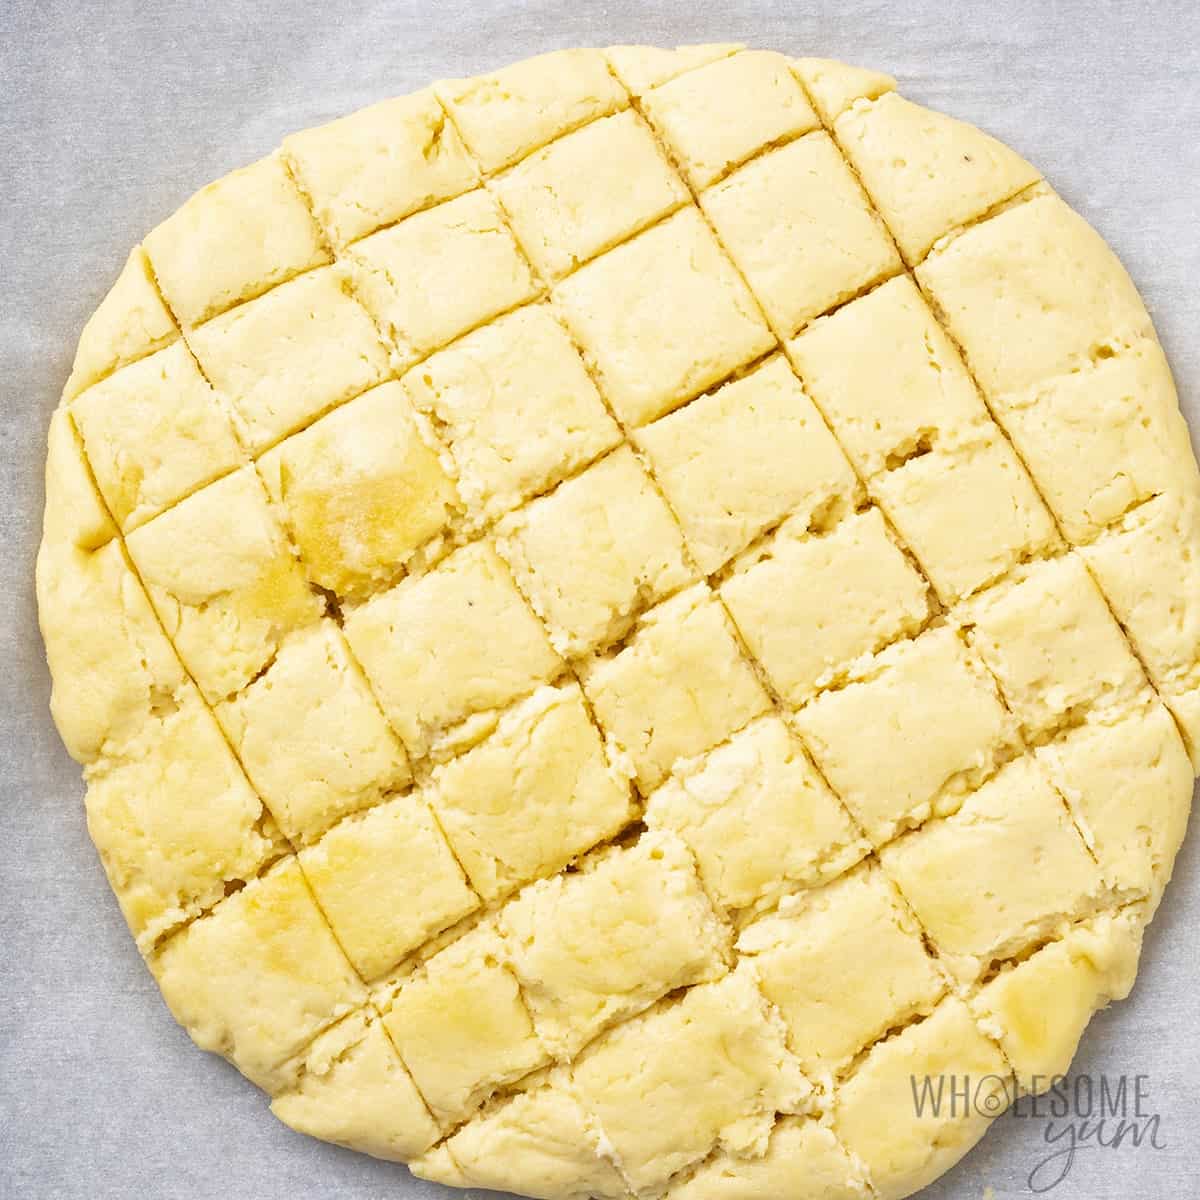
- Shape. Flatten the keto cheese bread dough into a disc, about 3/4 inch tall and 7 inches in diameter.
- Slice. Cut rows one inch apart in the dough disc, cutting almost to the bottom, but not all the way through. Then add cuts in the other direction to form a grid, as shown below.
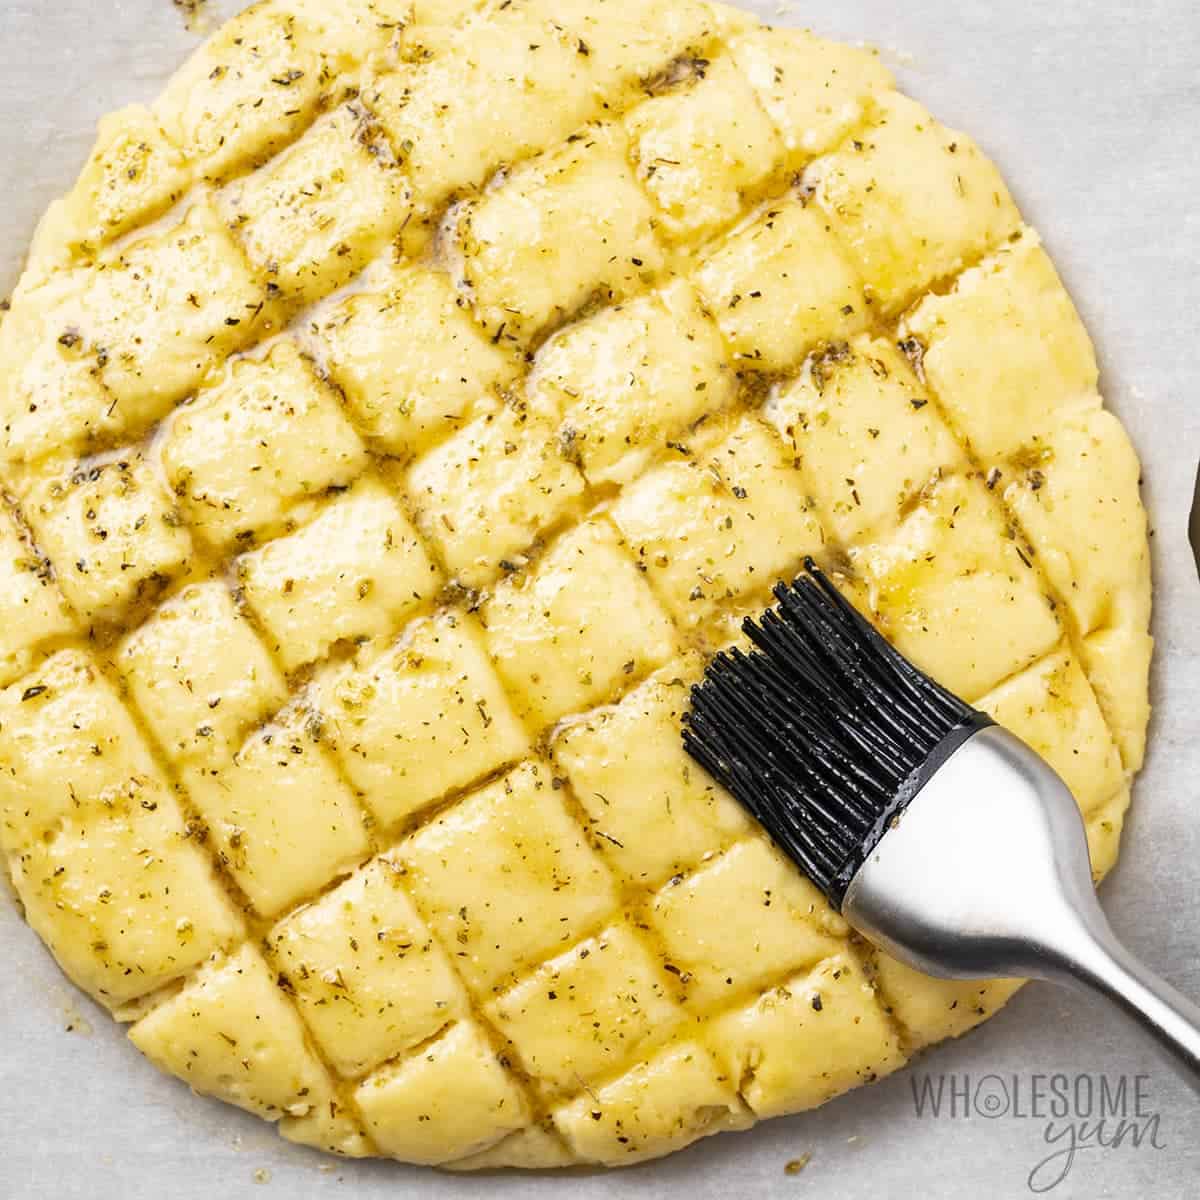
- Brush. In a small bowl, stir together melted butter, Italian seasoning, and garlic powder. Brush over the dough, letting it drip down into the cuts you made.
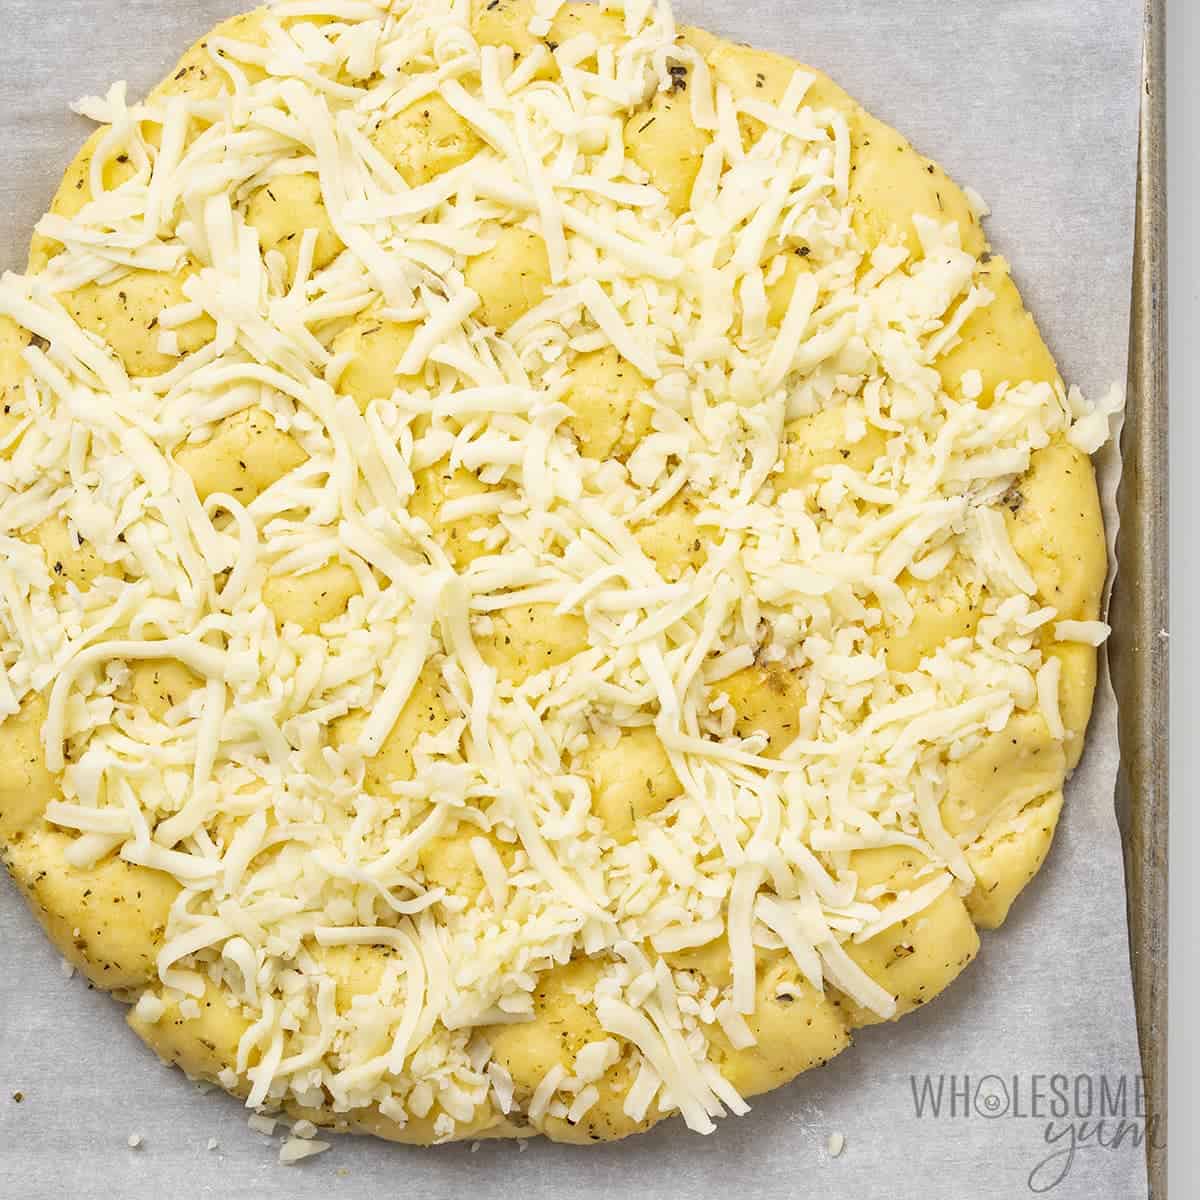
- Stuff. Sprinkle shredded mozzarella over the cut areas (not all over) and push inside the cuts.
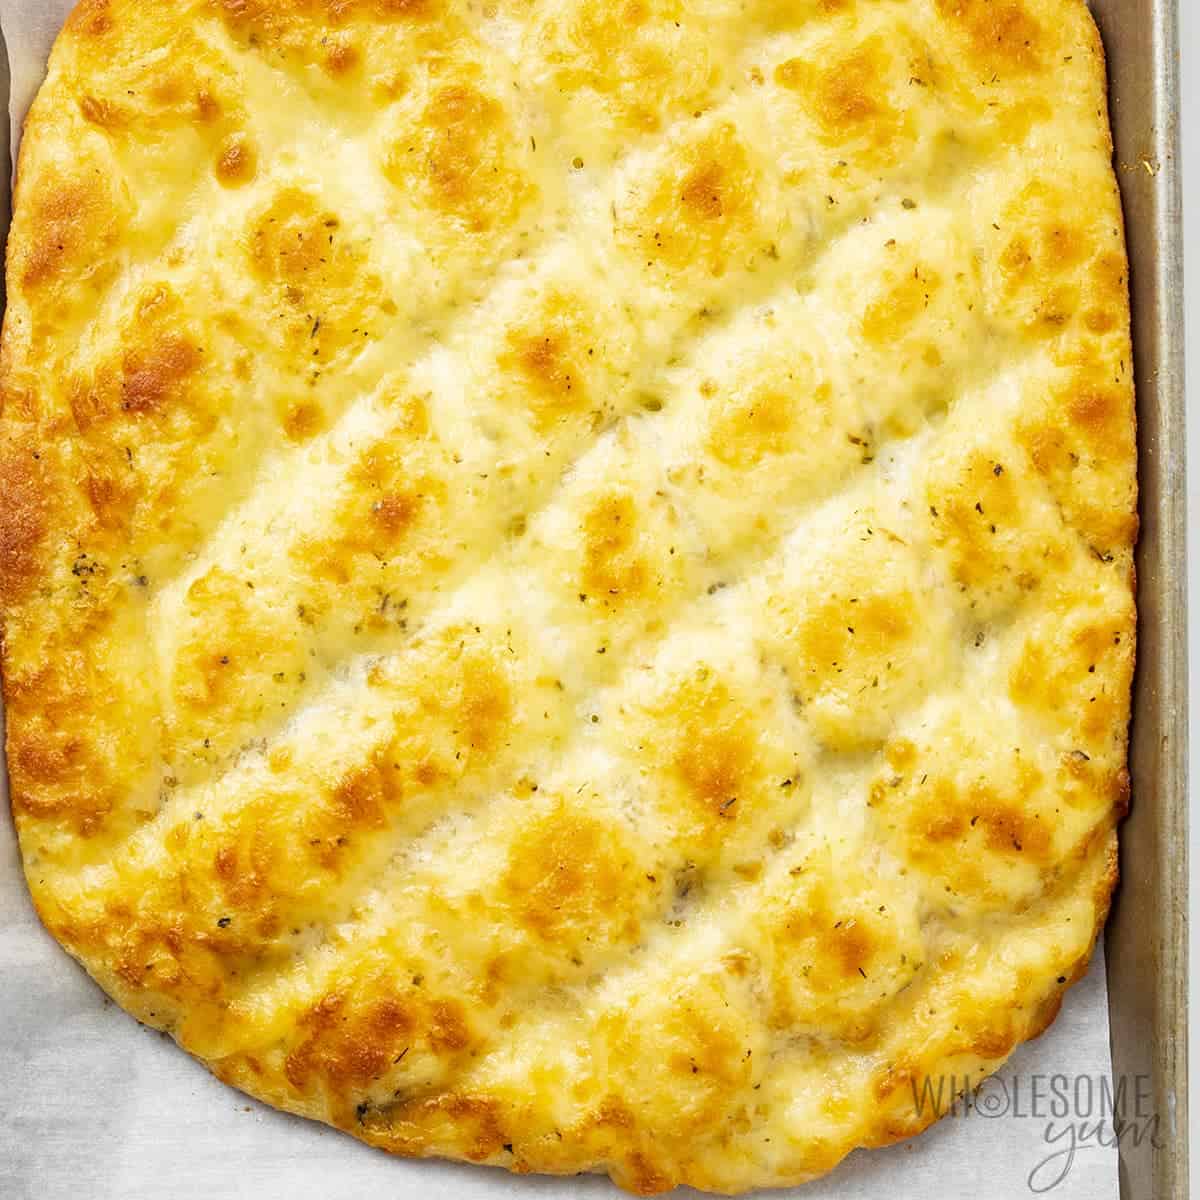
- Bake. Place in the oven until the keto friendly cheese bread is golden and cooked through. It needs to not only brown on top, but also be cooked inside.
My Recipe Tips
- When blooming the yeast, it’s ready when it’s puffy, bubbly, and larger in size. It won’t be very liquid anymore. That’s how you know it’s working!
- For extra chewy keto cheese bread, add xanthan gum. I didn’t find this necessary, but you can add 1/4 to 1/2 teaspoon of xanthan gum in the same step as the almond flour to make it more chewy.
- Do not over-process the dough, but do pulse until it’s uniform. You want the consistency to be the same throughout, but don’t want to deflate the yeast too much. Scrape the sides with a spatula if needed.
- Avoid sticky dough. This will depend on your kitchen temperature and humidity. If it’s sticky, chill the dough for 15-30 minutes in the refrigerator to make it less sticky. Also, using hands lightly covered in oil when working with the dough will help.
- A thin disc of dough works best. If it’s too thick, the top may burn before the inside is cooked through. However, if you run into this issue and find that there is sufficient browning during baking before the inside is done, you can tent the top with foil and continue baking.
- Wipe down the knife in between cuts when cutting the dough, so that it doesn’t stick to the knife too much.
- Add cheese to all the cuts in one direction first, then the opposite direction. It seems like a lot of cheese to fit in there, but it will melt down when you bake it.
- Watch closely in the oven. A good starting point to start checking is 10-12 minutes. It will likely take longer, but cook time will vary depending on thickness of your low carb cheese bread.
- Cheese pulls work best when the keto garlic bread is hot. But it depends on the mozzarella you use — freshly shredded mozzarella will pull better than the pre-shredded stuff from a bag. Another trick you can try for cheese pulls: cut small, short slits perpendicular to the seams, then pull apart.
Serving Ideas
Serve this keto garlic cheese bread recipe with your favorite Italian dish, such as a keto soup, low carb pizza, or low carb salad, to make a complete meal:
- Soups – Try vegetable soup or creamy cauliflower soup for a vegetarian meal, or zuppa toscana for something more hearty.
- Pizza – My favorite is classic keto pizza, but lighter, veggie-filled options include zucchini pizza crust, eggplant pizza, or pizza casserole.
- Salads – Try wedge salad, Caesar salad, or antipasto salad.
- Marinara Sauce – For dipping!
- Appetizers – Make a complete appetizer spread featuring keto meatballs, low carb mozzarella sticks, and buffalo chicken wings.
More Keto Bread Recipes
If you like this recipe, try these other easy keto bread ideas:

Keto Garlic Cheese Bread (Pull Apart)
An easy keto cheese bread recipe with gooey cheese pulls and 3g net carbs! Make this low carb keto garlic cheese bread with almond flour or coconut flour.
Ingredients
Tap underlined ingredients to see the ones I use.
Fathead dough:
Optional yeast ingredients:
Topping:
Instructions
Tap on the times in the instructions to start a kitchen timer.
-
Preheat the oven to 350 degrees F (176 degrees C). Line a baking sheet with parchment paper.
-
If you want to include the optional yeast, stir the warm water, inulin, and yeast in a small bowl, and set aside for 10-15 minutes to bloom.
-
Meanwhile, process the almond flour, baking powder, and eggs in a food processor.
-
Melt the mozzarella and cream cheese together in a bowl in the microwave (90 seconds, stirring halfway through and at the end) or a double boiler on the stove (stirring occasionally until smooth).
-
Immediately before the cheeses cool, add them to the food processor with the blade placed over the cheese, and process until a dough forms.
-
Once the yeast looks frothy and puffy, add it to the food processor. Pulse until just combined.
-
If the dough feels sticky to the touch, chill it for 15-30 minutes, until it feels firmer and less sticky.
-
Using oiled hands to make the dough easier to work with, form a ball and then flatten into a disc (3/4 inch tall, 7 inch diameter) on the parchment lined baking sheet. If the dough is sticky again after forming the disc, you may need to chill it again so that it’s less sticky.
-
Use a knife to cut rows one inch apart in the dough disc, cutting almost to the bottom but not all the way through. Then, cut 1 inch apart in the perpendicular direction, to form a grid, again not cutting all the way through.
-
In a small bowl, stir together the melted butter, Italian seasoning, and garlic powder. Brush over the dough, letting it drip down into the cuts you made. Stuff shredded mozzarella inside the cuts, trying to avoid a 1/2 inch border at the edges, so that it doesn’t seep out during baking (it’s okay if a little gets in).
-
Bake for 15-18 minutes, until the cheesy bread is golden and cooked through.
Did You Like It?
Leave a rating to help other readers (this also helps me continue to provide free recipes on my site), or get the recipe sent to your inbox.
Maya’s Recipe Notes
Serving size: 4 small pieces, or 1/12 entire recipe
- Tips: Check out my recipe tips above to help you get the perfect texture—fluffy yeast, chewy dough, and melty, pull-apart cheese!
- Store: Keep leftovers in the fridge for 3-4 days.
- Reheat: Warm in the oven or microwave until hot.
- Freeze: Freeze in an airtight bag or container for 3-6 months. Thaw before reheating for best results.
I provide nutrition facts as a courtesy. Have questions about calculations or why you got a different result? Please see my nutrition policy.
Add Your Notes Your Notes
Try More Of My Recipes


© Copyright Maya Krampf for Wholesome Yum. Please DO NOT SCREENSHOT OR COPY/PASTE recipes to social media or websites. We’d LOVE for you to share a link with photo instead.
Keto Garlic Cheese Bread Recipe


87 Comments
Diane S.
1Bakers beware. I attempted this using flax eggs, and it resulted in the dough spreading out flat and huge (Like a pizza), taking twice as long to bake. The flavor was still good, but it was a flop overall. Real eggs are necessary to the success of this recipe.
Maya | Wholesome Yum
1Thanks for sharing, Diane! Sorry to hear it didn’t turn out. Yes, my recipe does call for real eggs.
Tammie Giles
1I LOVE this recipe and have made it dozens of times—it’s ridiculously delicious and easy. I don’t bother with a food processor—I just put on some tight-fitting latex gloves (I get a box of a few hundred at Sam’s Club for messy jobs just like this one!) and knead it with my hands. When I’m ready to bake it, I put it on parchment paper like in the directions, then squirt a little olive oil over the ball of dough and cover it with another piece of parchment paper. Then I just use my hand to flatten it a bit to the right diameter. I have gradually reduced the grooves I cut to just 3 or 4 each direction (I’m apparently too lazy to stuff as many rows as are shown in the video, but it doesn’t affect the deliciousness!). I often have to bake it longer than the recommended time because I probably leave it thicker than recommended, but this is a very forgiving recipe and no matter WHAT I do, it turns out great. After baking, I cut it into generous pieces that will fit in my toaster for reheating (I prefer that to the microwave). I can then have it with soup, or salad, or just on it’s own any time I want.
Thank you Maya, for such an easy and delicious recipe!
Dawn Williams
0What is inulin powder and where can I get it? What does it do forvthe recipe and can I omit it if I dont have it
Maya | Wholesome Yum
0Hi Dawn, I described what it is and why you need it in detail in the Ingredients & Substitutions section above, and no, you can’t omit it. You can get it here.
Krissie
0This turned out great!!! Was even yummy the next day!! Mmmm! Made me feel like I was being naughty! Paired with sugar free pizza sauce for dipping! Yum!
Wholesome Yum D
0Krissie, this made me smile! Pairing it with sugar free pizza sauce sounds so good, such a fun idea!
Shirley H
0OMG this sounds sooo delicious! Would it be OK to substitute Instant Yeast for the active dry yeast? I still make bread for my husband, but that’s the only kind of yeast I have on hand. The instant yeast doesn’t need to be hydrated, so maybe it could just be incorporated with the almond flour???
Karen
0Did you try it that way? How did it work?
Wholesome Yum D
0Hi Shirley, I have never tested this recipe using instant yeast, please let me know the results if you try it.
margo4wits
0I couldn’t find the directions or nutrition facts for using coconut flour instead of almond flour. The recipe states at the top that either almond flour or coconut flour can be used. Can you tell me how much coconut flour and eggs? Thank you.
Maya | Wholesome Yum
0Hi Margo, Every one of my recipes, including this one, has an entire section on substitutions. You’ll find the instructions in there, above. Hope this helps!
SHeidi
0How cups of coconut flour (instead of of almond flour) since they both work differently?? Thank you
Wholesome Yum D
0Hi, 1/2 cup Coconut Flour
Shirley
0Took longer to cook. Very good and cheesy.
GRETA
0My family loved it! Thanks for this yum recipe!
Kris
0It was really hard to believe that this was keto! It was SUPER yummy! Thank you for another winner. 🙂
Kate
0These were delicious! I made them with coconut flour so they’d be nut-free and they were a big hit!
Shelby
0Love the keto twist on a classic comfort food! It came out delicious and everyone in the house loved it.
Jennifer
0This was delish! It totally cured my cravings for garlic bread! And the cheese? Yum!
Eilene
0To save time can the dough be made ahead of time and kept in fridge overnight?
Wholesome Yum D
0Hi Eilene, I have never tried that but if you do please let me know the results.
Ann
0This would be great for a spaghetti night! It looks so delicious! Thanks for the share! Excited to give it a try!
Gwynn
0This recipe was so easy to make and so delicious too. And being keto is just a bonus!
Veronika
0Almond flour is my favorite so I had to try this bread and I’m so glad I did! Making your own bread sound daunting but it was really easy and turned out delicious!
Luke
0A fantastic garlic cheese bread, my daughter loved it and will be making this again over the weekend 🙂
Micah
0These were delicious! I used psyllium husk powder instead of the inulin and it worked just fine. Also topped it with some fresh tomatoes and basil.
Lisa
0This is terrific! I really can’t believe that it is low carb!
Joanie Janzen
0I love your recipes. My question is when I go to print this recipe; it does not include the exchange of the almond flour for the coconut flour. Are you able to include this? I am allergic to almonds and i look for coconut four recipes. I just happened upon this one! Thanks so much! 🙂
Maya | Wholesome Yum
0I’m so glad you like the recipes, Joanie! There isn’t currently a way to get a printer-friendly version of the entire blog post with substitutions, but you can use the “Save Recipe” feature to save it in your account (for free) to refer back to.
Gwynn
0This recipe has amazing flavor and I’m so happy it’s keto too!
Ann
0Oh yum! This is the perfect add to our spaghetti night! I wish I could roll out dough in a perfect circle like you did!
robin
0Delicious garlic bread!
Sarah
0I love this recipe so much! I think this is the best way to make this kind of garlic bread! Thank you for sharing this recipe
Toni
0This is really amazing! Such a great bread for my family!
Jane Cross
0Thank you so much for this!! I am so excited to be able to eat garlic chesse bread again. It’s AMAZING!
Erin
0These keto breadsticks are the perfect pairing with meatballs and sauce. Love that I can still have it without all the carbs.
Freya
0I don’t eat eggs so I’m interested in trying this recipe with a flax egg instead, I’ll let you know how it works out!
Bernice
0Amazing! It looks like the ‘real’ deal. I am drooling over all the cheese and it’s so easy to make too. Everyone gobbled it up.
Blossom
0Hi, Maya! Do you know if Ground Flaxseed would work instead of the Inulin Powder since they are both prebiotic fibers (and if so, would it be equal ratio)? Thanks!
Wholesome Yum D
0Hi Blossom, I have never tried this but please let me know the results if you do. Thanks!
Ivelisse Santana
0HI, In this recipe, one can use any type of inulin powder?
Wholesome Yum M
0Hi Ivelisse, Yes, the inulin is simply needed to activate the yeast. Alternatively, you can use any sugar you have on hand. Enjoy!
Brenda
0I don’t have any yeast so I did mine without it. I also only made half a recipe and it turned out great! I know with the yeast it would have been even better but this way is good too. I also rolled it very thin more like a pizza crust. I was very pleased
Helene
0This was my 1st keto bread with yeast and what a difference it makes! I did use a “pressed” garlic clove rather than the powder b/c I grew up with garlic in everything since my Mother was from Nice. I ended up dividing the dough into two balls and measured them 7″ each. I did not increase the toppings and they went very well on top of each circle of dough. I did have to use avocado oil on my hands after refrigerating the dough. I noticed they stuck to the parchment paper; so I had to use a fresh sheet which I “lightly” used my hands to spread on the new sheet. I did notice the two doughs did spread during cooking, but I considered that when I offset them on the pan. I also was afraid of cutting too deep when making the squares; so, they were swallowed up after cooking. That was not a problem b/c each circle of dough had 6 servings. They were so delicious!. I am going back to baking more keto bread with yeast and also trying the use of yeast for pizza dough and cinnamon buns. Thank you, Maya!
Deb Bielawski
0Well, I went out and purchased all the ingredients on the day we went into lockdown, full of enthusiasm I made this for dinner. I wish I could say I cook as well as I decorate a house. It wasn’t even like damper (I am in Australia and its a doughy kind of bread make over a bush fire) it was like an awful brick. The cheese on top with the herbs and butter was fine, but the bread itself was embarrassing. It was cooked but just did not taste nice or have an edible texture. Maybe I am a video kind of person when it comes to learning new things, didnt think I was but starting to think at 51 I may have just lost the plot to cook.
I love your webpage and signed up for the meal app so no complaints against you, just my failure
Wholesome Yum M
0Hi Deb, Sorry this recipe didn’t turn out as expected. What type of almond flour did you use? Ground almonds or almond meal won’t work well. Make sure to use a fine or superfine ground almond flour.
AnnMarie Dillon
0Yummy! I did have a problem with the mozzarella and cream cheese it was not creamy or smooth. Microwave 90 seconds 30 at a time. I did have a small food processor. Can this be hand mixed? Will definitely make again.
Wholesome Yum M
0Hi AnnMarie, Yes, you can hand mix this recipe as needed. Just make sure that the almond flour and cheese get fully incorporated into a cohesive dough.
Sonja
0Hello Maya! ❤️
First, a huge THANK YOU for all your SCRUMPTIOUS recipes! I am a huge fan…. hubby & I have been on Keto for 2 1/2 yrs and it’s the easiest & most fun program I’ve ever been on in my life. Lost 95 lbs! It’s not for everyone, but it sure works for us. And now my sons are doing it and getting healthy.
Second, just made your “Garlic Cheesy Bread”…. and OMG! It was soooo delicious. Over these past 2 1/2 yrs. I’ve made so many different Keto garlic breads, too many to count and most of them pretty good… but still searching for that super yummy cheesy garlic bread, ya know? WELL… I found it! And the family LOVED it!
( ** Note to everyone- do NOT skip the instant yeast step. Super important! Made all the difference it making it fluffy….like real bread.)
Personally, with all my Keto “bread” recipes, I also always add 1 to 2 Tbsp. of Nutritional Yeast for extra yeast flavor and it adds B-vitamins! So BONUS 🙂
Thank you much!!!
Sonja
Johanna
0Is there any way to skip the egg or use an egg replacement? I’m allergic to eggs, but these look delicious.
Wholesome Yum M
0Hi Johanna, I have not personally tested this, but you may be able to use flax eggs in place for the chicken eggs in this recipe. Please let us know how it turns out if you decide to try it!
DAWN CLARK
0Hi,
I wanted to see if arrowroot is the same as inulin? I already have arrowroot and didn’t want to get the inulin unless I couldn’t use the arrowroot.
Thank you!!
Dawn Clark
Wholesome Yum M
0Hi Dawn, They are not the same. Arrowroot is used as a thickener. Thanks for checking.
Dylin C
0I want to start with saying that I love bread. Like love, garlic bread in particular considered a meal in my mind.
With that in mind I want to say this isn’t bread. But dang is it good, the yeast made a huge difference, and I used sugar instead of the insulin (the yeast eats the sugar). It’s not really like fat head bread because of that. It’s more dare I say bread like. It’s not phenomenal but it is stinking good in a pinch of a craving.
Now with that being said, for the love of God re- format your web page it was impossible to write this review because of all the ads popping up. I understand you have to make money but maybe reformat it so it’s not a headache to use.
Wholesome Yum M
0Hi Dylin, Thanks for your feedback! I have created an ad-free version of the site, you can learn more about it here: Wholesome Yum Plus
Faye
0Can you use baking powder instead of yeast? I’m allergic to yeast.
Wholesome Yum M
0Hi Faye, The yeast step is optional, but if you would like to replace it, feel free to use 1 tbsp baking powder.
Beth
0This is delicious. The yeast is a game-changer, it really tastes like the original wheat bread.
Since I didn’t chill the dough it spread quite a bit, but it was absolutely amazing. I’m thinking it reminds me of a deep dish pizza, so since about half was left over, I’ll top it with a light layer of sauce, pepperoni and a little more cheese.
PeggyD
0Just when I thought I was going to say – it’s too much work to do again, I took a bite of the finished recipe. Ohhhhh my goodness , it is sooo good. This will be my go to cheese bread. It really is head and shoulders above the other keto breads I’ve tried. I wonder if you can use this basic recipe for other applications?
Wholesome Yum M
0Hi Peggy, I’m so glad you loved the recipe! If you are looking for similar bread recipes, I have these Fathead Dinner Rolls and Soft Pretzels that you may like as well. Enjoy!
Michelle
0Easy to make and very very tasty!!
Aisha
0It turned out great. I did find it a bit difficult to stuff the mozzarella into the cut without cutting all the way through. I simply topped with the cheese and tried to stuff as much as I could. it turned out great though. Thank you.
Anita
0This is absolutely my favorite Keto recipe. My husband can’t stop eating it! We love it! Thanks for sharing.
Yvonne Carlson
0Do you have to use a food processor to make this? I don’t have one and have all of the ingredients. Can I stir/knead it?
Wholesome Yum M
0Hi Yvonne, Yes you can do this by hand. It takes a bit of work to get everything incorporated. If you have a stand mixer, this can help you too.
Janet
0This looks so yummy! I need to use a stand mixer as well. Should I use the bread hook or paddle? Thanks, I’ve never made a bread before so this will be my first.
Wholesome Yum M
0Hi Janet, I think the paddle will work best for this.
Cary
0Wow! These are unbelievably good. No, DELICIOUS! I made these tonight with your Broccoli Cheese Soup and these taste almost identical to Domino’s Parmesan Bread Bites (which of course I cannot eat), except that I like these better. I just can’t believe these are a low carb food. WOW! My wife approves too.
Kristi
0I just wanted to point something out. I haven’t made this yet, but I want to. I just love the fact that this recipe is in the dinner section, but not in the side section! YOU GET ME!! I WOULD SO EAT THIS BY ITSELF FOR DINNER! Go diet food!
Maya | Wholesome Yum
0Haha, sorry about that! Totally with you but not sure everyone would see it this way – the dinner section was a mistake and I fixed it. The primary category is actually neither, it’s breads, so I left it in there, along with appetizers and almond flour recipes. But of course you’d have dinner rolls for dinner, too! 🙂
Chelsea Santos
0I was able to find and purchase inulin, however looks like yeast is harder to find than toilet paper! Is it that much of a difference to skip that part? I’m happy to wait until it’s restocked, but figured I’d ask because mama could really use some cheesy bread in her life right now. Thank you!
Maya | Wholesome Yum
0Hi Chelsea, You can definitely make these without the yeast (you’d also skip the inulin and water in that case). You just wouldn’t get that yeast-y flavor and they will be a bit more dense.
Dana Bennett
0Hello!!! This looks sooo good. Is there a substitute for the inulin?
Wholesome Yum M
0Hi Dana, The inulin is used to feed the yeast. You can use any type of REAL sugar (i.e. sugar, coconut sugar, honey, maple syrup, etc.) to feed the yeast. The sugars will be consumed, so no need to be alarmed about adding it to your keto recipe.